At long last, I’m riding a complete installation that meets at least a portion of my original goals. It’s been a rocky journey but now I can tick off “fast, precise, and reliable shifting that is impervious to freezing” and “high quality, ergonomic shifter” from my list. Here are the gory details of the recent build that got me here. Once I’ve had time for evaluation and to refill my coffers, I’ll embark on Phase II—Dynamo Lighting and Hydraulic Brakes and Phase III—Schlumpf. Stay tuned.
Platform
I’m going into this project with a platform that I believe is about the best for both commuting and touring—a recumbent tadpole trike with 20” wheels all-around. That’s a great start, and the following additions have the potential to push performance, ergonomics, and build quality dramatically further. For now the platform is my trusty Trice Q with ICE Adventure HD main cruciform. I call this the HDQ. My goal is to eventually move all of these modifications to a new ICE Sprint and re-install the original components on the HDQ for my wife to use.
Goals (beyond a stock production trike)
These are the achievable goals remaining after my original dreams were dashed against the rocks of reality. Still, some dramatic improvements.
- Fast, precise, reliable shifting that is impervious to freezing (Phase I)
- High quality, ergonomic shifter (Phase I)
- Smooth, reliable brakes that are impervious to freezing (Phase II)
- High quality, permanently mounted, self-powered lighting (Phase II)
- Wide gear range (Phase III)
- No front derailleur (Phase III)
Which Di2?
While Alfine was a bust, Di2 was a huge hit. After dumping the Alfine hub and motor I still had a handful of expensive Di2 components, all of which work equally well with external gearing. There are currently three groupsets offering external Di2 gearing: Deore, Ultegra, and XTR. Best I can tell Deore and Ultegra are functionally equivalent (Ultegra may actually have an advantage because it now works with an 11-32 cassette). So Deore is out. XTR is interesting because it gives you an 11-40 cassette that provides great range when paired with the Schlumpf Speed Drive or SRAM Hammerschmidt. But oh, the cost. I’ll have to wait until Di2 trickles down a couple groupsets in the mountain line, the way it trickled down from Deore to Ultegra for roadies. Ultegra it is.
Wheel
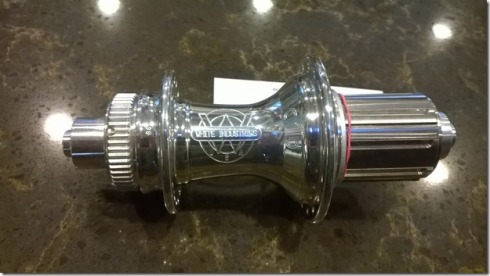
The current generation of external Di2 (road or mountain) is 11-speed. Unfortunately Shimano doesn’t make an 11-speed 135mm O.L.D. hub. Even for 11-speed XTR, they skipped 135mm and went straight to 142mm. Not to worry. Several “boutique” hub manufacturers make very nice 11-speed 135mm hubs. I chose the White Industries CLD-11 because it appears to be highly respected and has the least amount of pawl noise of any hub but Shimano’s. CLD means Centerlock Disc. I don’t care so much about the disc because I ultimately plan to run a rim parking brake, but this hub was considerably lighter than White Industries’ 6-hole disc hub. This thing competes at the Deore level– top of the line– so it’s not cheap. But it is a thing of beauty. Combined with my usual Sun CR-18 rim and Wheelsmith spokes, this wheel may outlive me. In lieu of flowers, send me on the Eternal Journey with my White Industries wheel. A wheel seems a lot more useful for a journey anyway.
White Industries CLD-11
Drivetrain
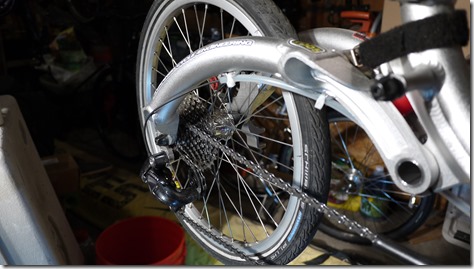
To run an 11-32 cassette, Shimano says you need the GS (medium cage) version of the RD-6870 derailleur. This is unfortunate because the “medium” cage is, surprisingly, within a millimeter or so of the length of my SRAM X9 long cage mountain bike derailleur. So when fully extended on a 20” drive wheel, it’s darn close to hitting the ground. One of the advantages I’ve enjoyed in the past by eliminating the front derailleur is the ability to run a short cage rear derailleur because you don’t need capacity to handle the chain wrap of a front triple. I pushed back—is the “GS” derailleur really any different other than the cage length? But Shimano held firm without offering me any details that might explain why. I was convinced when my brother located a (recumbent!) LBS with Di2 experience who confirmed it really does matter. Oh well, I know it will work because I’ve been running the X9 for years. Until Phase III I’ll be running a front triple anyway, so I guess it’s good I have the capacity of the medium cage.
For the rest of the drivetrain I decided to keep it matched to Shimano in the unlikely chance that it really does matter. I’ve been mixing Shimano and SRAM cassettes and chains for years without problem. But then again, I am upgrading to Di2 because I want to improve my shifting. Hmm. I also decided to stay with the bottom end groupset because I see no evidence that throwing money at this part of the equation buys you anything but minor weight savings. The bottom groupset for 11 speeds is currently Shimano 105.
Installation Strategies
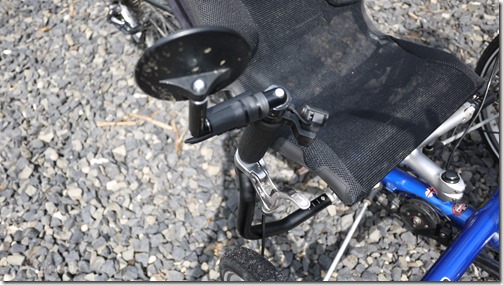
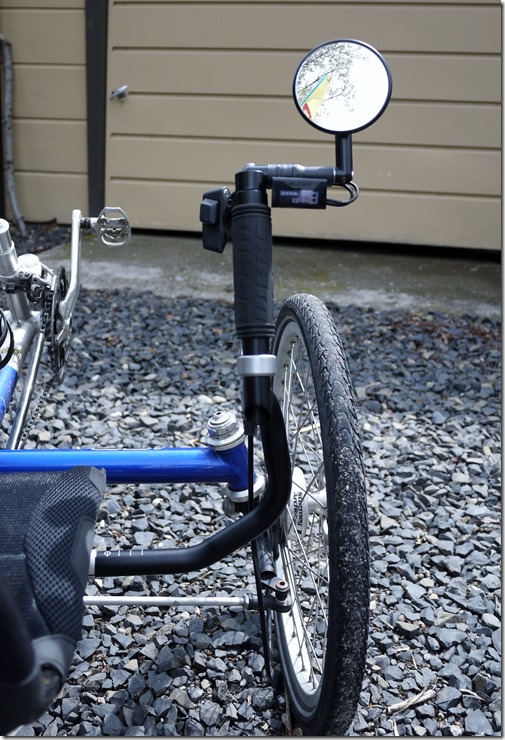
Installation decisions are most heavily influenced by the placement of the battery and the display, because the location of everything else is pretty much fixed. I originally thought I wanted the display on my front boom, where I mount my GPS (when touring). But once I had a chance to use the system with the Alfine hub, I realized that, at night, I might not want that bright Alfine display in the center of of my field of vision. And it turned out that my Mountain Mirrycle mirrors offered an ideal mounting location that is easy to see at a glance, but out of my direct line of sight.
With the display figured out, only the battery was left. Recumbents are famously (and thankfully) lacking in the seat post department. Fortunately a tadpole trike offers many alternative locations for the battery, and I think I’ve considered them all. They are the front derailleur tube, front boom, rear frame section, and handlebar. When I thought I was going to mount the display on the front derailleur tube, also mounting the battery there made sense. Or, possibly, mounting the battery in the front boom. But either requires cabling between the battery/display at the front of the trike and the rest of the system at the center and rear. Once I decided to mount the display at the handlebar, both of those options could be eliminated.
The next obvious choice was mounting the battery in the tube of the rear frame section. This was tidy from a wiring standpoint because it is near where the handlebar meets the frame. But it requires drilling a hole in the main cruciform to get a cable from the handlebar to the inside of the rear frame section. When you look at the amount of internal cable routing you get from this—pretty small—and the hassle you add dealing with internal wires whenever you separate the rear section from the main cruciform, it was easy to eliminate this option.
The winning option was to mount the battery in the right handlebar. It turns out that the battery with a single E-Tube cable next to it fits snugly within the handlebar tube. It’s snug enough that you don’t need to worry about the battery or cable rattling in this portion of the tube, but not so snug as to make it difficult to install. This also allows the connections between battery, display, and shifter to all be made inside the handlebar tube—none of it visible or susceptible to damage from the outside. Only a single E-Tube cable need protrude from the handlebar and make its way to the rear derailleur.
Parts List
Enough rationalization and strategy. Here’s what I ended up doing, starting with the parts list.
| Description | Weight | Cost |
| White Industries CLD-11 hub | 265g | $295 |
| Sun CR-18 36h Rim | 348g | $34 |
| Wheelsmith Spokes | 199g | $20 |
| Skewer | 75g | |
| Shimano 105 11-speed 11-32 cassette | 309g | $50 |
| Shimano HG600 11-speed chain (qty 3) | 640g | $60 |
| Shimano Ultegra RD-6860 GS 11-spd medium cage derailleur | 268g | $247 |
| Mountain Mirrycle Mirror | $14 | |
| Shimano SM-BTR2 Di2 Battery | 51g | $130 |
| Shimano SW-S705 Di2 Right Hand Flat Bar Shifter | 44g | $100 |
| Shimano SC-705 Di2 E-Tube Display Unit | 18g | $94 |
| Shimano Ultegra Di2 Internal Routing Junction Box SM-JC41 | 4g | $30 |
| Shimano EW-SD50 E-Tube wire Battery to Junction Box (200mm) | 4g | $25 |
| Shimano EW-SD50 E-Tube wire Display to Junction Box (1000mm) Note: Based on Adventure handlebar Note: This wire is cut and then spliced | 12g | $25 |
| Shimano EW-SD50 E-Tube wire Junction Box to Derailleur (1200mm) Note: Based on Adventure HD cruciform and Q suspended rear | 14g | $36 |
| 7/32” ID Poly-E tube (750mm) | ||
| Shimano Ultegra Di2 Grommets (4-pack) | $7 | |
| Shimano E-Tube Wire Holder (pack of 20) | $5 |
The Build
The overview is that the display is mounted on the arm of a Mountain Mirrycle mirror and the shifter is mounted at the top of the handlebar, near the display. The battery, junction box, and wiring to the display and shifter are all routed inside the right handlebar. A single E-Tube wire leaves the handlebar and runs along the route normally taken by the conventional rear derailleur cable, guided by a length of 7/32” (inner diameter) Poly-E tube, ending at the rear derailleur. The E-Tube cable that runs from the display to the junction box must be cut and then spliced so that it can be threaded without a connector through the 90 degree turn in the mirror cap. 
Overview
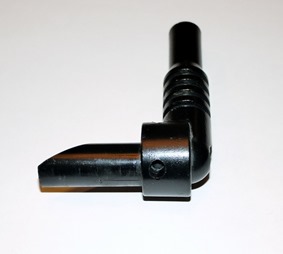
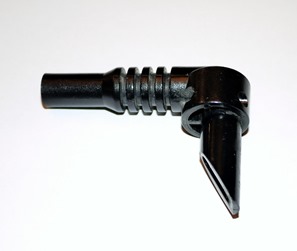
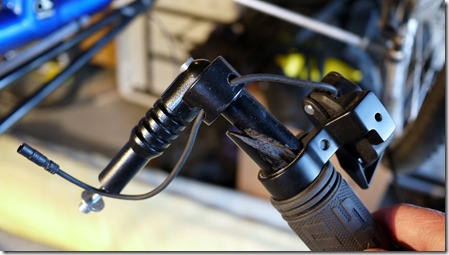
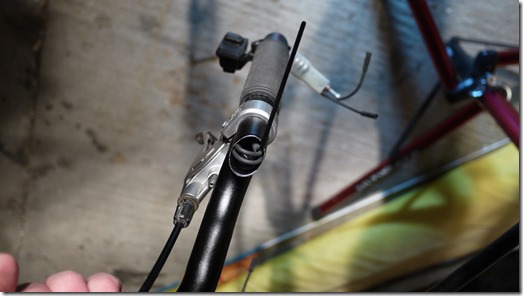
The cap of the Mirrycle mirror is well suited to routing a single E-Tube cable coming from inside the handlebar, through a 90-degree turn, and out along the arm of the mirror to the display. There is also enough room in the cap to route the E-Tube cable from the shifter through the cap and out alongside the other cable on its way to the display. I removed all of the parts from the main mirror assembly until left with just the piece that forms the right angle between handlebar and mirror arm. I then used a drill press to make a 13/64” hole on the front side of the cap, so that the exit hole comes out along the horizontal mirror arm. 13/64” is precisely the diameter of the E-Tube connector, allowing the shifter cable to pass through the mirror cap on the way to the display. Next, I drilled another hole next to the first exit hole, alongside the mirror arm, then used a file to merge the two holes into one hole big enough for two E-Tube cables to pass side-by-side along the mirror arm. This second cable is the one that runs from the display to the junction box inside the handlebar.
13/64” thru-hole in Mountain Mirrycle Mirror cap
Hole enlarged on the inside to pass two cables
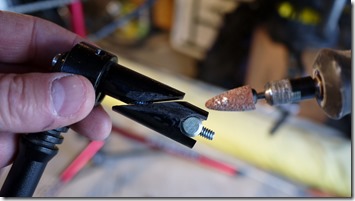
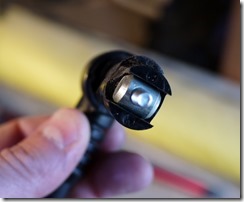
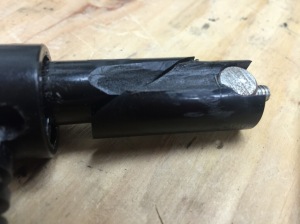
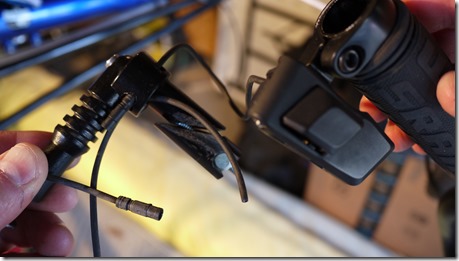
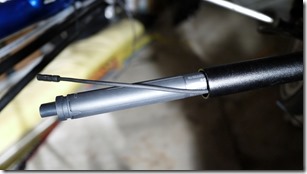
The trick to routing the cable from the display to the junction box is getting it past the ninety degree turn at the mirror cap. To do this, the cable has to be cut because the connector can’t make the turn. And then it has to get past the wedge that is used to lock the mirror to the inside of the tube. I used a Dremel tool to grind a little groove alongside the wedge, just big enough for a single E-Tube cable. I purposely made it a tight fit to keep the cable from rattling in this section.
Grinding a groove to pass a single cable between locking wedge and inner tube wall
Now the shifter is mounted to the top of the handlebar and the E-Tube is routed through the 13/64” thru-hole in the mirror cap.
Shifter cable passing through mirror cap
Next, an E-Tube cable is cut so that it can be threaded into the enlarged hole in the mirror cap, through a 90 degree turn, and out the bottom of the cap into the inside of the handlebar tube. Leave enough cable length to reach from the display to the splice in the handlebar, with some allowance for creating the splice itself. For my Adventure handlebar I kept it long enough to make it all the way though the vertical portion of the handlebar and out the bottom. Once the splice was made, I stuffed it up into the tube. If you have a Q-era handlebar with a single curved tube instead of the Adventure’s welded arrangement, you can probably make this cable shorter and do the splice near the top of the tube, and push the splice down into the tube from the top.
Cable without connector threaded through 90 degree turn in mirror cap
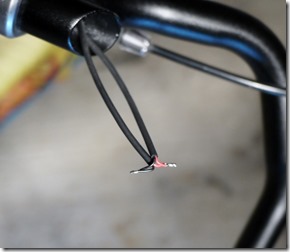
Once both cables are routed through the mirror cap, the length from where the junction box cable leaves the mirror cap must be adjusted so that it makes the correct radius curve to keep it aligned with the other cable as it loops toward the display. The cable coming from the shifter is a fixed length, so it dictates the loop. Note the shifter must be close to it’s final orientation on the handlebar before doing this adjustment. It took a little fiddling with the display in place to get it right. Once I got the length right, I tightened the mirror onto the handlebar which kept the cable from moving. Because the radius of the loop is different for each cable, the lengths will be a little different when pulled out straight (no loop).
Cable lengths adjusted
With the lengths appropriately set, I applied a piece of shrink tubing to the mirror arm using a heat gun, to hold the cables in place. I used white shrink tubing because I was planning to wrap the arm with handlebar tape, so the color wouldn’t matter. But that didn’t work out so well. Later, I applied a black piece of shrink tubing over the white piece because I think it looks better.
With the shrink tube in place, I simply attached the display to the mirror arm the same as you would to a conventional handlebar. The connectors can go into either port of the display, whichever keeps the cables closest together in their loop.
Cables secured with shrink tubing
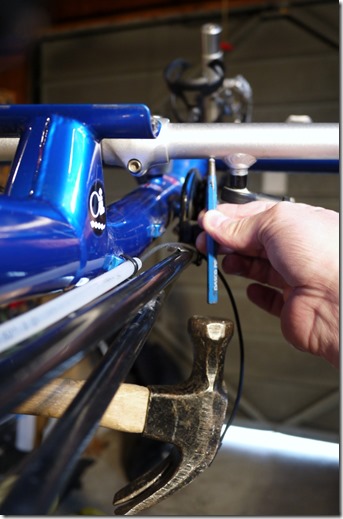
Now for the junction box side of the spliced cable that runs to the display. For the Adventure handlebar, a hole must be drilled in the center of the tube that is welded to the vertical handlebar section. For handlebars that don’t have a weld in the way, this step isn’t necessary. Conveniently, there was a small dimple right in the center of the weld. I used a punch to make it a bigger target and then drilled it out with a hand drill. You can’t get a straight shot at it because the drill bit will hit the bottom of the vertical tube, but it’s plenty close enough. The result is a hole right into the center of the tube that bends its way to the steering pivot. I used a 13/64” drill bit because the next step is threading an E-Tube cable with connector through it. But I wish I’d used a 1/4” bit because I later found out that the E-Tube grommet requires the bigger hole to seat properly. You normally can’t see the hole, so lack of a grommet isn’t aesthetic, but I think it would provide some protection against the cable rubbing against the potentially sharp edges of the hole and being cut. I don’t think it’s a big deal either way but I’ll fix it next time I’m in there.
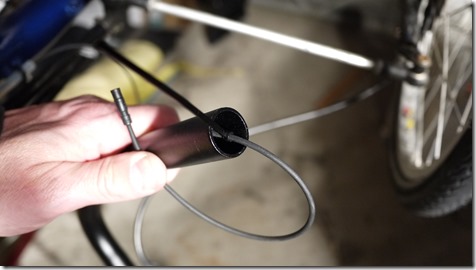
If you measured and ordered well, you can use the other half of the cable that was already cut to run from the outer part of the handlebar to the junction box. I ordered E-Tube cable before the current plan was in my mind, so I didn’t have a cable long enough for both sides. So I cut the connector off of another cable—the expensive way of doing things. In any event, you want to push the connector of the cable through the hole just drilled in the handlebar (or from the outer end of the handlebar tube if no hole was necessary) and keep pushing until the connector exits the other end of the handlebar tube.
Cable exiting battery-side of handlebar
Note: Before pushing the cable through, I roughly calculated the point on the wire that would be equidistant between the end of the battery and the hole in the handlebar, attached an E-Tube wire holder at that point, and pushed it through the hole. The hope is that the wire holder will prevent the cable from rattling inside the handlebar tube. Depending on the length and design of your handlebar tube, you may want to apply more of the wire holders.
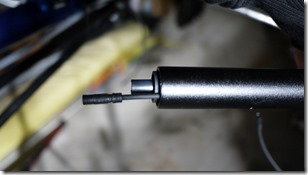
Now pull the cable from the end of the handlebar until it protrudes just past the connector on the battery. Then push the battery and the cable running next to it back into the handlebar tube until just the connectors from the battery and cable protrude from the tube.
Inserting battery and cable into handlebar tube
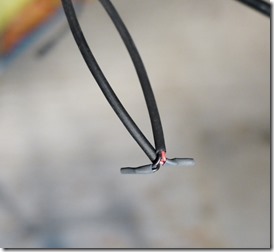
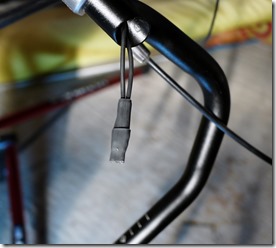
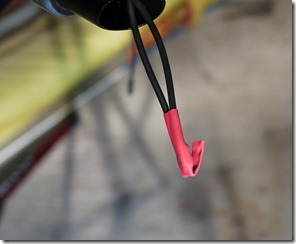
At this point the splice can be made at the other end of the handlebar. I soldered the two wires together, applied shrink tubing to the individual wires as well as both cables, and then covered all that with some special shrink tubing with glue on the inside, which should seal the splice pretty well from the elements. There are probably as many ways to make this splice as there are trike pilots. Once complete I attached a wire holder or two and stuffed the splice up into the vertical portion of the handlebar. There is enough tension on the two looped cables that I don’t think it’s going anywhere.
The Splice
Stuffing the splice up into the handlebar tube
The cable that runs from the junction box to the rear derailleur needs a way out of the handlebar tube. I marked the location of the exit hole with a punch and then completely removed the center handlebar section so that I could drill it with a drill press. I located the exit hole by turning the handlebar while holding the cable at various places on the tube, watching how the loop of cable behaved throughout the motion of the handlebar. The other end of the cable was attached to the cable guide on the frame, where the guide tube is located.
And then at the last minute I rotated the hole down the tube so that the cable would exit more from the bottom than the side. I’m not sure what possessed me to do that, but it was a minor mistake. Next time I’ll orient the hole so that the wire comes out the side rather than the bottom. Orienting the hole on the side causes the loop to lay on top of the main frame tube instead of bashing into it from the side. You can see from the picture below where I ended up drilling the hole.
Locating the exit hole
After reattaching the center handlebar to the frame, it was time to hook all the cables to the junction box and insert the outer handlebar into the inner portion. I remembered to put the pinch collar in place first or I would have done this twice. I pushed the cable from the derailleur in through the new hole in the handlebar and out the other side. Hooked everything to the junction box. One connector in the junction box is empty so I installed a plug to keep it waterproof. The loop from the battery to the junction box gets stuffed in first, with a couple of wire holders in place. In my installation, this loop is longer than it needs to be because the only short cable I had on hand was 300mm. 200mm would work better.
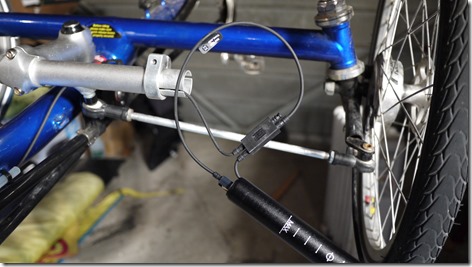 Connected
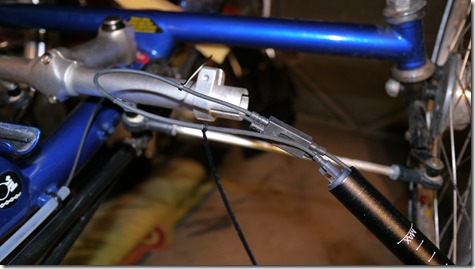 Ready to insert
In the pictures I had already done the next step, but it can wait until now. I routed a 750mm length of 7/32” ID Poly-E tube along the route formerly taken by the derailleur cable, from the closest attachment point on the frame near where the E-Tube cable exits the handlebar, all the way back to the last attachment point nearest the derailleur. Even though the E-Tube cable seems like solid stuff, it doesn’t have the strength or rigidity to make that trip dangling between the attachment points. After internal routing, Shimano’s solution is to tape the cable to the frame. They sell special tape just for this. In the best case this isn’t very appealing to me, and this isn’t the best case because the cable would somehow have to make it past the pivot for the rear suspension. I like the poly tube approach much better.
Guide tube
I routed the cable through the guide tube and attach it to the derailleur. The display lit up! If it hadn’t I would have checked the electrical connections and the firmware revisions of all the Di2 components. Once the system was running, I moved the steering from rail to rail and make sure there was just enough slack in the cable between handlebar and frame to handle a hard left turn, and that the cable didn’t misbehave with all the slack from a hard right turn. Extra cable can be pulled from or pushed into the handlebar.
Hard Right
When the cabling looked right, I install a grommet in the handlebar to hold the cable in place and give it a clean look. Then I adjusted the derailleur per Shimano documentation. And went for a ride.
Grommet
Cost, in Dollars and Grams
It’s interesting and mildly gratifying to note that even with all the individual pieces that comprise Di2, the net weight is slightly less than the stock ICE configuration. Of course weight savings wasn’t the goal, and thankfully there are much more compelling reasons for enduring what turns out to be almost triple the cost over stock ICE components. When you ride a lot, reliable, ergonomic, and quiet shifting is (nearly) priceless.
| Stock ICE Sprint | Wt | Cost | Di2 Upgrade | Wt | Cost |
| X9 Rear Derailleur, Shifter, and Cable | 397g | $144 | Ultegra Di2 RD-6870 GS Rear Derailleur, Alfine SW-S705 Shifter, Alfine SC-705 Display, SM-BTR2 Battery, E-Tube cable, Junction Box | 415g | $745 |
| 9-speed KMC X9 chain | 697g | $51 | 11-speed Shimano HG600 chain | 640g | $60 |
| ICE Capreo 9-speed 9-32 Cassette | 296g | $126 | Shimano 105 CS-5800 11-speed 11-32 Cassette | 309g | $50 |
| ICE Capreo Wheel | 990g | $187 | White Industries CLD-11 wheel | 887g | $350 |
| Total | 2380g | $508 | 2251g | $1,205 |
Oops
Inevitably, things are learned in the first pass of a project that lead to changes in the next iteration. Unfortunately this was a one-shot project for me, no iteration for a while at least. When I move this to a new trike, I’ll make the following changes. 1) Drill the hole for the E-Tube wire leaving the handlebar further up on on the tube, so the wire comes out almost parallel to the center tube of the frame. I think this will cause less flex on the wire when making sharp turns. 2) I should have used 1/4” bit for the hole between the handlebar sections so I could install a grommet. Oops aside, I think the installation turned out well. After I get some time on it I’ll report how Ultegra Di2 is working out.







PS if you’re still counting grams on a trike, especially a trikepacking touring model, you have 1 too many wheels.
LikeLike
There are grams worth their weight (a third wheel for instance) and grams that are not. True that if weight were the only consideration I wouldn’t be riding a trike, but I still appreciate when a more reliable, ergonomic, performant, and silent component is also the lightest.
LikeLike