9,949 miles to be precise. I was on a short tour along the Trail of the Couer D’Alene’s in Northern Idaho when I noticed some odd vibrations in my drivetrain. Nothing audible but it felt like something was caught in my rear derailleur cage. It felt the same in either gear on the Schlumpf which reinforced the idea that the problem was elsewhere. I couldn’t find anything amiss anywhere in the drivetrain and eventually it went back to normal, smooth operation. This happened a couple more times but always snapped out of it and eventually stopped acting up.
I’m pretty judicious about lubricating my Schlumpf SpeedDrive using their lube though I gather most any kind of lube will work. If anything I over-lube. When I got home I squirted in 2 ml more lube, I was pretty close to the 6 month mark, and went on a local ride. Climbing the first hill, the scuzziness in the drivetrain was back. This time when I took a look there were metal shavings all over the chain. As I limped home it never “snapped out of it” again. On closer inspection at home I noticed a whole bunch of lateral play in the Schlumpf. I’m pretty sure it’s done.
I contacted Utah Trikes who had installed the Schlumpf about six an a half years ago, hoping that they were a repair shop for the hub. They’re not. They told me a new hub would cost around $800 and is currently on backorder, it might take several months to get one. I emailed the factory in Germany and so far have only received the “we’re really busy, expect delays” reply. So much of that these days.
I was joking just a few weeks ago on this blog about how much I liked my Schlumpf but that my tune might change if it failed tomorrow. Tomorrow has arrived and I think I’m done with Schlumpf. It bothers me that a piece of equipment this expensive apparently can’t be repaired. At least not in a timely matter. 10,000 miles would be a decent lifetime if it wasn’t a throw-away when it finally died. Maybe it’s not as bad as this, I’m still investigating options, but initial indications are not good.
It doesn’t help that this is the last in a long line of issues I’ve had with internally geared hubs (IGH). After initially loving DualDrive, Sturmey-Archer, and Alfine hubs I eventually gave up on them all. In the case of Alfine it gave up on me. I’ve slowly come to the conclusion that the relatively minor advantages of an IGH compared with a DI2 externally-geared system are far outweighed by their cost and reliability issues. I think at this point the only thing that would bring me back to IGH would be belt drive and that’s just not a thing for recumbents. If somehow that did happen, Rohloff is about the only hub I’d consider. And with that I’d be going from zero to two mechanical cables which would be a pretty tough sell for me.
For now I think I’ll slap a conventional bottom bracket on and ride with my single chainring for awhile. The gear range is fine for my commute without overdrive and gravity will suffice for now on downhills. Once removed I may try to disassemble the Schlumpf myself and see if I can fix it (but can I get parts?) or maybe I’ll send it to Utah Trikes and see if they can get it repaired through the factory. I don’t know.
Maybe I’ll add a motor– I’ve been kicking that around but was stuck because with the Schlumpf I can’t add a torque-sensing bottom bracket for pedal-assist. Seems I don’t have that constraint any more. With a motor I’m not as concerned about the low end of the gear range so I could add some teeth to the chainring to improve my top end without resorting to my least favorite piece of cycling technology short of chain tubes: the front derailleur.
Update
The problem wasn’t the Schlumpf. It was my idler that is now getting new bearings. But it wasn’t even the bearings though they are a little rough– the chain was getting wedged between the cog on the power-side idler and the outer plate of the idler. This has never happened before and I’m not sure how it’s even possible, will have to investigate. In the meantime I think I’ll send the Schlumpf off for an “overhaul” since I’ve already removed it from the trike and it is pretty sloppy at this point.
The good news is that my fears about servicing the Schlumpf have been allayed. The Schlumpf factory got back to me and offered to fix or replace the hub. They sort of implied for free (aside from shipping) but that may have just been a bad translation. They also gave me the name of a shop in Seattle that services Schlumpfs, thinking I may send it there.
So for now the Schlumpf remains my only success story with internal gears. But it’s a huge success: two front gears with near-perfect spacing for my needs, crisp shifts, no clumsy front derailleur, no cables. And hopefully still going strong at 10,000 miles. I’ll report back on the outcome of the overhaul in a future post.
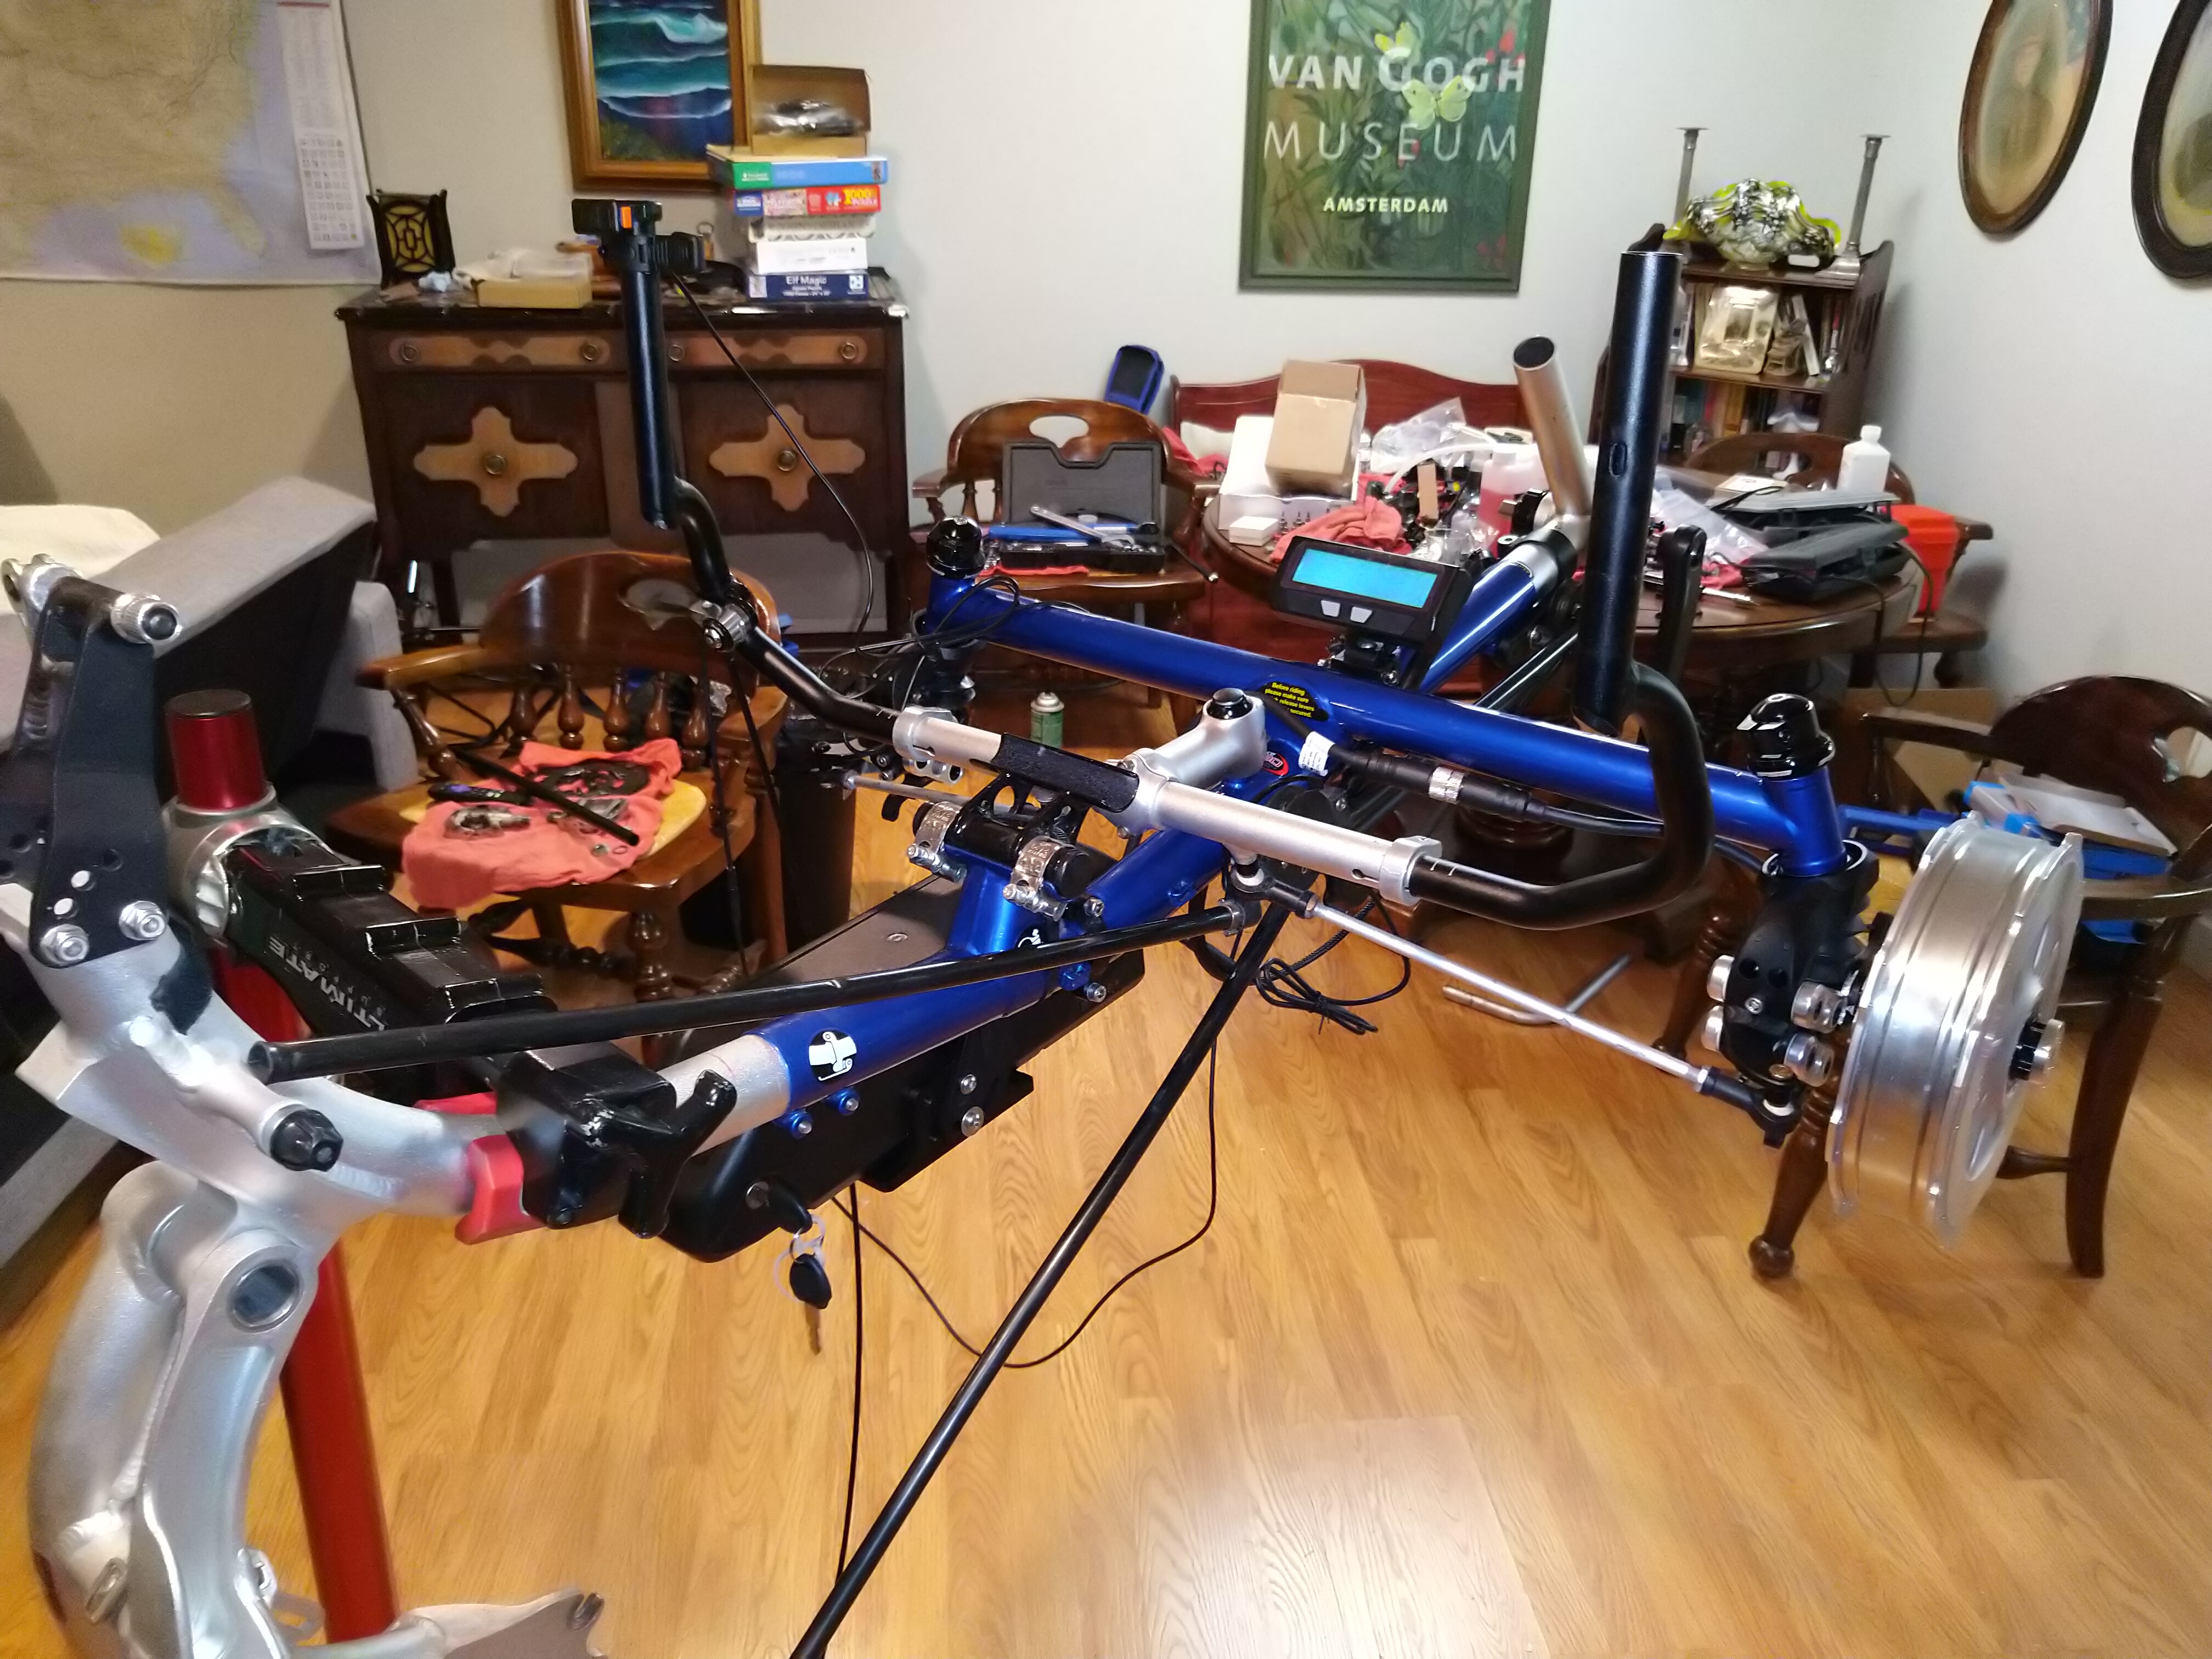
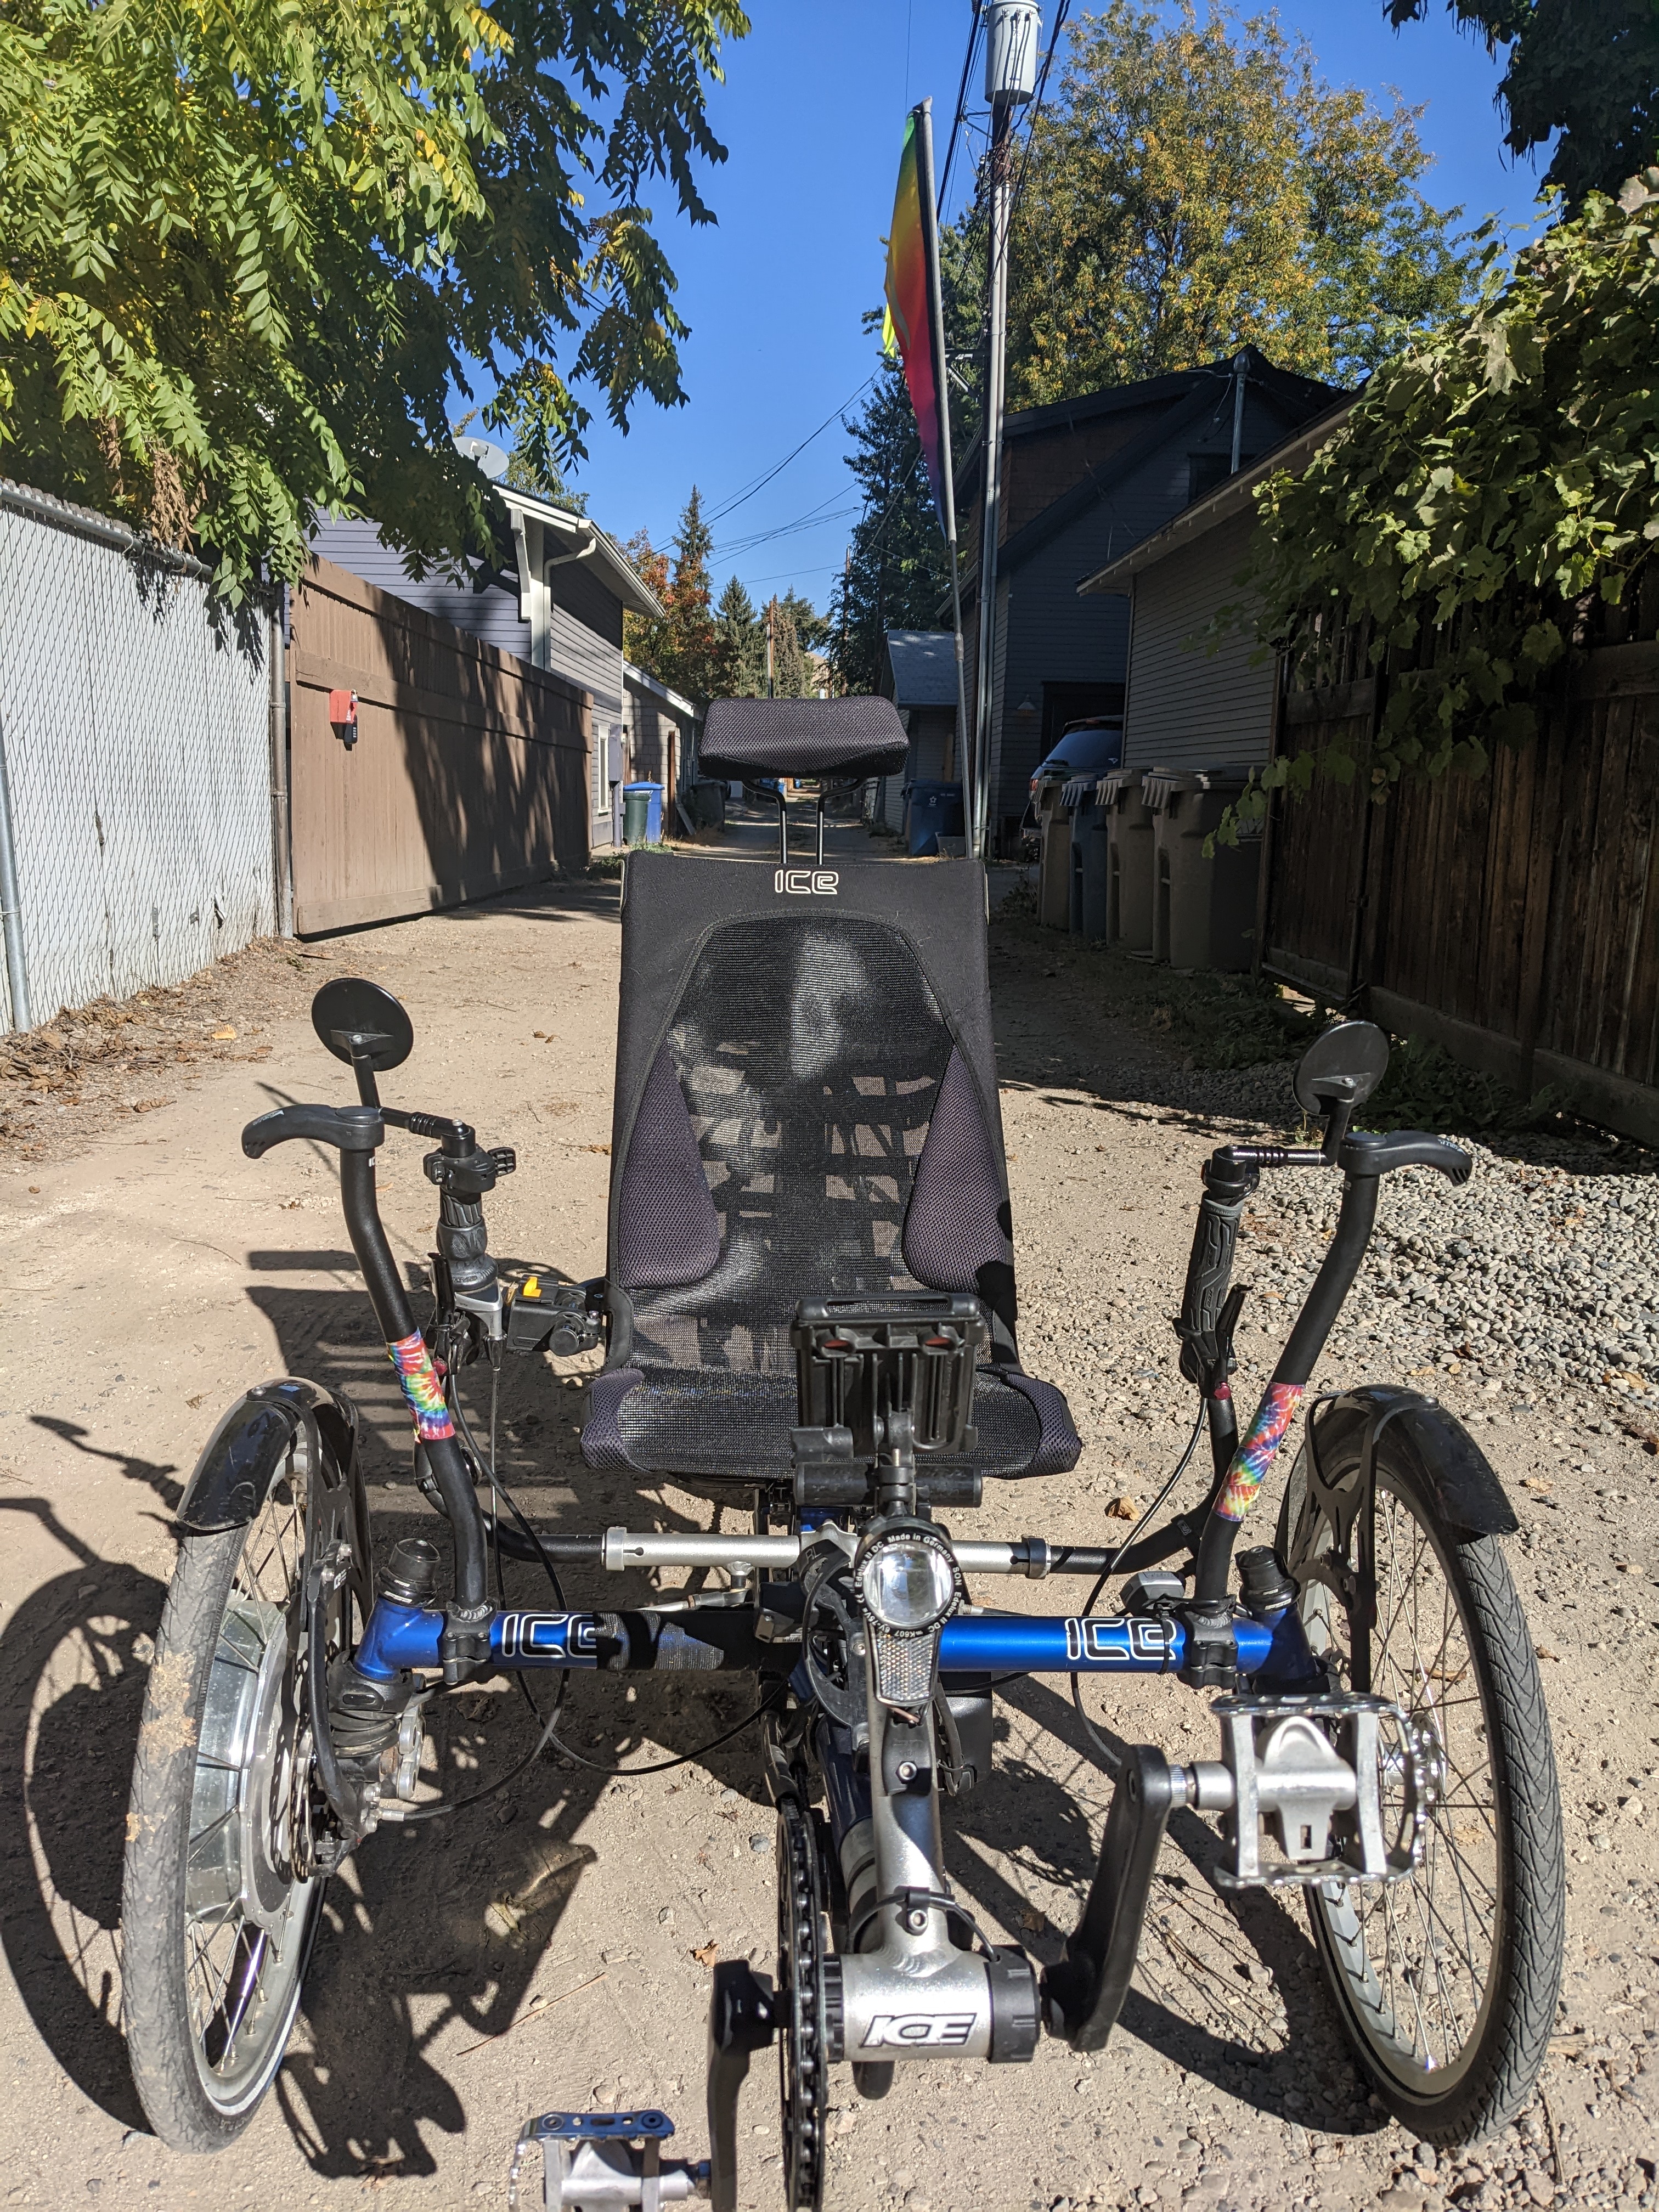
Behold the HDQE. The HD refers to the current-model ICE Adventure HD frame. The Q refers to its origin as a 2008 Trice-Q of which only the boom, suspended rear section, and rear derailleur remain. E is for Electric.
This trike has undergone many changes over the years but this is by far the biggest. The result is perhaps the ultimate electric pedal-assist trike, a bold claim considering I could have simply purchased a complete electric-assist trike from ICE.
Better than ICE E-Assist?
ICE’s integration of the Shimano STEPS mid-drive motor into their trike line is impressive. STEPS itself is a proven geared mid-drive motor with integrated torque sensor yielding smooth, natural pedal-assist and ICE has integrated it into their boom in typical elegant fashion. Another big point in its favor is that STEPS integrates with Shimano Di2 electric shift, currently my favorite piece of bike technology. I’ve been running it on my Sprint for years. I’m still sad that ICE doesn’t offer a retrofit kit with STEPS. It would be so easy, just swap out the boom. And the combination of STEPS and Di2 provides automatic shifting, a perfect solution for my mom who has never mastered that art. But alas their web site makes a point of saying it is not available as a retro fit kit. When I inquired with the factory about this a few years ago they said simply “We only obtain Steps for OEM fitment” and suggested I try Bionx. Which I did for a different trike and it turned out great. There is much not to like about Bionx– a dealer is required to make even the simplest changes to the system. Oh and they don’t actually exist anymore. But my experience with Bionx sold me on a direct-drive hub vs. a geared mid-drive motor. So why do I think the HDQE is better than an Adventure with E-Assist?
I could upgrade my wife’s existing trike so it didn’t cost more than $8,000 to electrify.
Direct-drive hub motors are nearly silent, significantly quieter than geared motors. It’s difficult to explain why this matters so much but it does to me.
Direct-drive hubs are simpler than geared motors with fewer moving parts. The bearings are the only parts particularly prone to wearing out and they are easily replaced.
Hub motors don’t use the drivetrain. This has a number of advantages: Less stress and wear on the drivetrain, no interaction between shifting and the motor, and propulsion that is independent of the drivetrain. And with the hub motor on a front wheel, increased traction from propulsion on two different wheels.
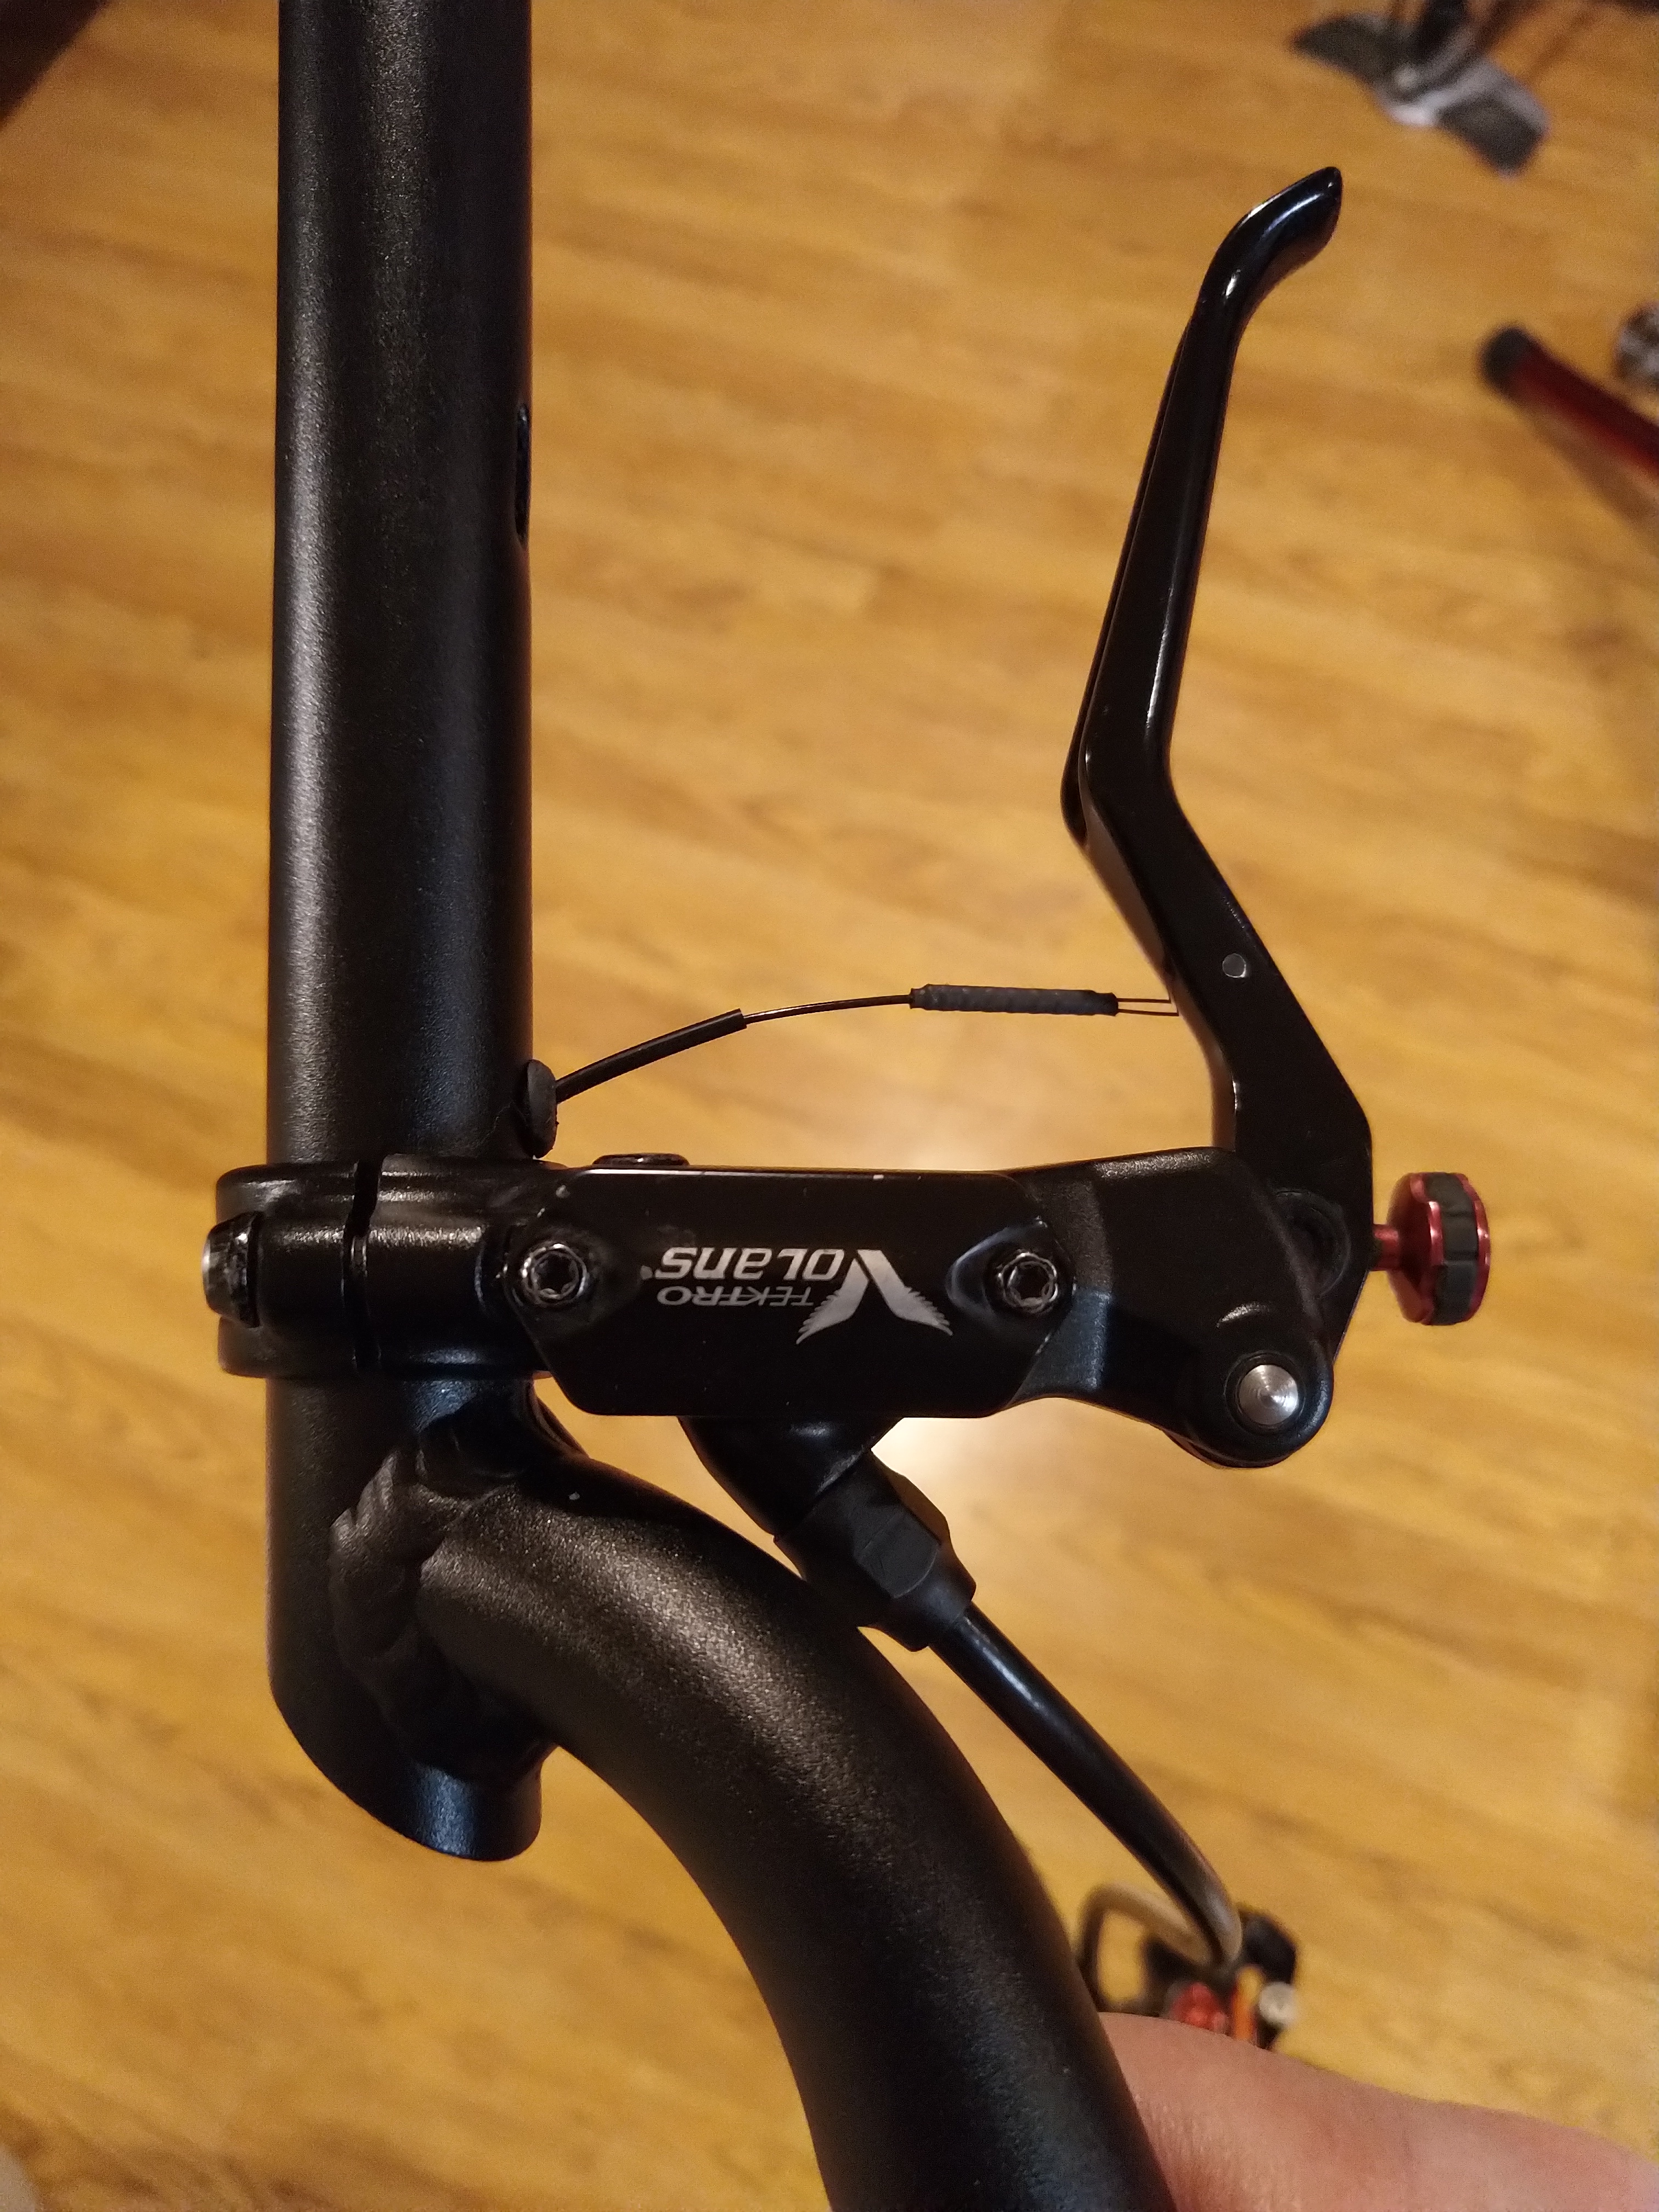
Direct-drive hub motors allow regen. In addition to extending range it’s a fantastic way to slow the trike when braking. Especially when you have crappy Tektro brakes that squeal embarrassingly.
Ability to choose any battery and PAS sensor
Ability to configure the system any way I want, whenever I want.
Of course there are down sides to a direct-drive hub motor:
It is heavier and bulkier than an equivalent geared motor. I ride a trike, my mantra is that weight is the enemy unless it adds something useful enough to justify the weight.
It adds more drag when “off” because the motor can’t be mechanically disengaged.
Together, these two are a bit painful for me. They effectively mean that once electrified I’m obligated to ride with the motor on to offset the added weight and drag. But I’m not sure that isn’t just as true for a mid-drive system. Anyway it’s a moot point for this project. This is my wife’s trike and she’ll always ride with assist.
Here’s a more thorough discourse on the advantages and disadvantages of hub vs mid-drive and geared motors. For me, the short answer is: The HDQE is better than E-Assist because it’s cheaper, quieter, and field-programmable. The challenges were integrating this tech as cleanly as ICE has integrated STEPS and getting the pedal-assist working smoothly so that it feels just like normal pedaling but with more power. I think I succeeded on both counts.
Grin
I’ve been toying with this conversion idea for some time, much to my wife’s dismay. I got my experience with Bionx by converting my mom’s ICE Adventure to an e-trike with a Bionx rear hub a few years ago. The conversion was straightforward and the result was quite good. If Bionx hadn’t gone out of business I probably would have done the same thing again. But throughout all of this I’d been eyeing some other options that would give me more control over the system. One was Falco which made some impressive-sounding claims. 5 phase drive technology! Ultra-reliable! Ultra-fast Operations! (I have no idea what that means). But at the time a couple of years ago I couldn’t even figure out how to order one and decided it was more marketing than product. They still have a web site, maybe I was wrong. After my mom’s Bionx trike was stolen (from the rear patio at her retirement home, WTF?) we got her into an upright electric trike that uses an EBO hub motor. It’s a reasonable option and the company operates near home in Denver but the options seem limited, especially for pedal-assist (PAS) which appears to be limited to the basic approach based on crank rotation rather than measured power to the pedals. Recently a friend turned me on to Golden Motor which also seems reasonable but similarly limited.
What I kept returning to over these years of mulling and brooding was Grin Technologies out of Vancouver, BC. This is a very different type of operation than any other I’ve run across. It appears to be run by a small but talented band of technical geeks. Instead of marketing propaganda you’re bombarded with detailed, accurate technical, educational, and support information. As an engineer myself I’m always drawn to thoughtful engineering over marketing BS and these guys deliver. The amount of information was initially a little overwhelming even for me and I was put off slightly at the idea of having to grock it all when I could much more easily just go buy a Bionx (incidentally also based in Canada before their demise). But the benefits are enormous. It’s an insanely open approach to electrification– they produce controllers and displays that work with virtually any components (motors, battery packs, etc.) available. They stock a curated set of these components married with their controllers and glue technology into complete retrofit kits. They have staff that understand the products they sell and the market they’re in. But what finally sold me was the second iteration of their own Grin All-Axle Front Hub.
While Grin sells and supports all the usual suspects in Chinese hubs, I’ve been slightly troubled by reports of reliability and fit-finish issues. In general I think they’d work fine and the price is comparatively right, but this Grin hub is impressive. Even if it had no real advantages (it does) it would be worth the higher price just for the aesthetics. I’ll let Grin articulate the advantages, they do a pretty good job without resorting to hyperbole.
Asymmetrical front drive, Disc brakes, Front suspension
ICE Suspension Kingpost
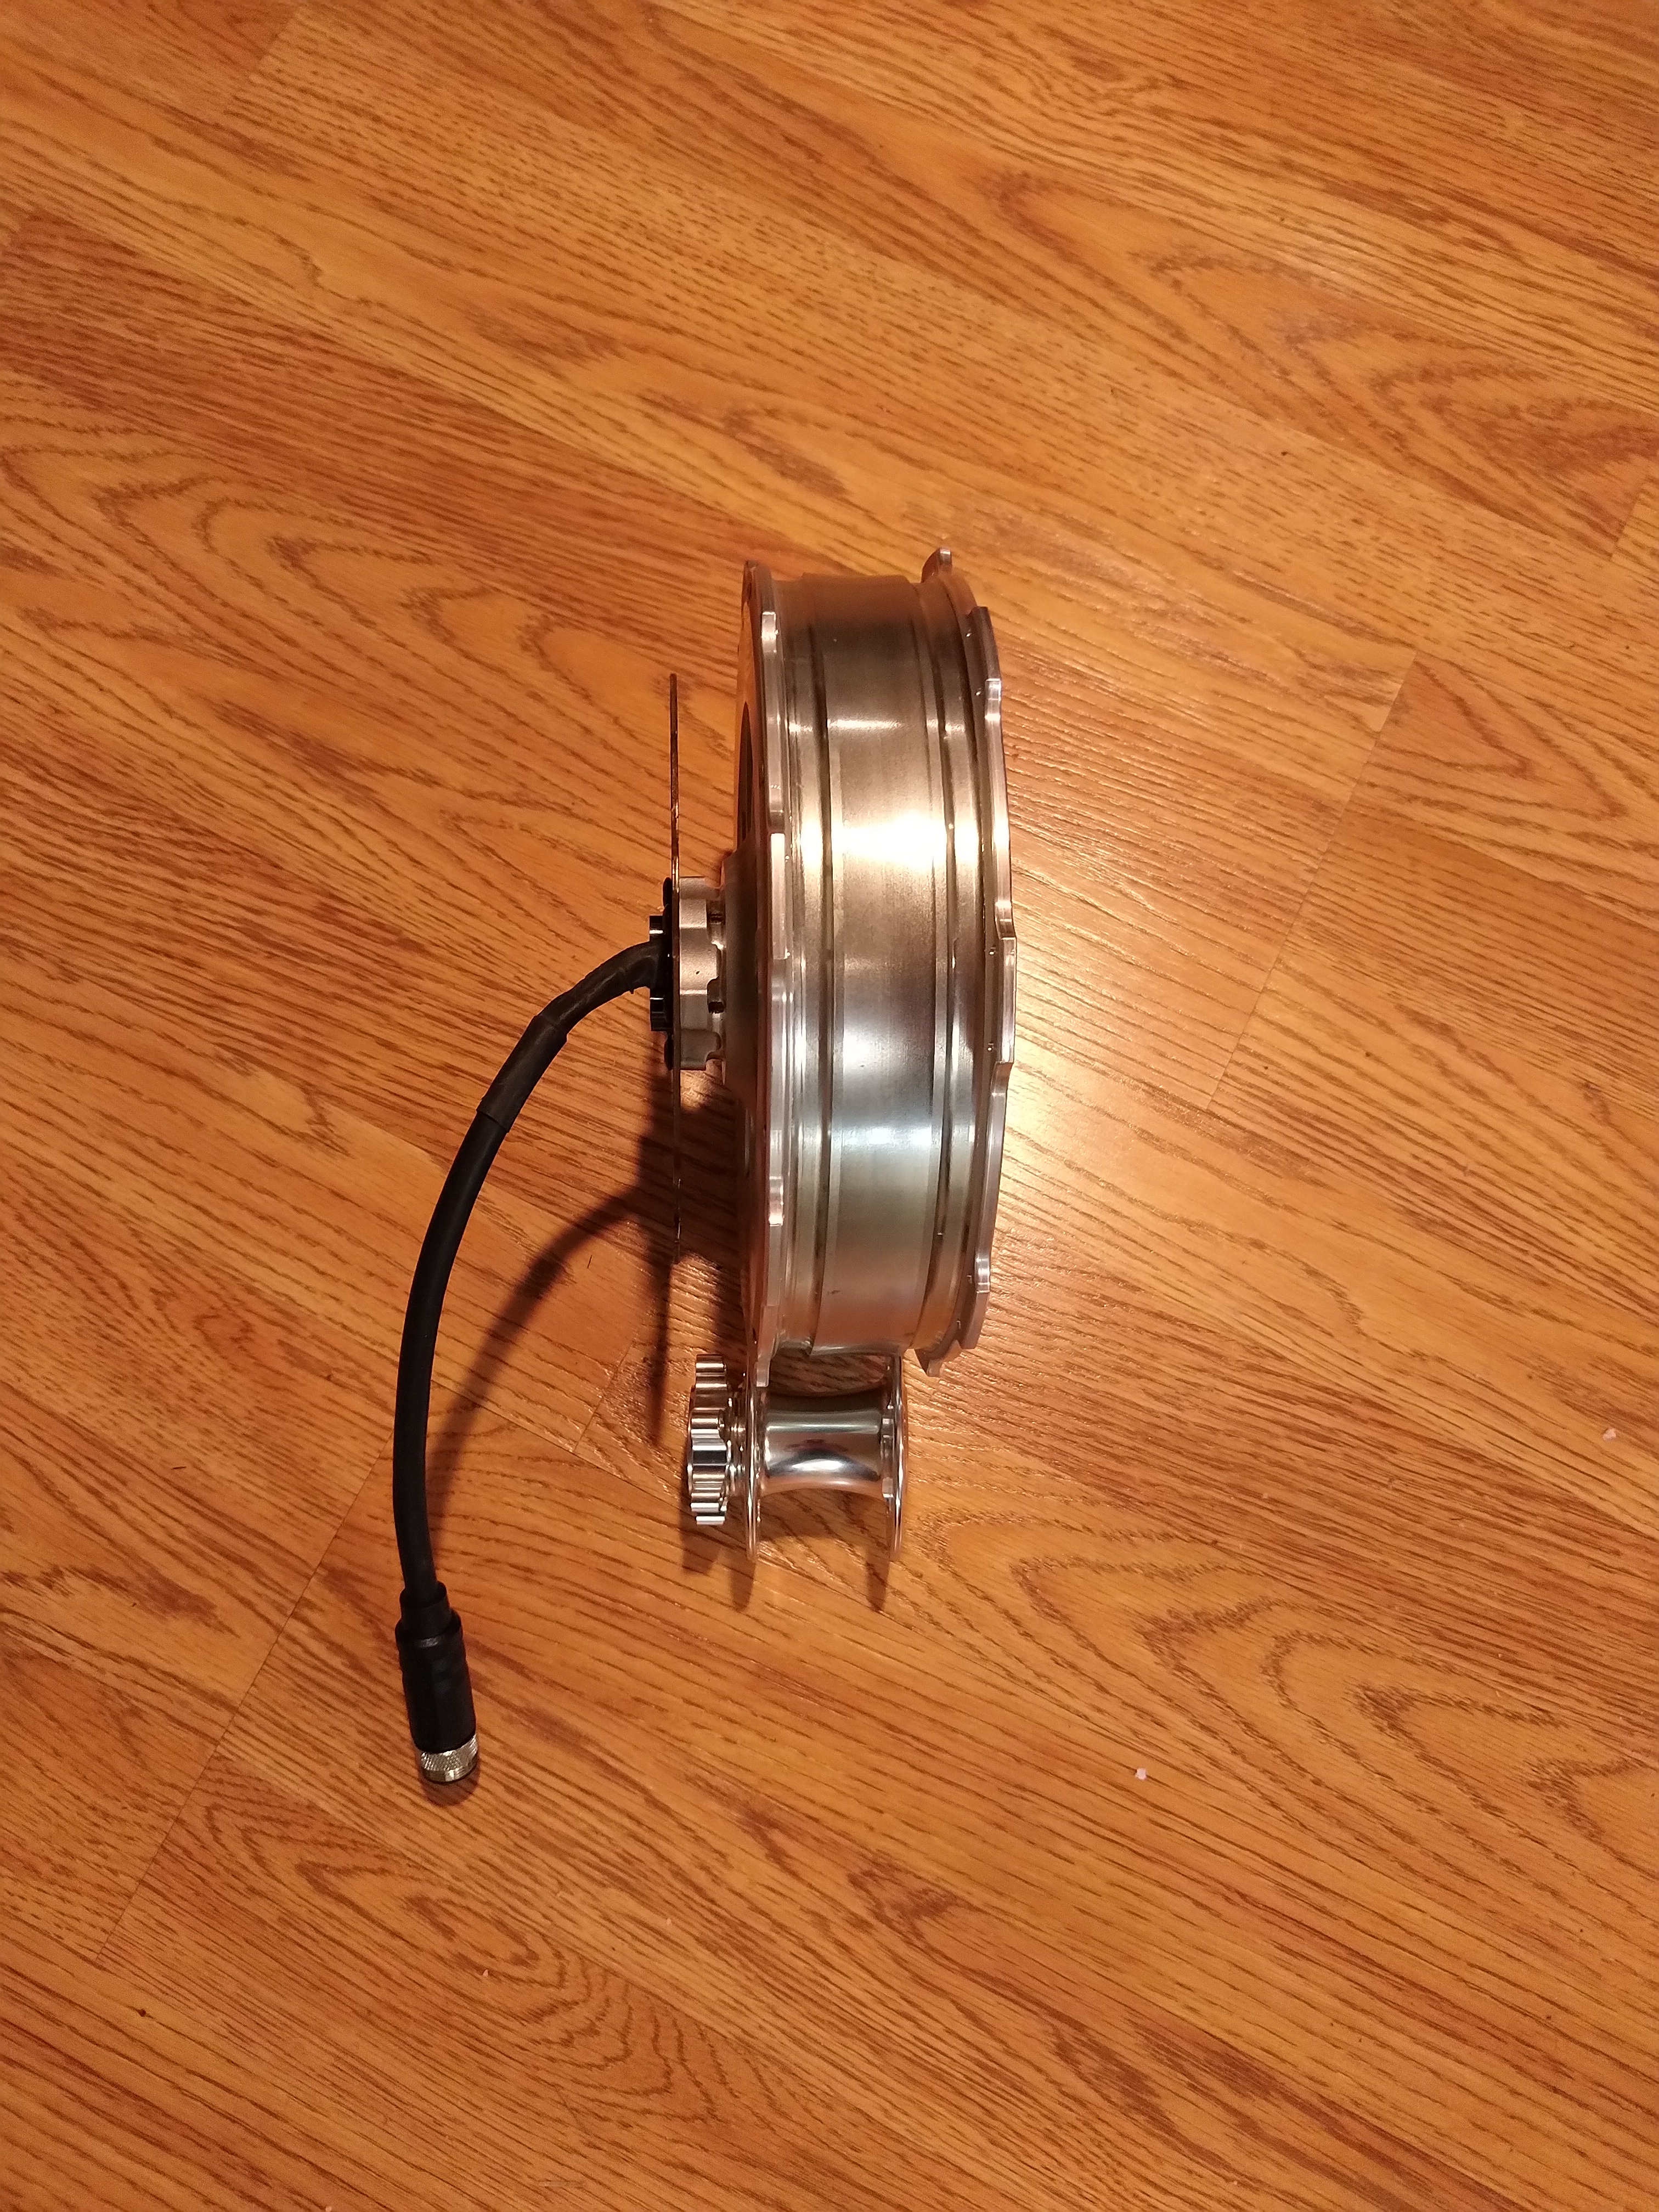
Grin designed their All-Axle hub to work with virtually all axle types and routed the power cable through the axle so that it can be mounted single-sided as the front hub of a tadpole trike. They even talk about mounting two motors, one on each front wheel, but that’s overkill for my application. I’m looking for pedal assist not a race car. So I decided to mount the motor on the right wheel. This required building a new right front wheel with the motor. And replacing the right drum brake with disc. And since it would be pretty wonky to have one front drum brake and one front disc brake, I rebuilt the left wheel with a disc brake hub. And I’d been itching to replace the mirrored Tektro hydraulic brakes on my trike with Shimano hydraulics so I moved the Tektros to the HDQE. And the mirrored Tektro brakes happen to be compatible with ICE’s front suspension kingposts so, why not, I upgraded to front suspension as well. Whew!
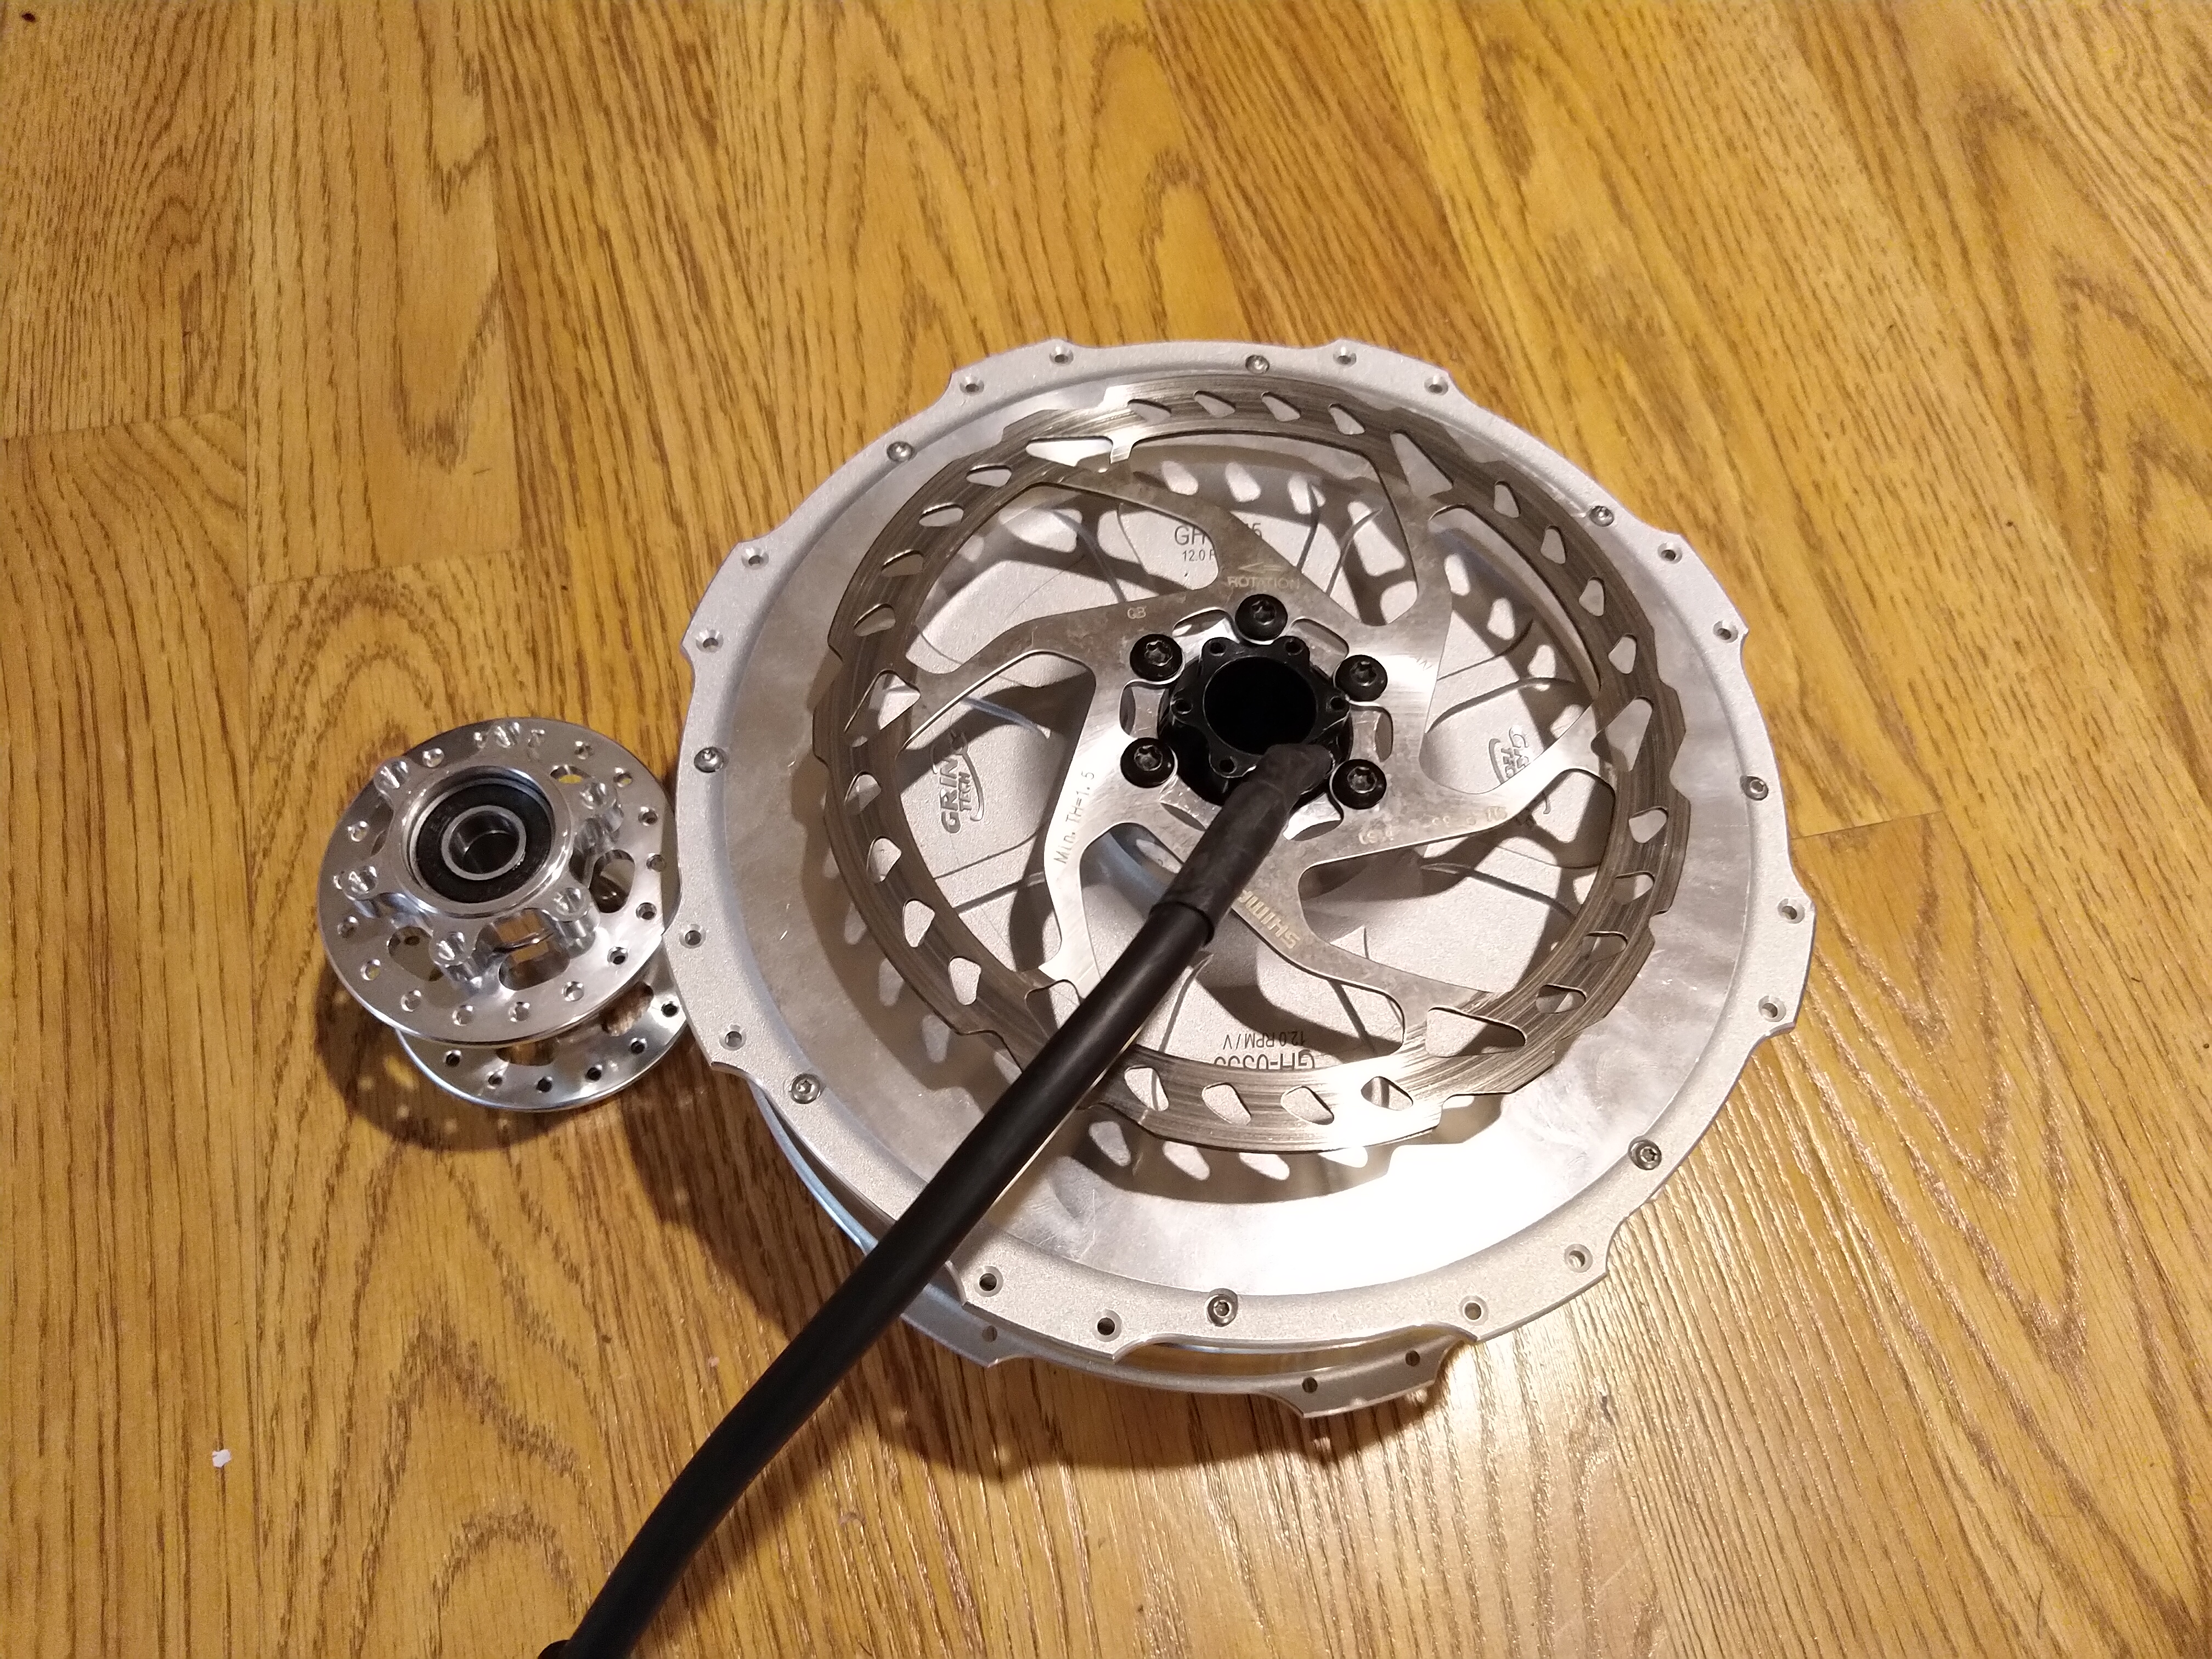
Left and Right Hubs
Wheelbuilding
I’ve built quite a few 20 inch wheels now in my trike career. Grin made this build the easiest yet with well-placed drillings on the hub and excellent tools and advice.
And now I will continue to barf out various artifacts from this effort with little explanation because in the nearly two years I’ve procrastinated in finishing this blog post I’ve forgotten most of the details. I blame the pandemic. And the ensuing supply-chain issues, everyone’s favorite excuse for… everything.
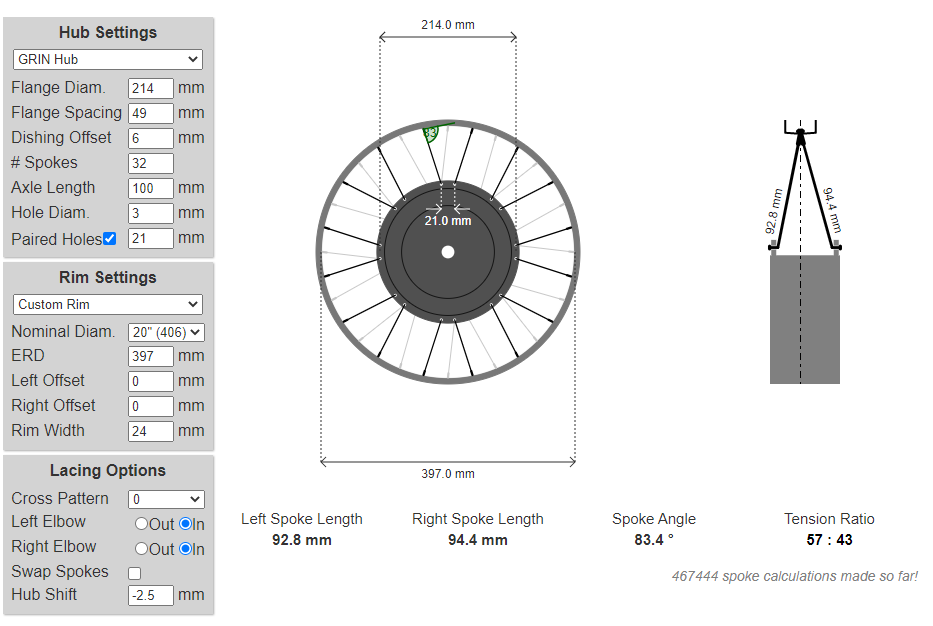
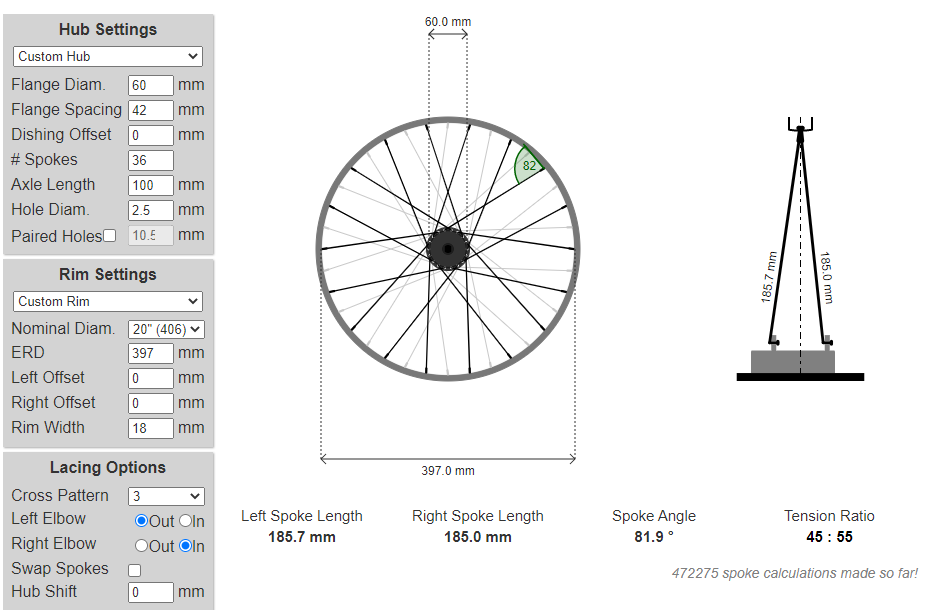
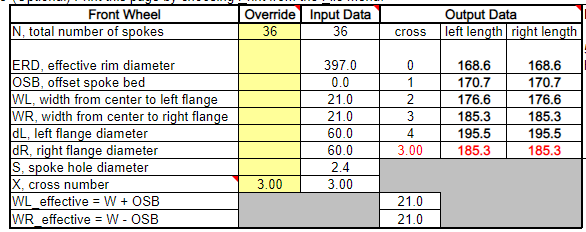
Grin dish offset to match original ICE contact patchMotor wheel (right)Left wheelLeft wheel (Spocalc)
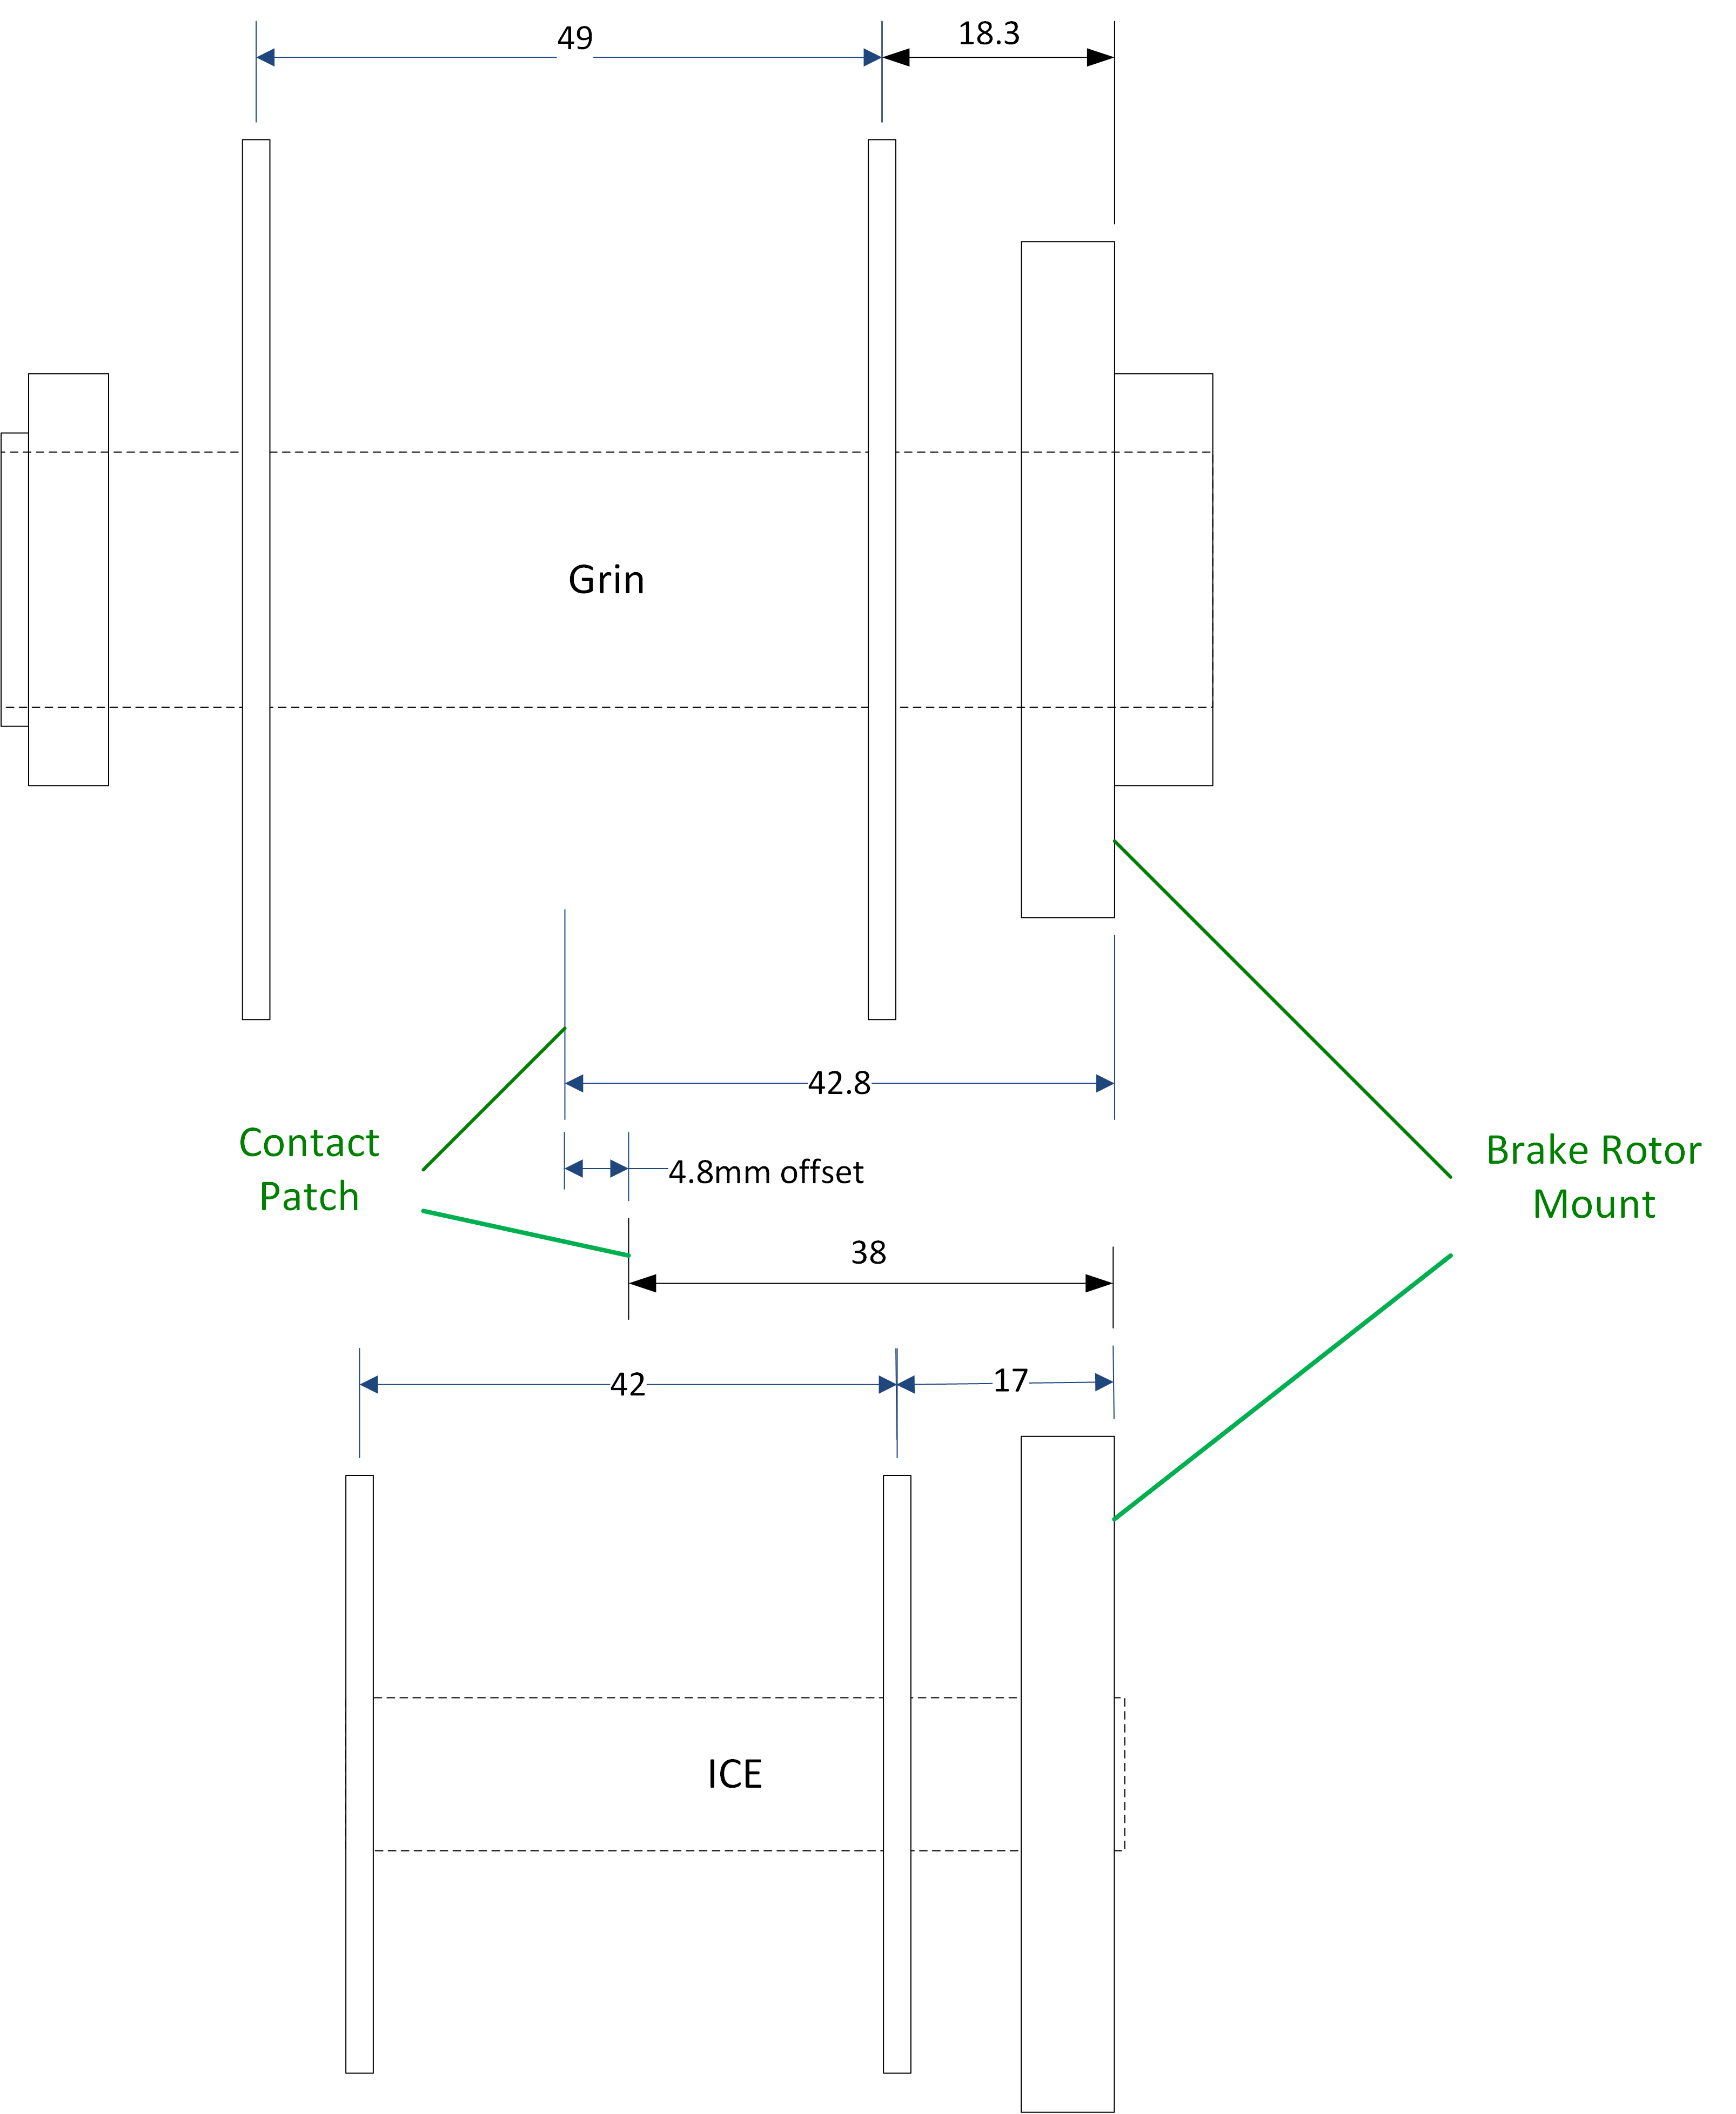
Buyer’s remorse and a custom axle
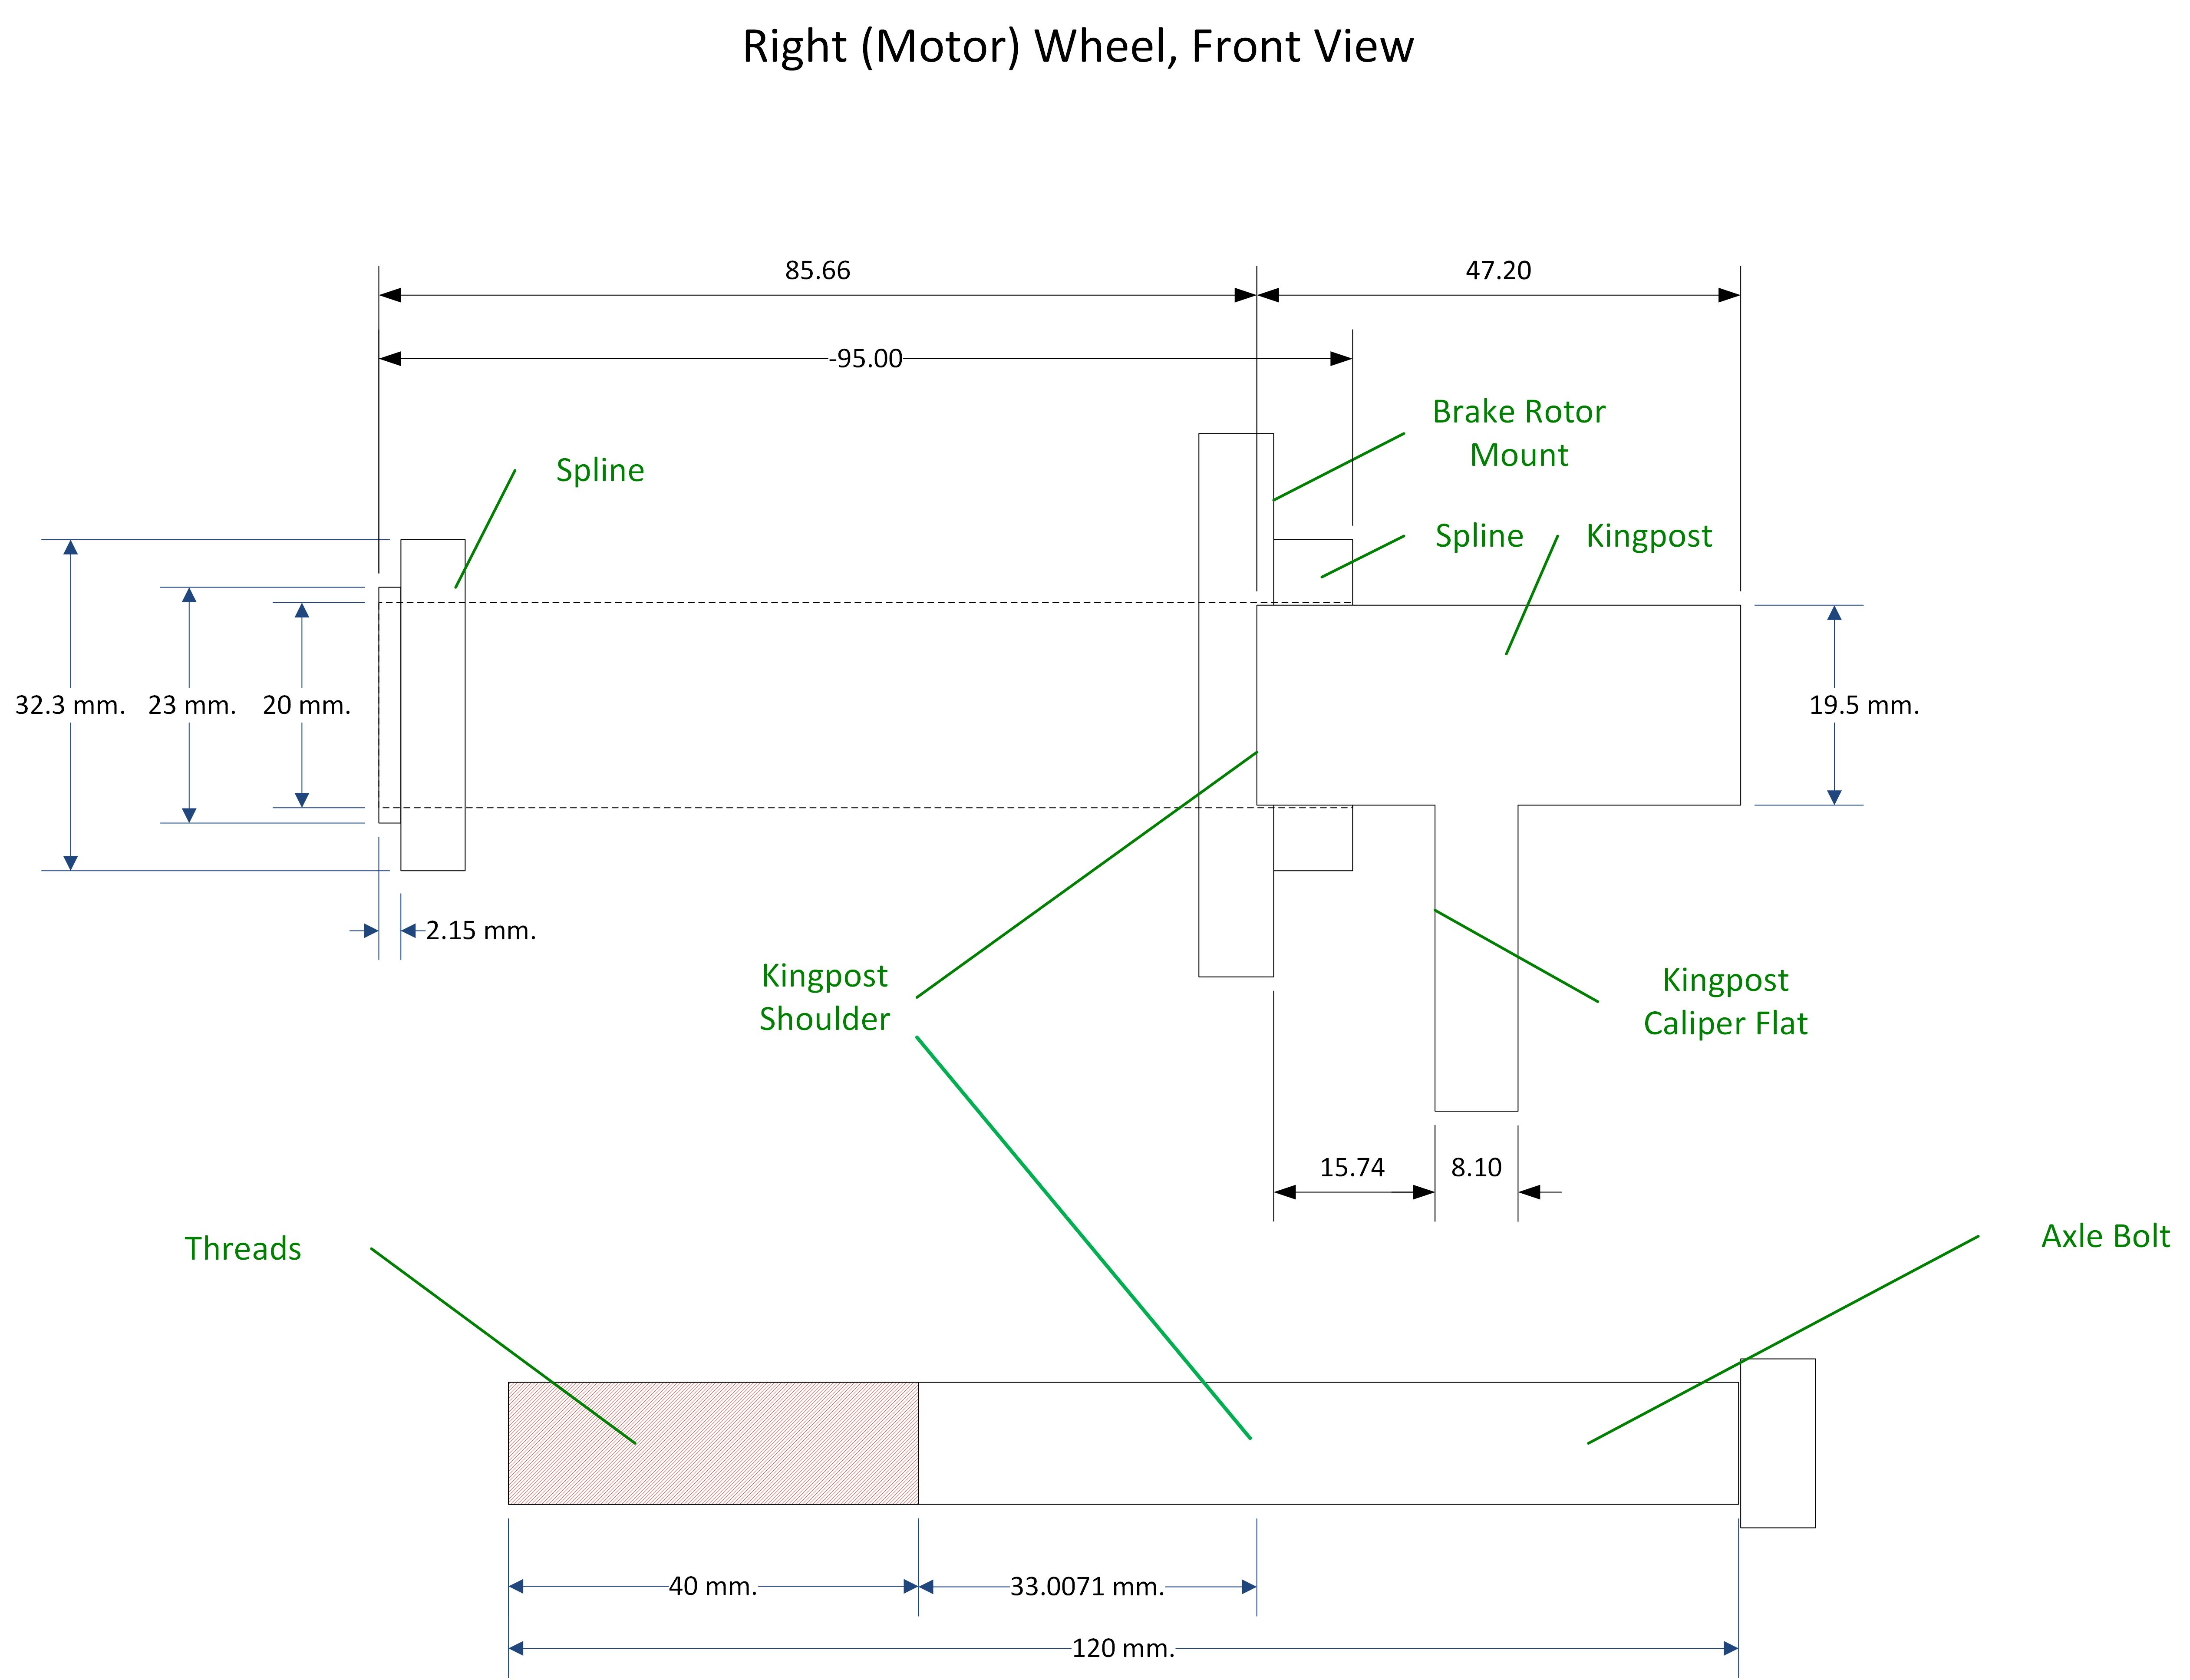
The ICE OEM axle is 12mm so I ordered Grin’s 12mm axle inserts. However the dimension of ICE’s suspension kingpost and Grin’s motor are such that the alignment of the disc brake rotor on the motor winds up about 10mm outboard of where the kingpost puts the centerline of the disc brake caliper. 10mm doesn’t seem like much but it’s way more than I was willing to shim the caliper outward to center it on the rotor. I fully expected to be testing Grin’s return policy until we discovered we could make up the 10mm by removing the 12mm axle inserts and sliding the now 20mm axle opening of the hub over the shoulder of the kingpost. Genius!
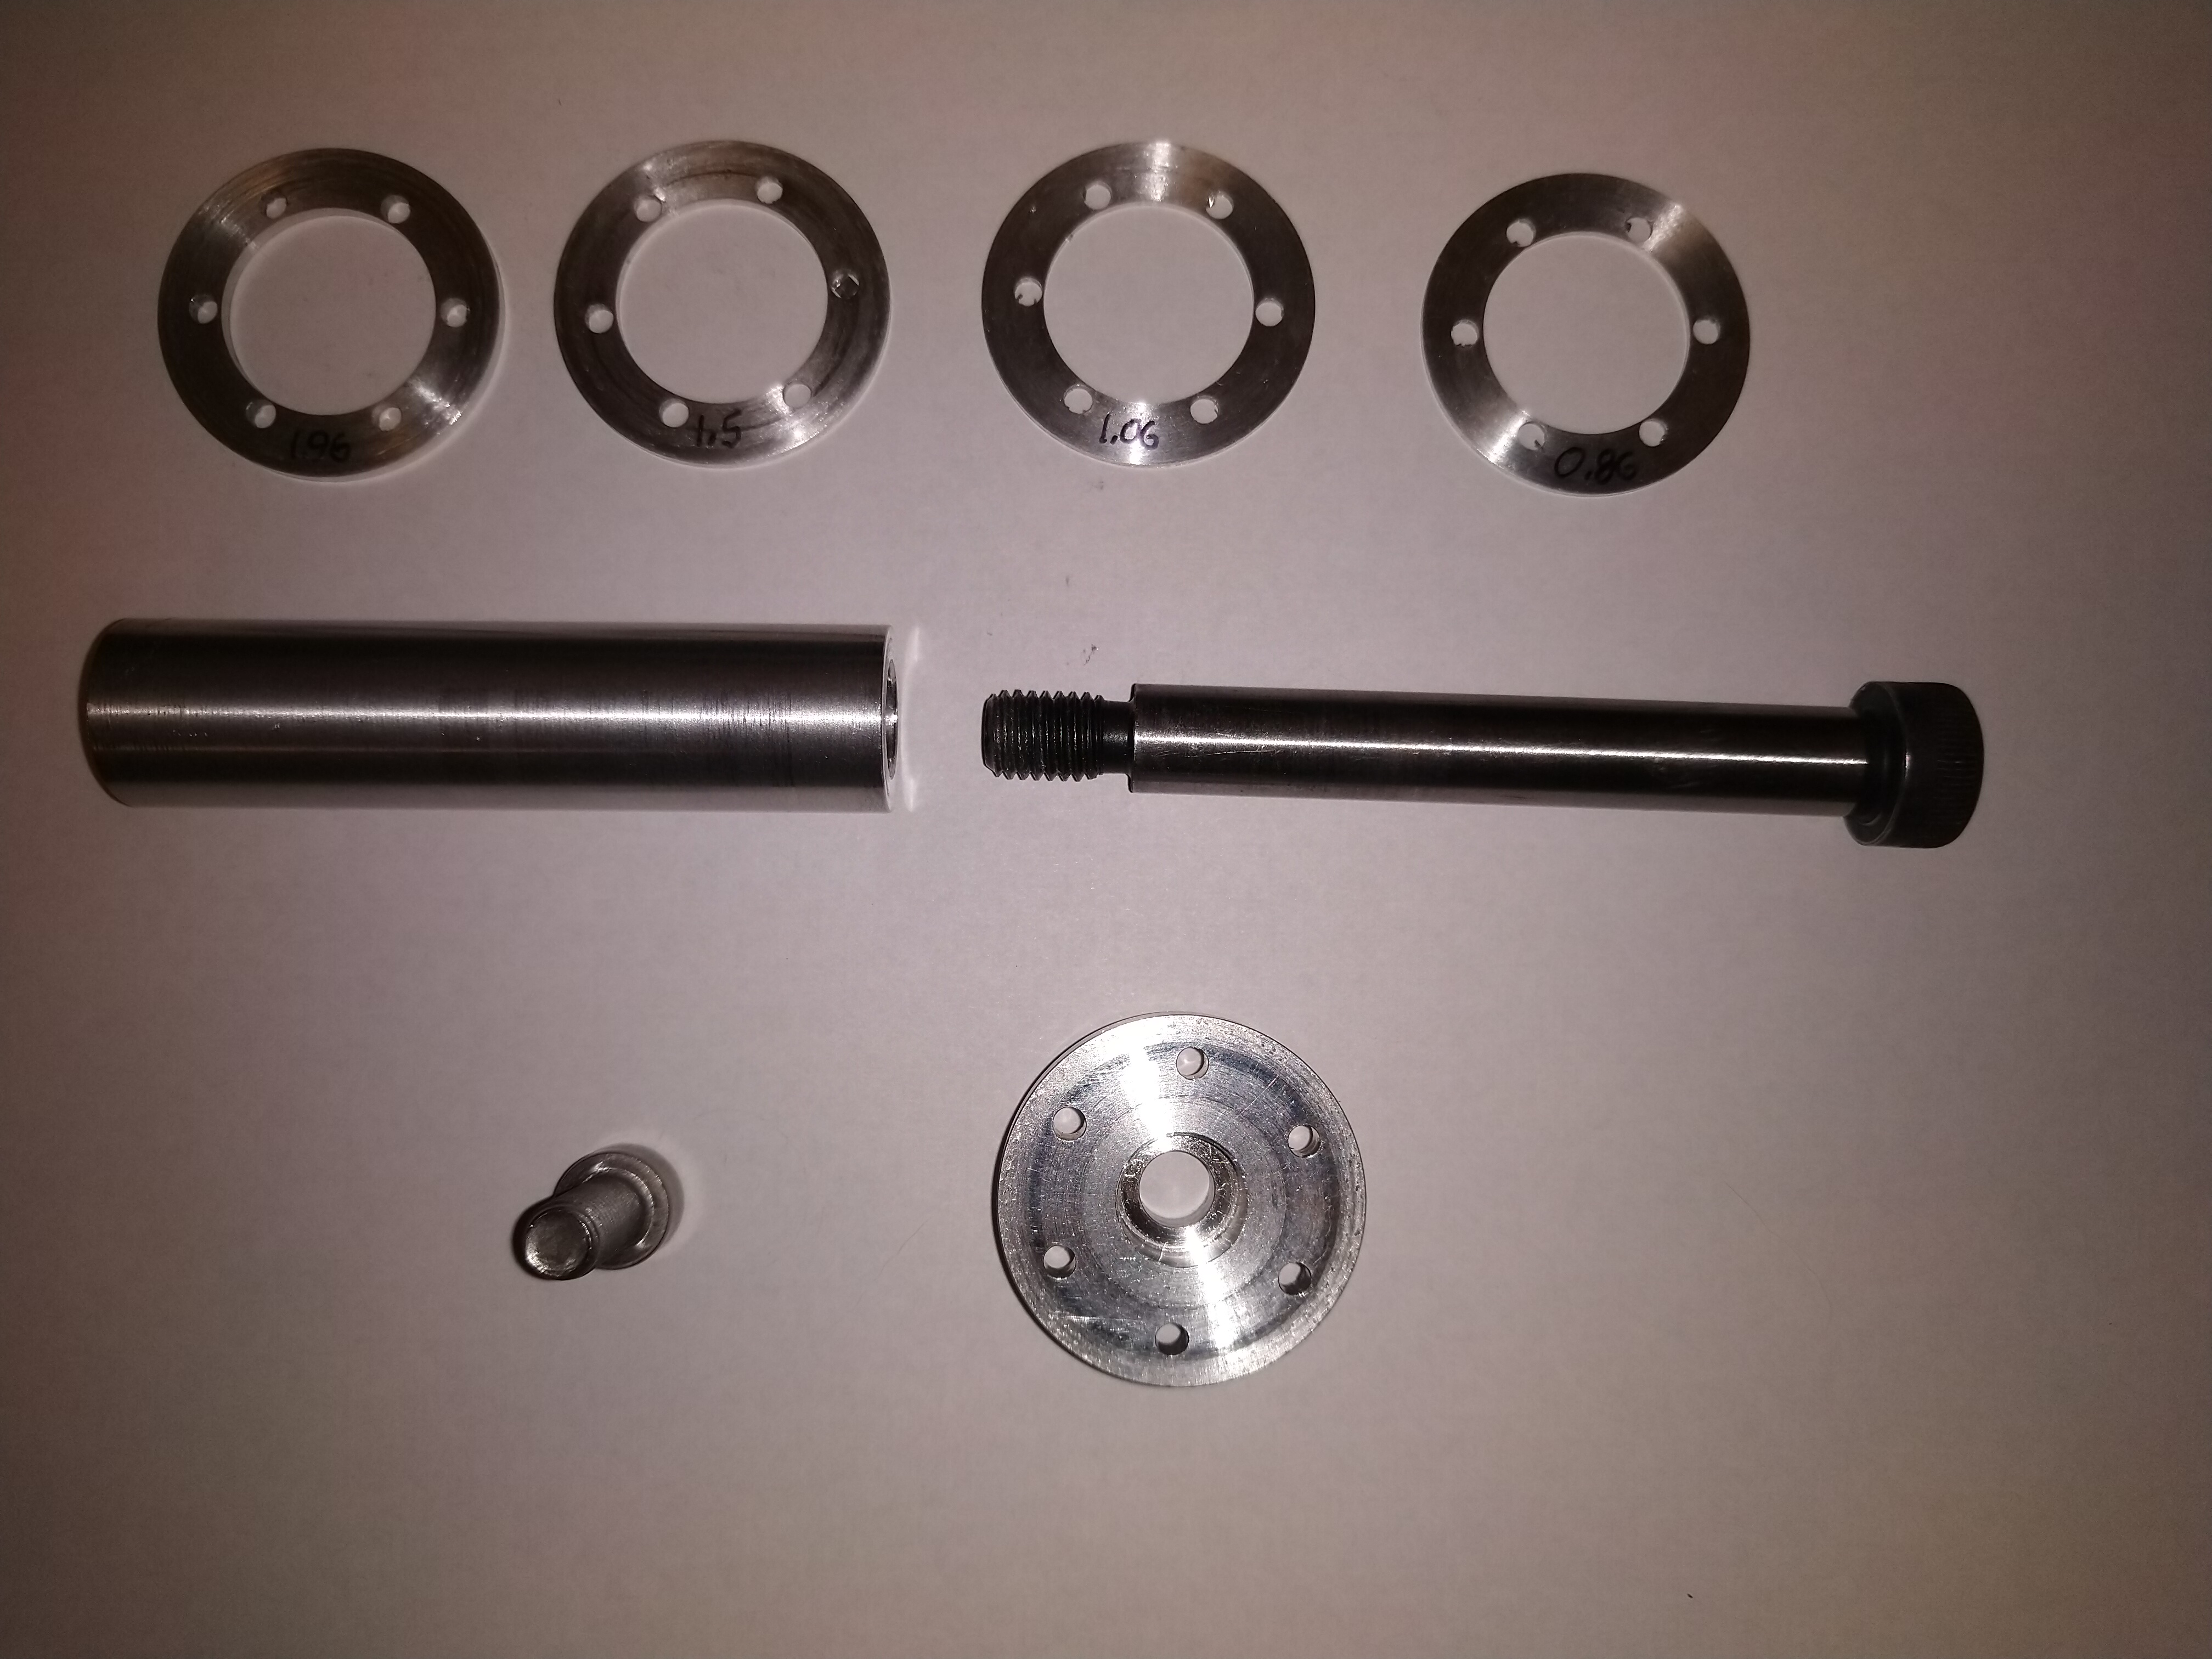
The “we” I’m referring to and the genius in this story is my friend Paul, a consummate tinkerer and fabricator of all things mechanical and electrical. And now Paul had a new project: fabricate a 20mm axle and end cap that allowed this little slide-over maneuver and prevented the hub from sliding outward or (more interestingly) inward. But hey this was a much easier lift than the complete tadpole trike he fabricated from scratch for his first aluminum welding project. Indeed after numerous Signal calls and mailings of parts back and forth (Paul lives about a thousand miles away) I had a perfectly milled 20mm axle and end cap in hand. This turned out to be the easy part…
Grin hub in position with 10mm overlap over kingpost shoulder20mm axle, axle bolt for kingpost, endcap and bolt, some shims used to figure out exact length needed for axle
Tortuous torque arm
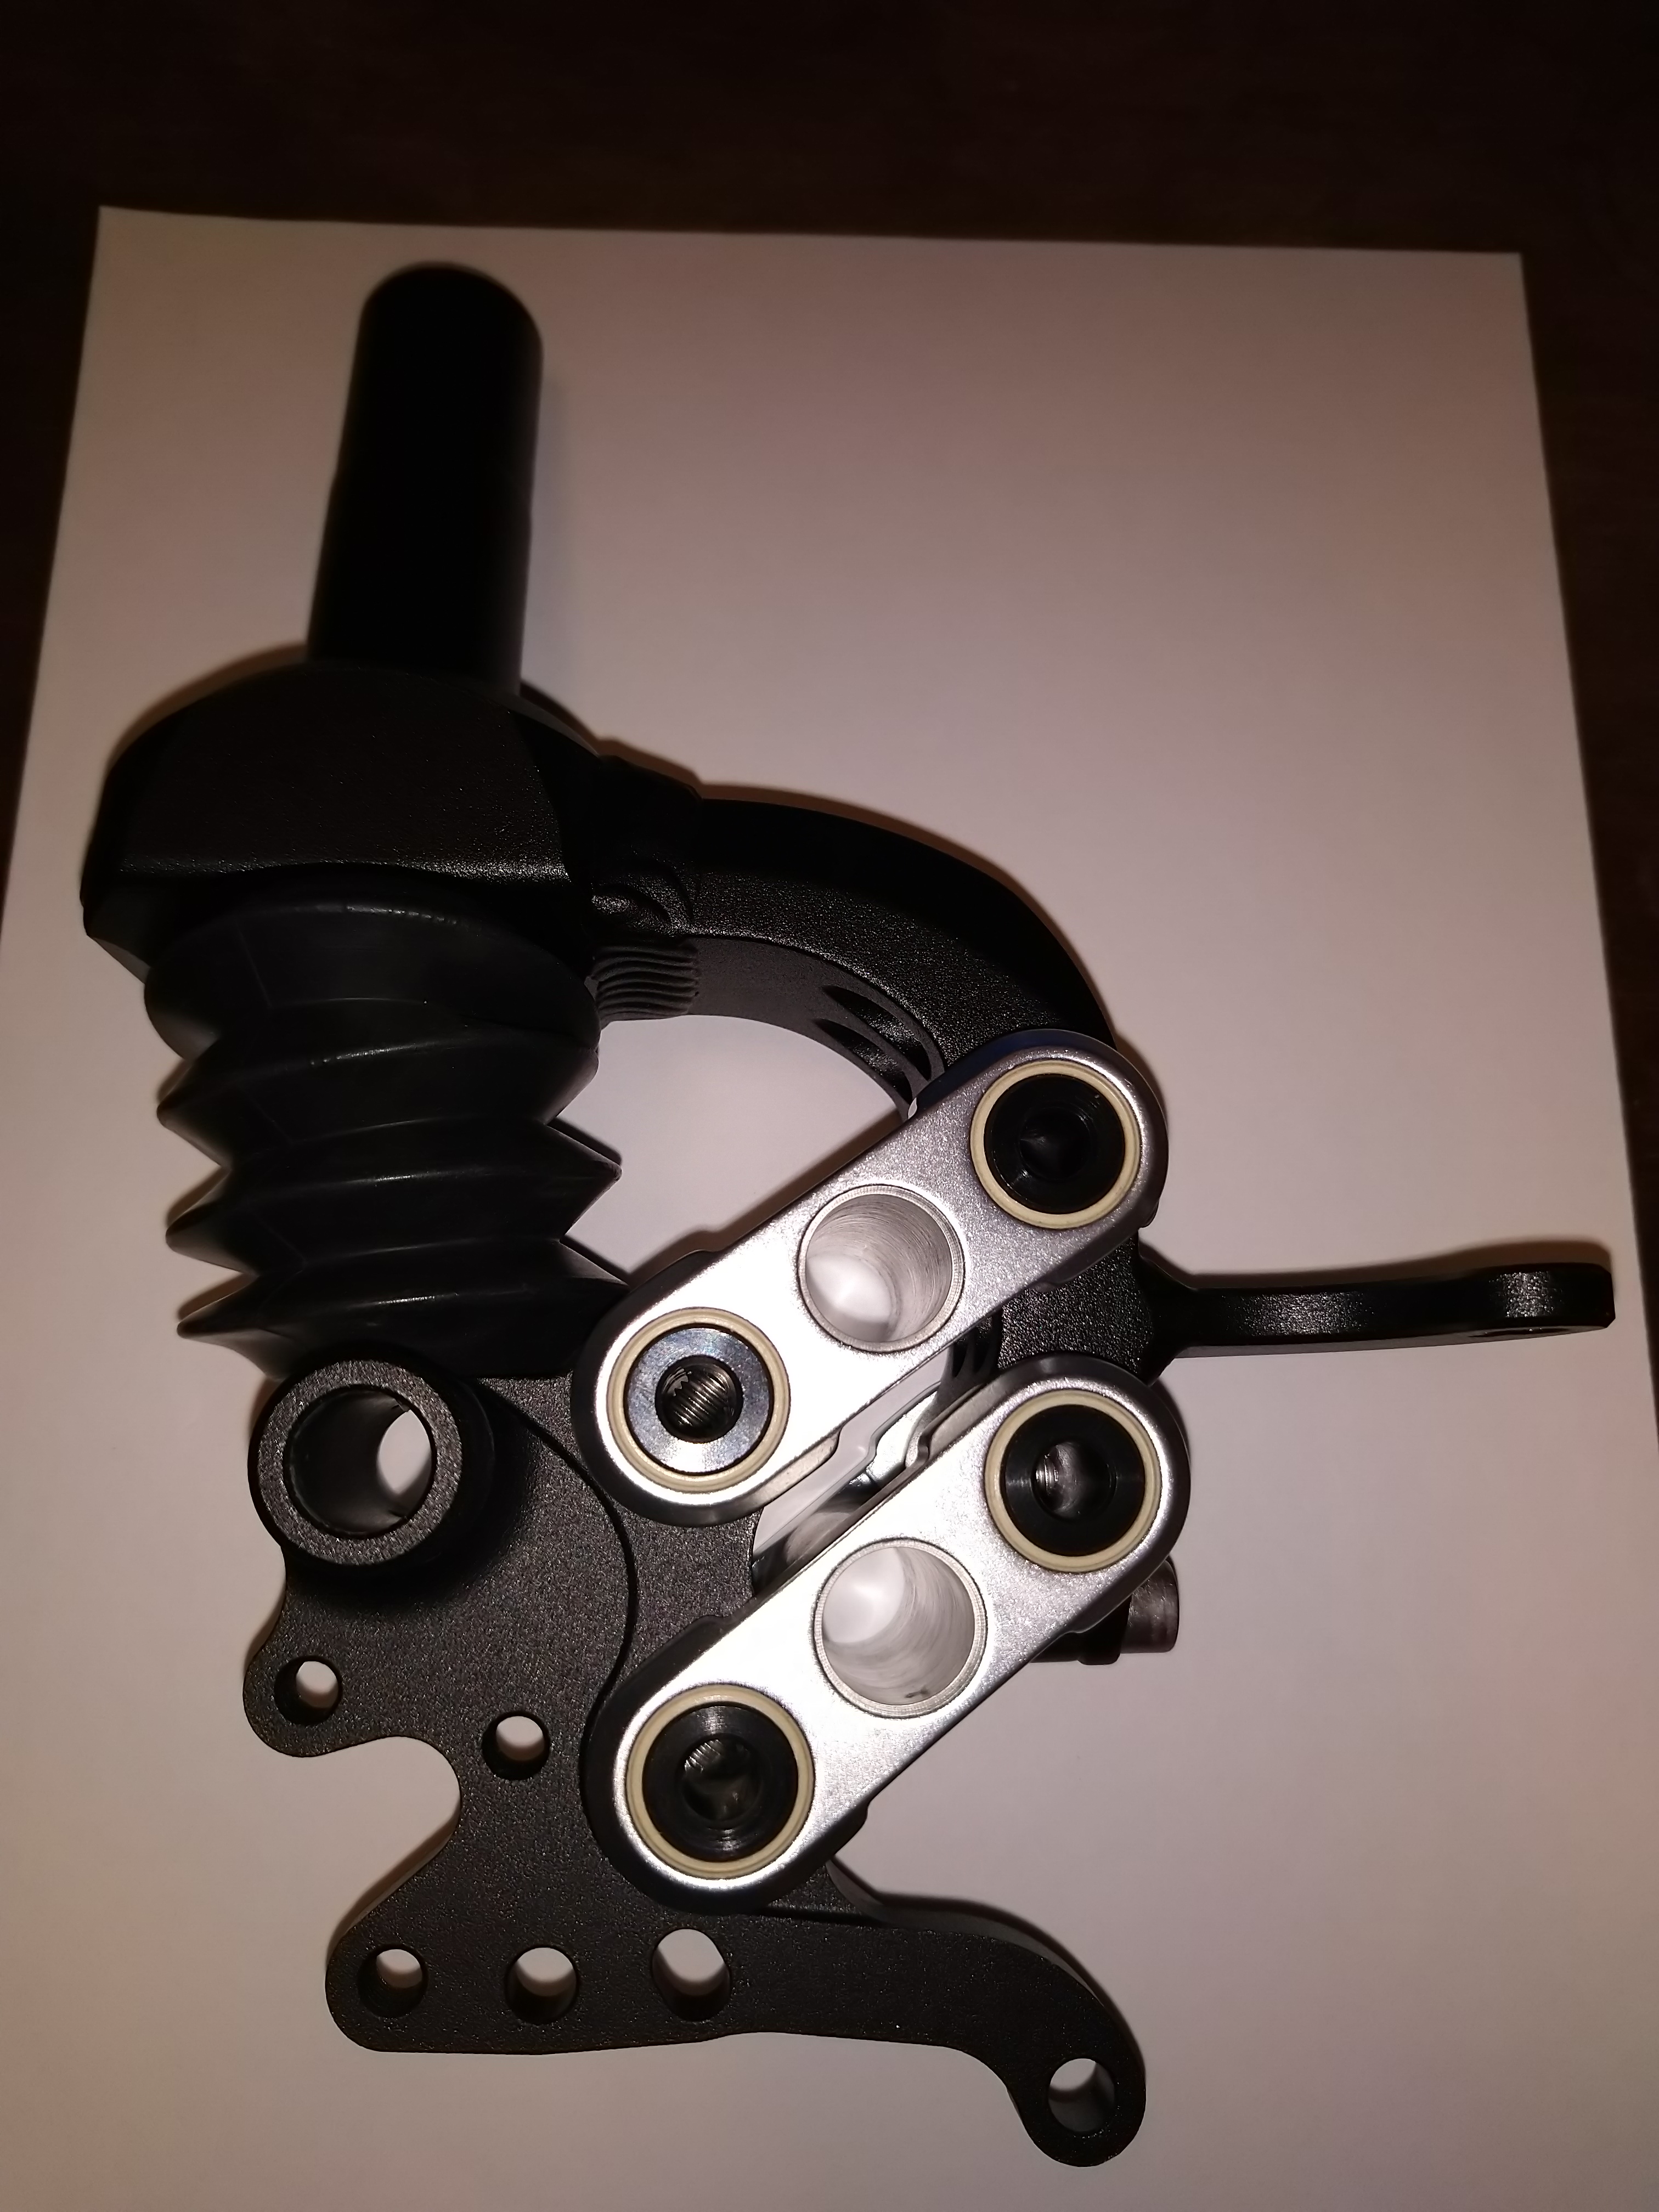
…now for the hard part. A drive hub needs a mechanism to prevent the stationary portion of the hub from rotating when power is applied. I ordered the Greenspeed Single-Side Adapter from Grin because it looked closest to what I’d need and they didn’t yet offer an ICE adapter. Maybe I’d get lucky and it would just work. I wasn’t lucky.
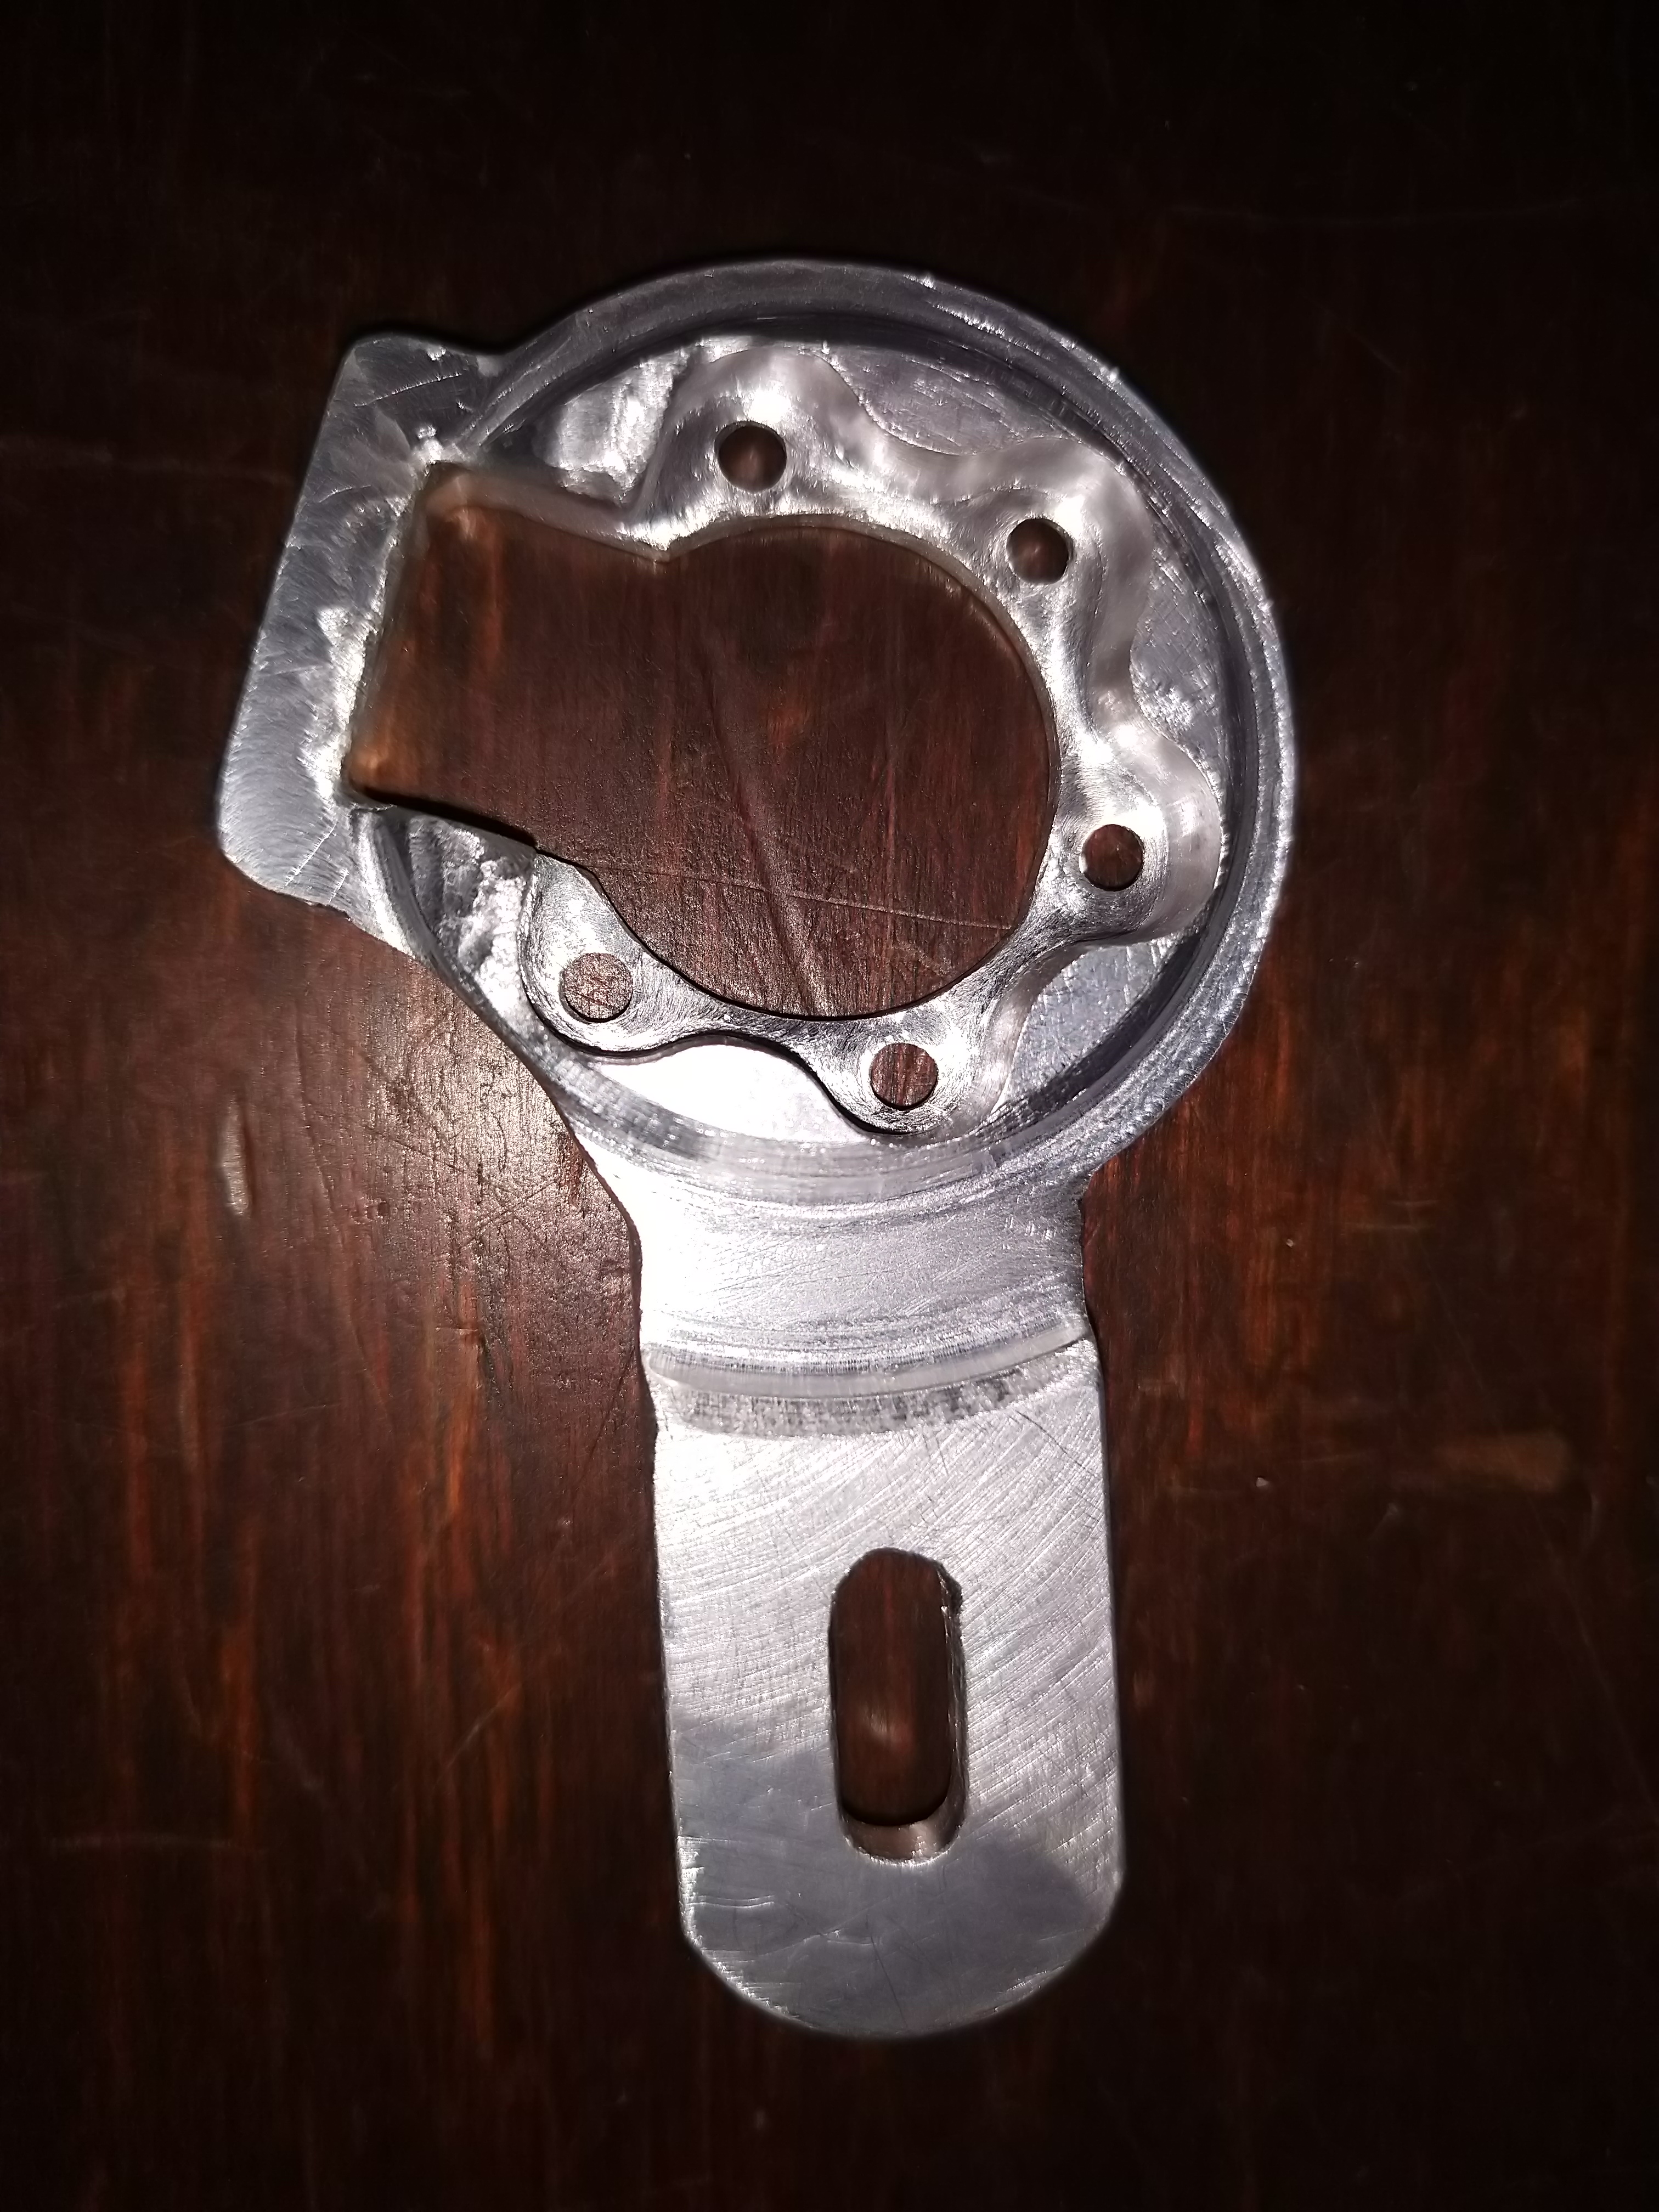
Grin adapter w/ custom plate and cutout to clear kingpost suspension
The Greenspeed adapter is built on Grin’s universal adapter that includes a machined aluminum part that mates to the spline of the hub, allowing us to remove the attached metal plate that picks up the caliper mount of a Greenspeed brake and replace it with our own plate that picks up the ICE caliper mount. However reaching the ICE brake mount would have required a decidedly long and unwieldy plate that wrapped most of the way around the hub to reach its attachment point. Instead we decided to pick up a pivot point for the kingpost suspension which was closer but still a long way from where the connection to the adapter needed to be. We could do better.
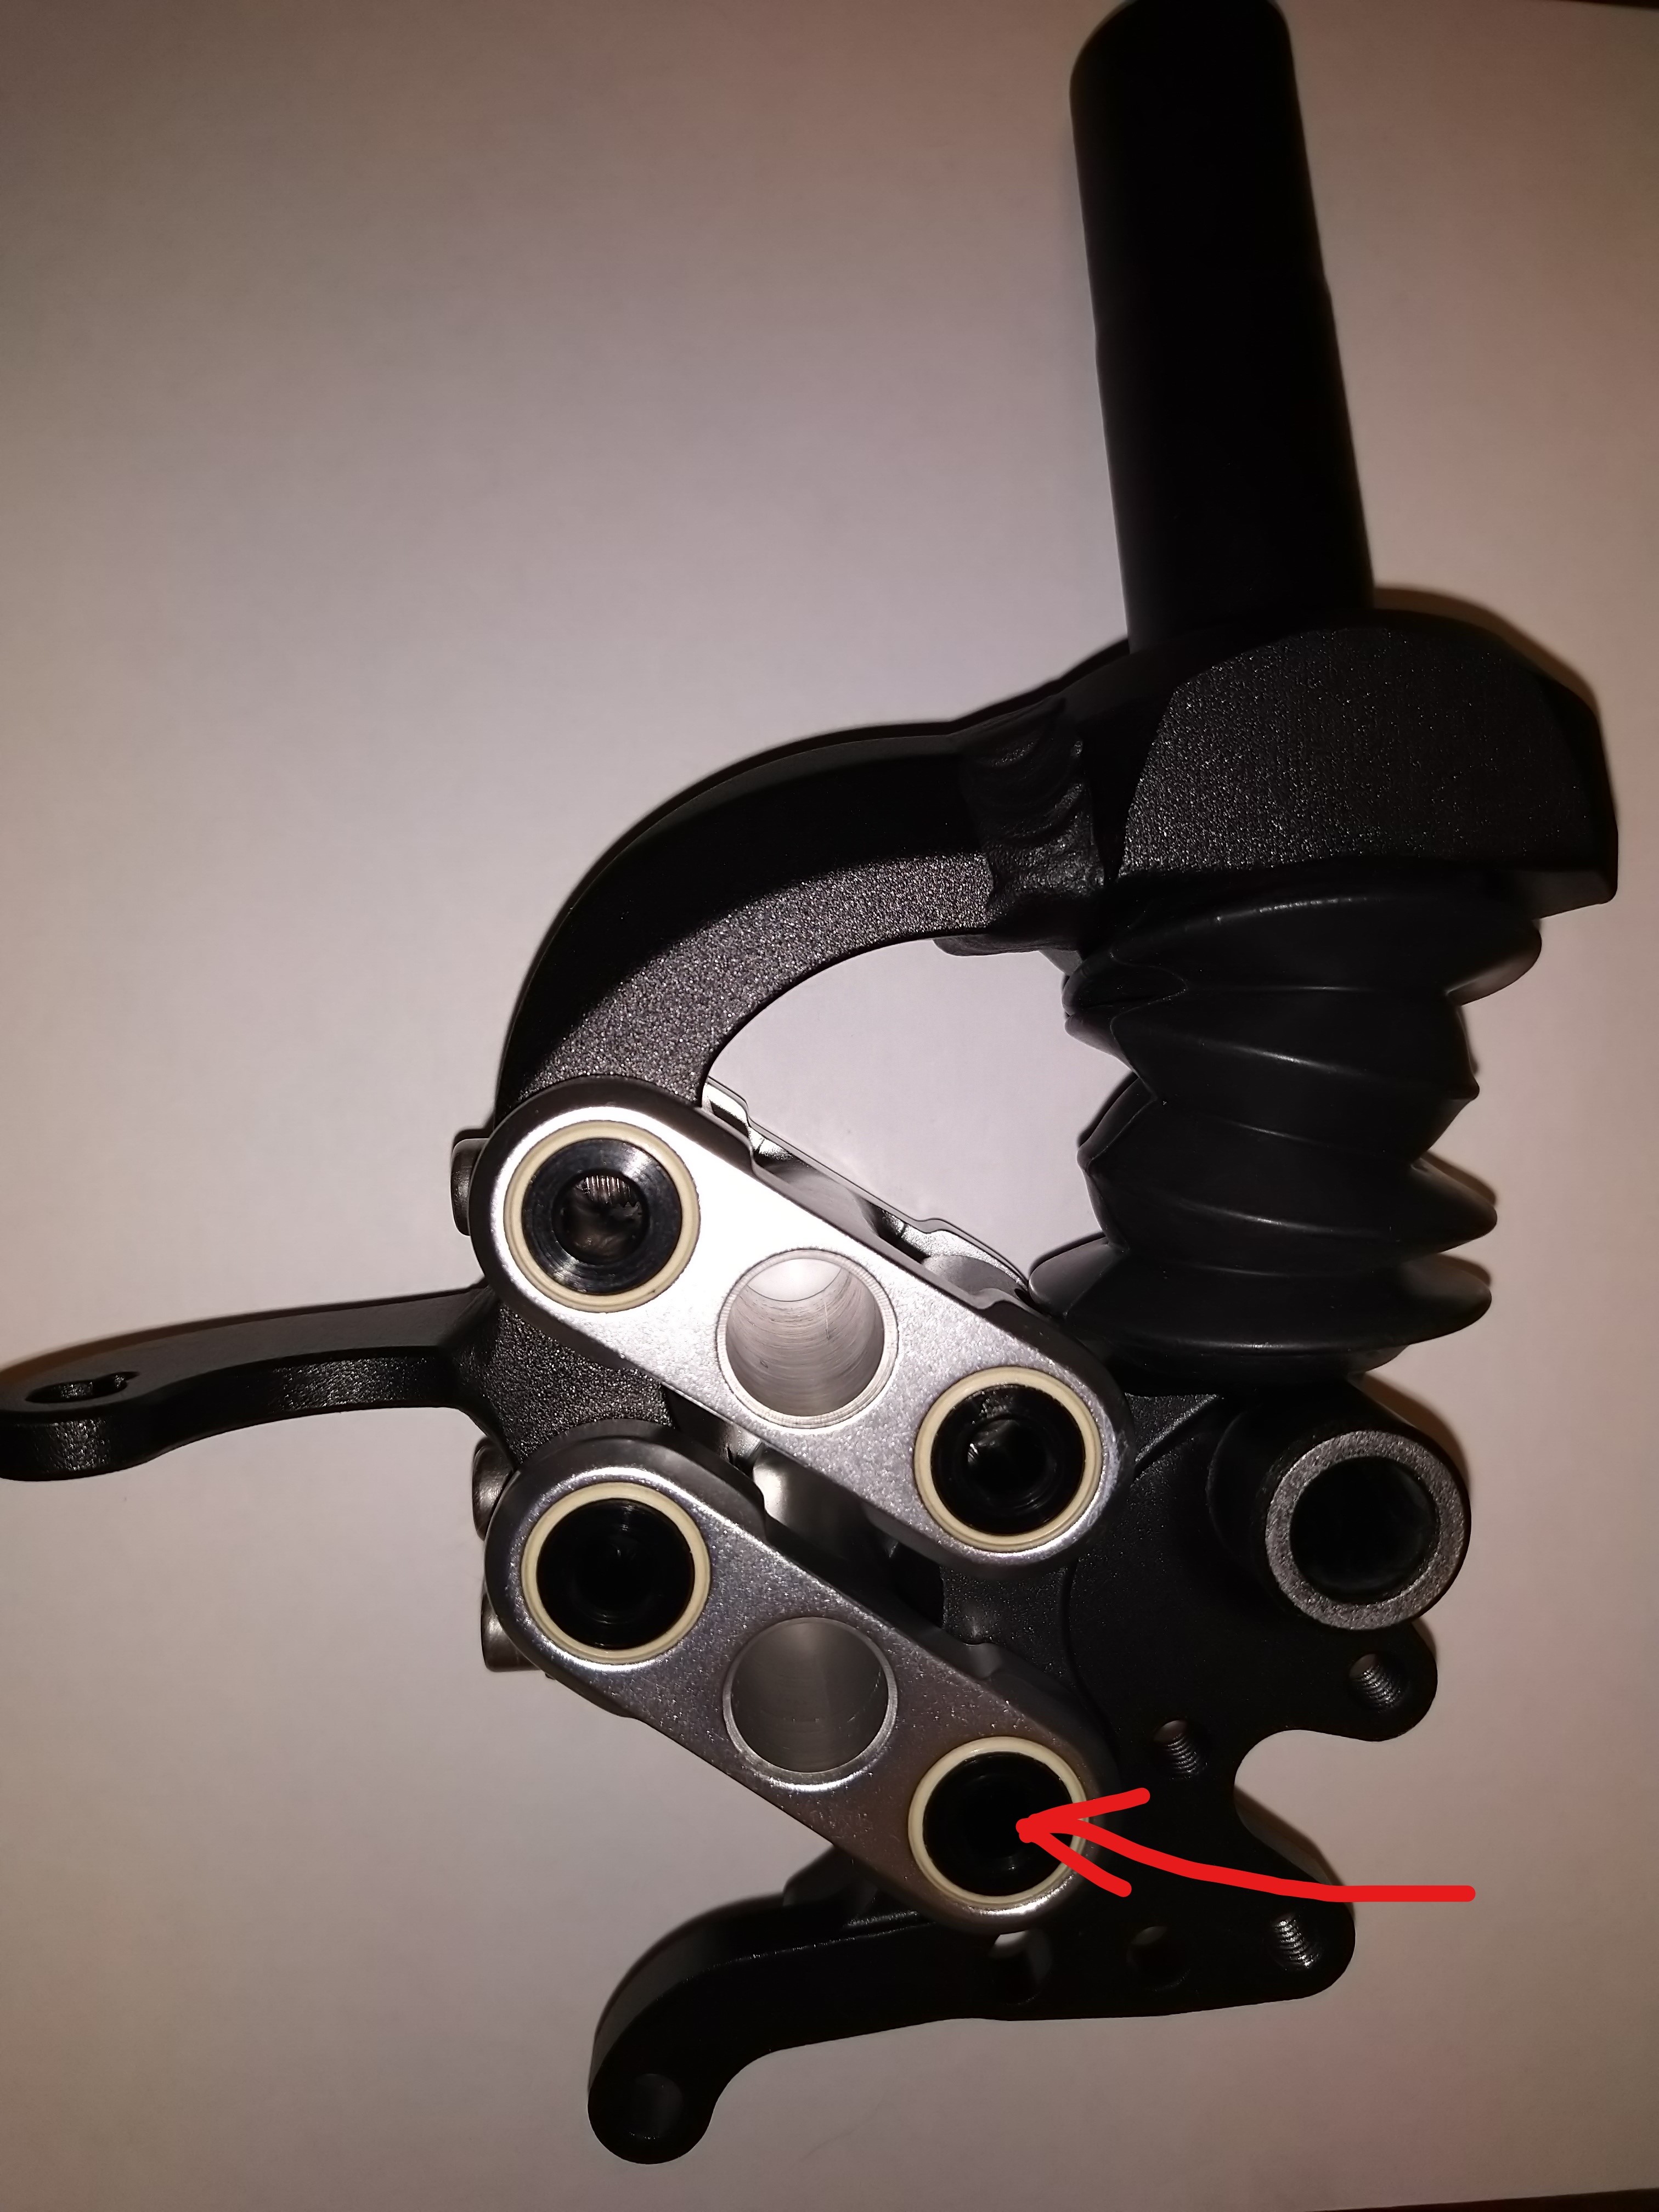
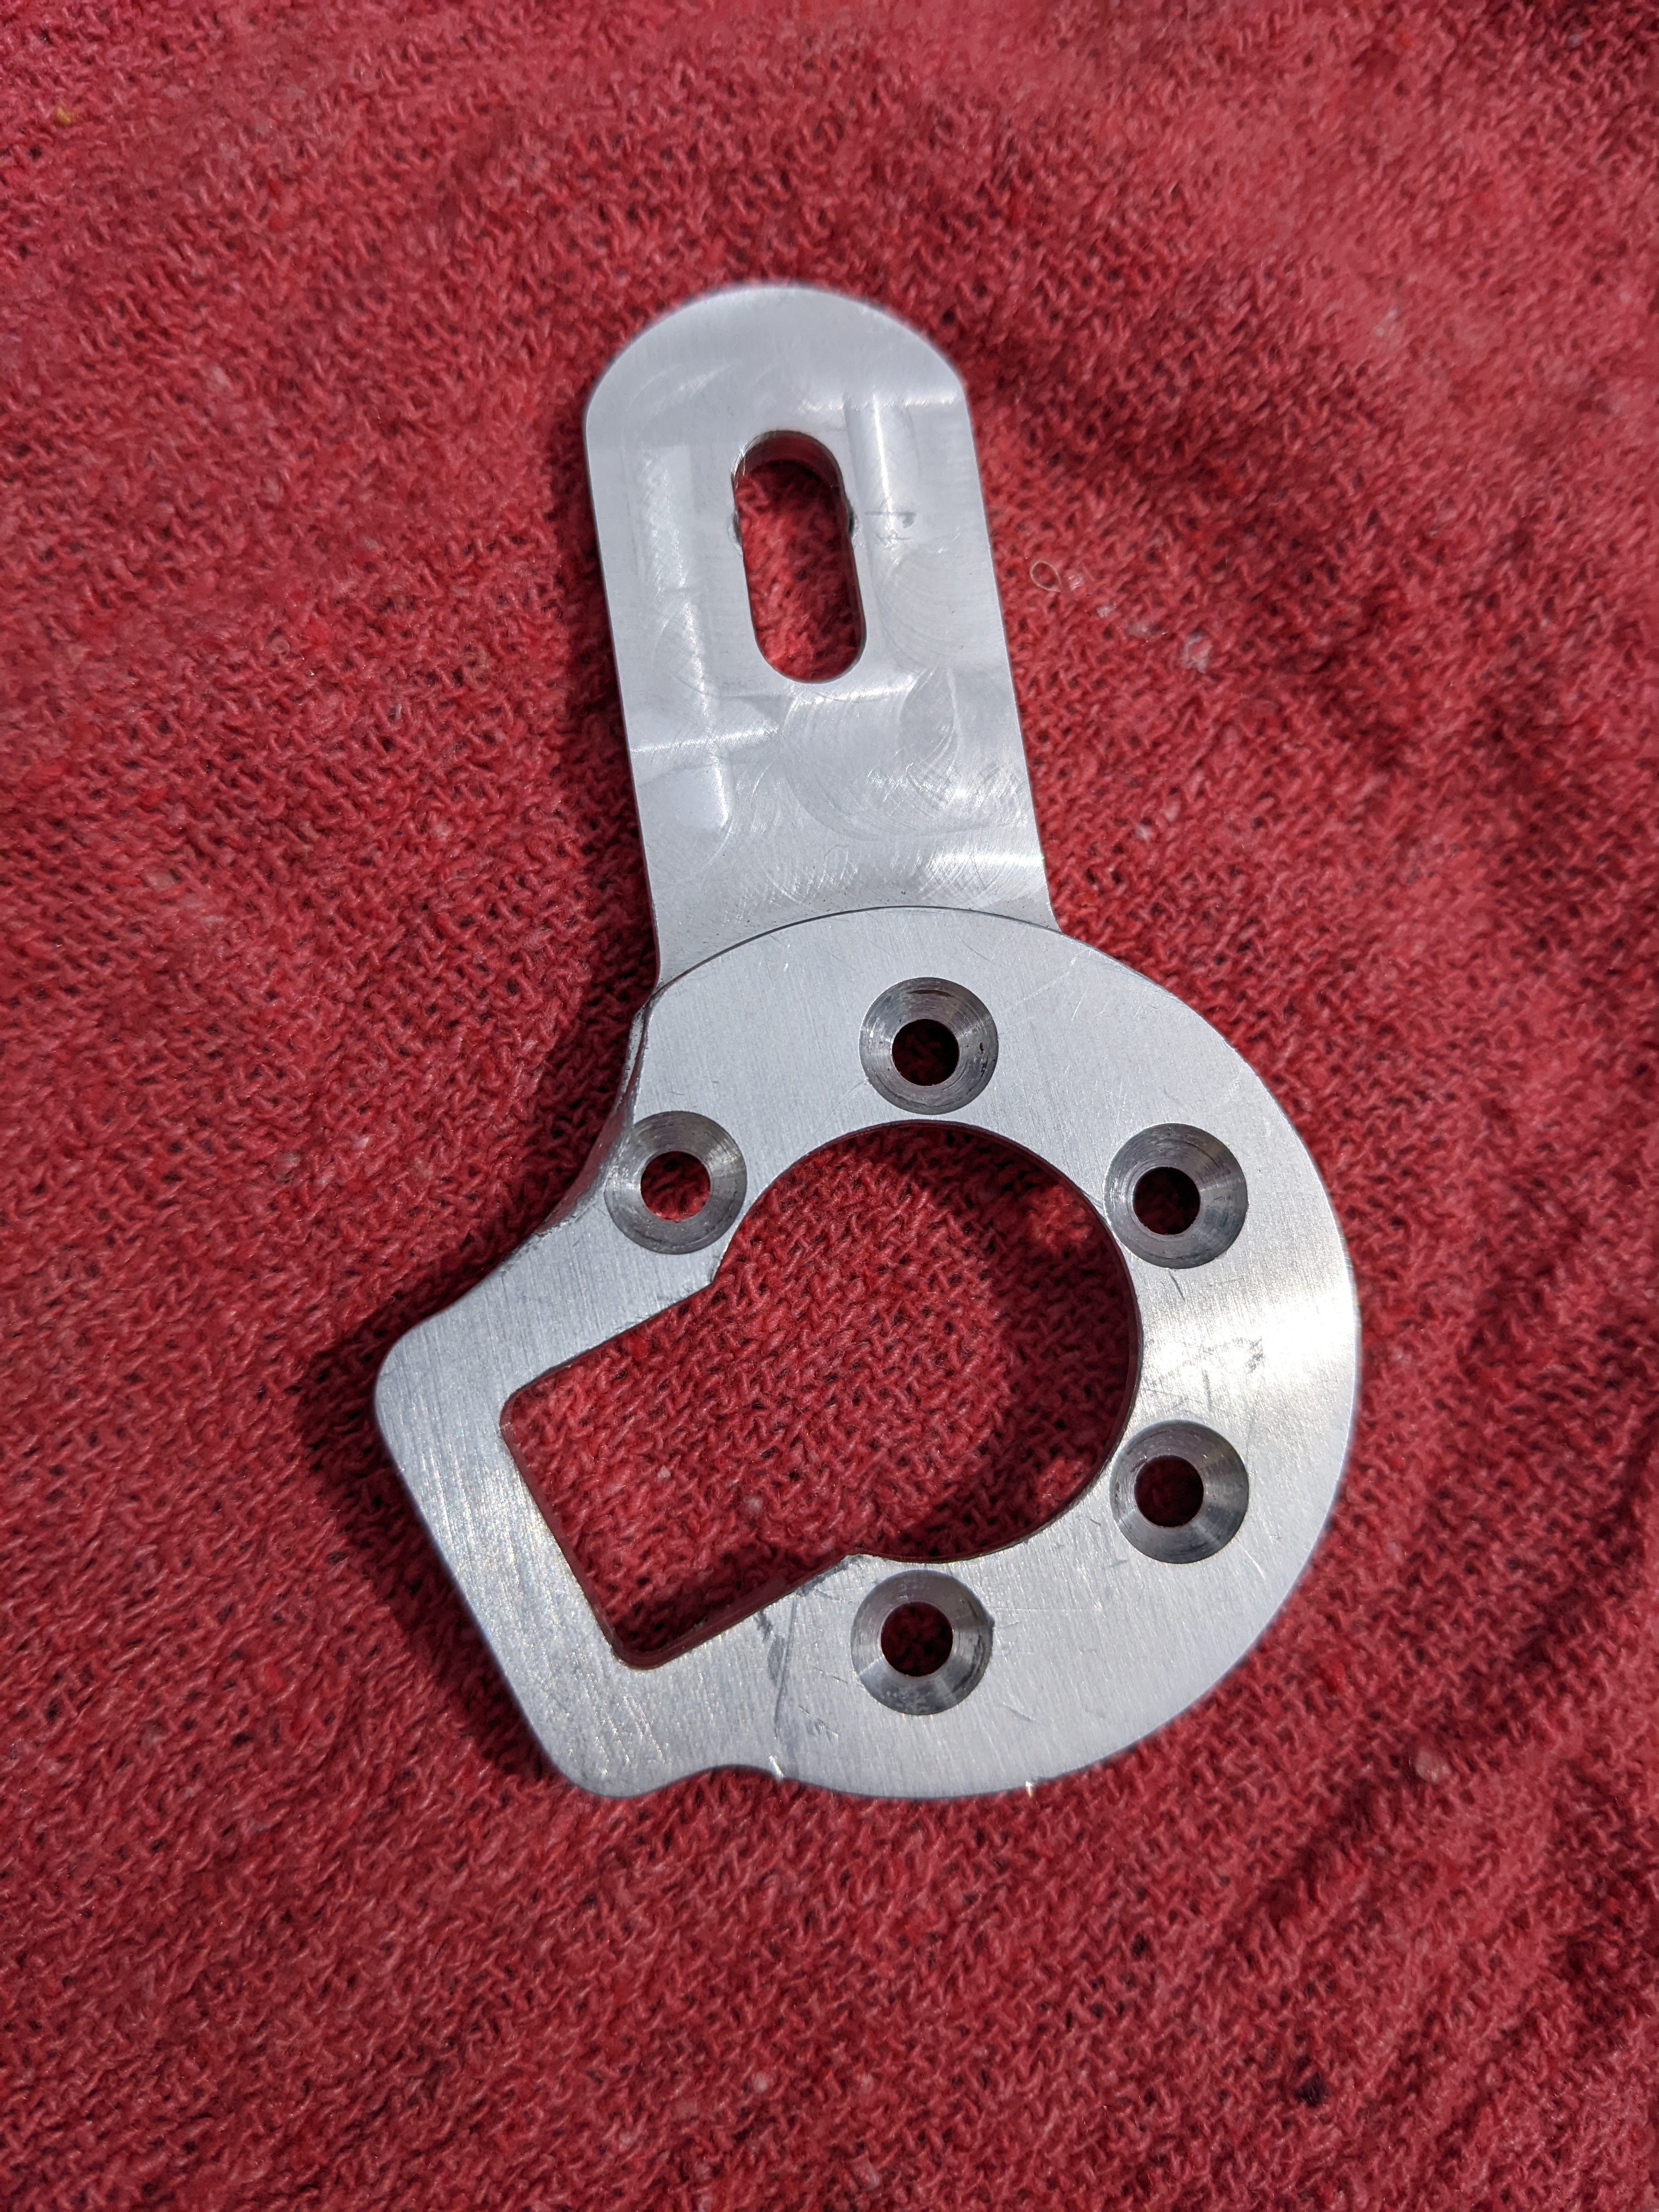
I contacted Grin and they graciously offered up the mechanical drawing for the spline assembly of their universal single-side adapter. We’d make our own! Oh the folly of engineers with a CNC machine. The idea was to mill an adapter that picked up that same suspension pivot point much more directly than our attempt with the universal adapter. The result would be a compact torque arm that was more solid and aesthetic. Yeah I said it, more aesthetic.
Pivot point where we installed a stainless steel pin
Now Paul had a new, humdinger of a project. Build up a 3D model in Freecad of our own adapter design from the dimensions on Grin’s adapter drawing, use that to program his CNC machine, and pop out a perfectly milled custom torque arm. What could be easier.
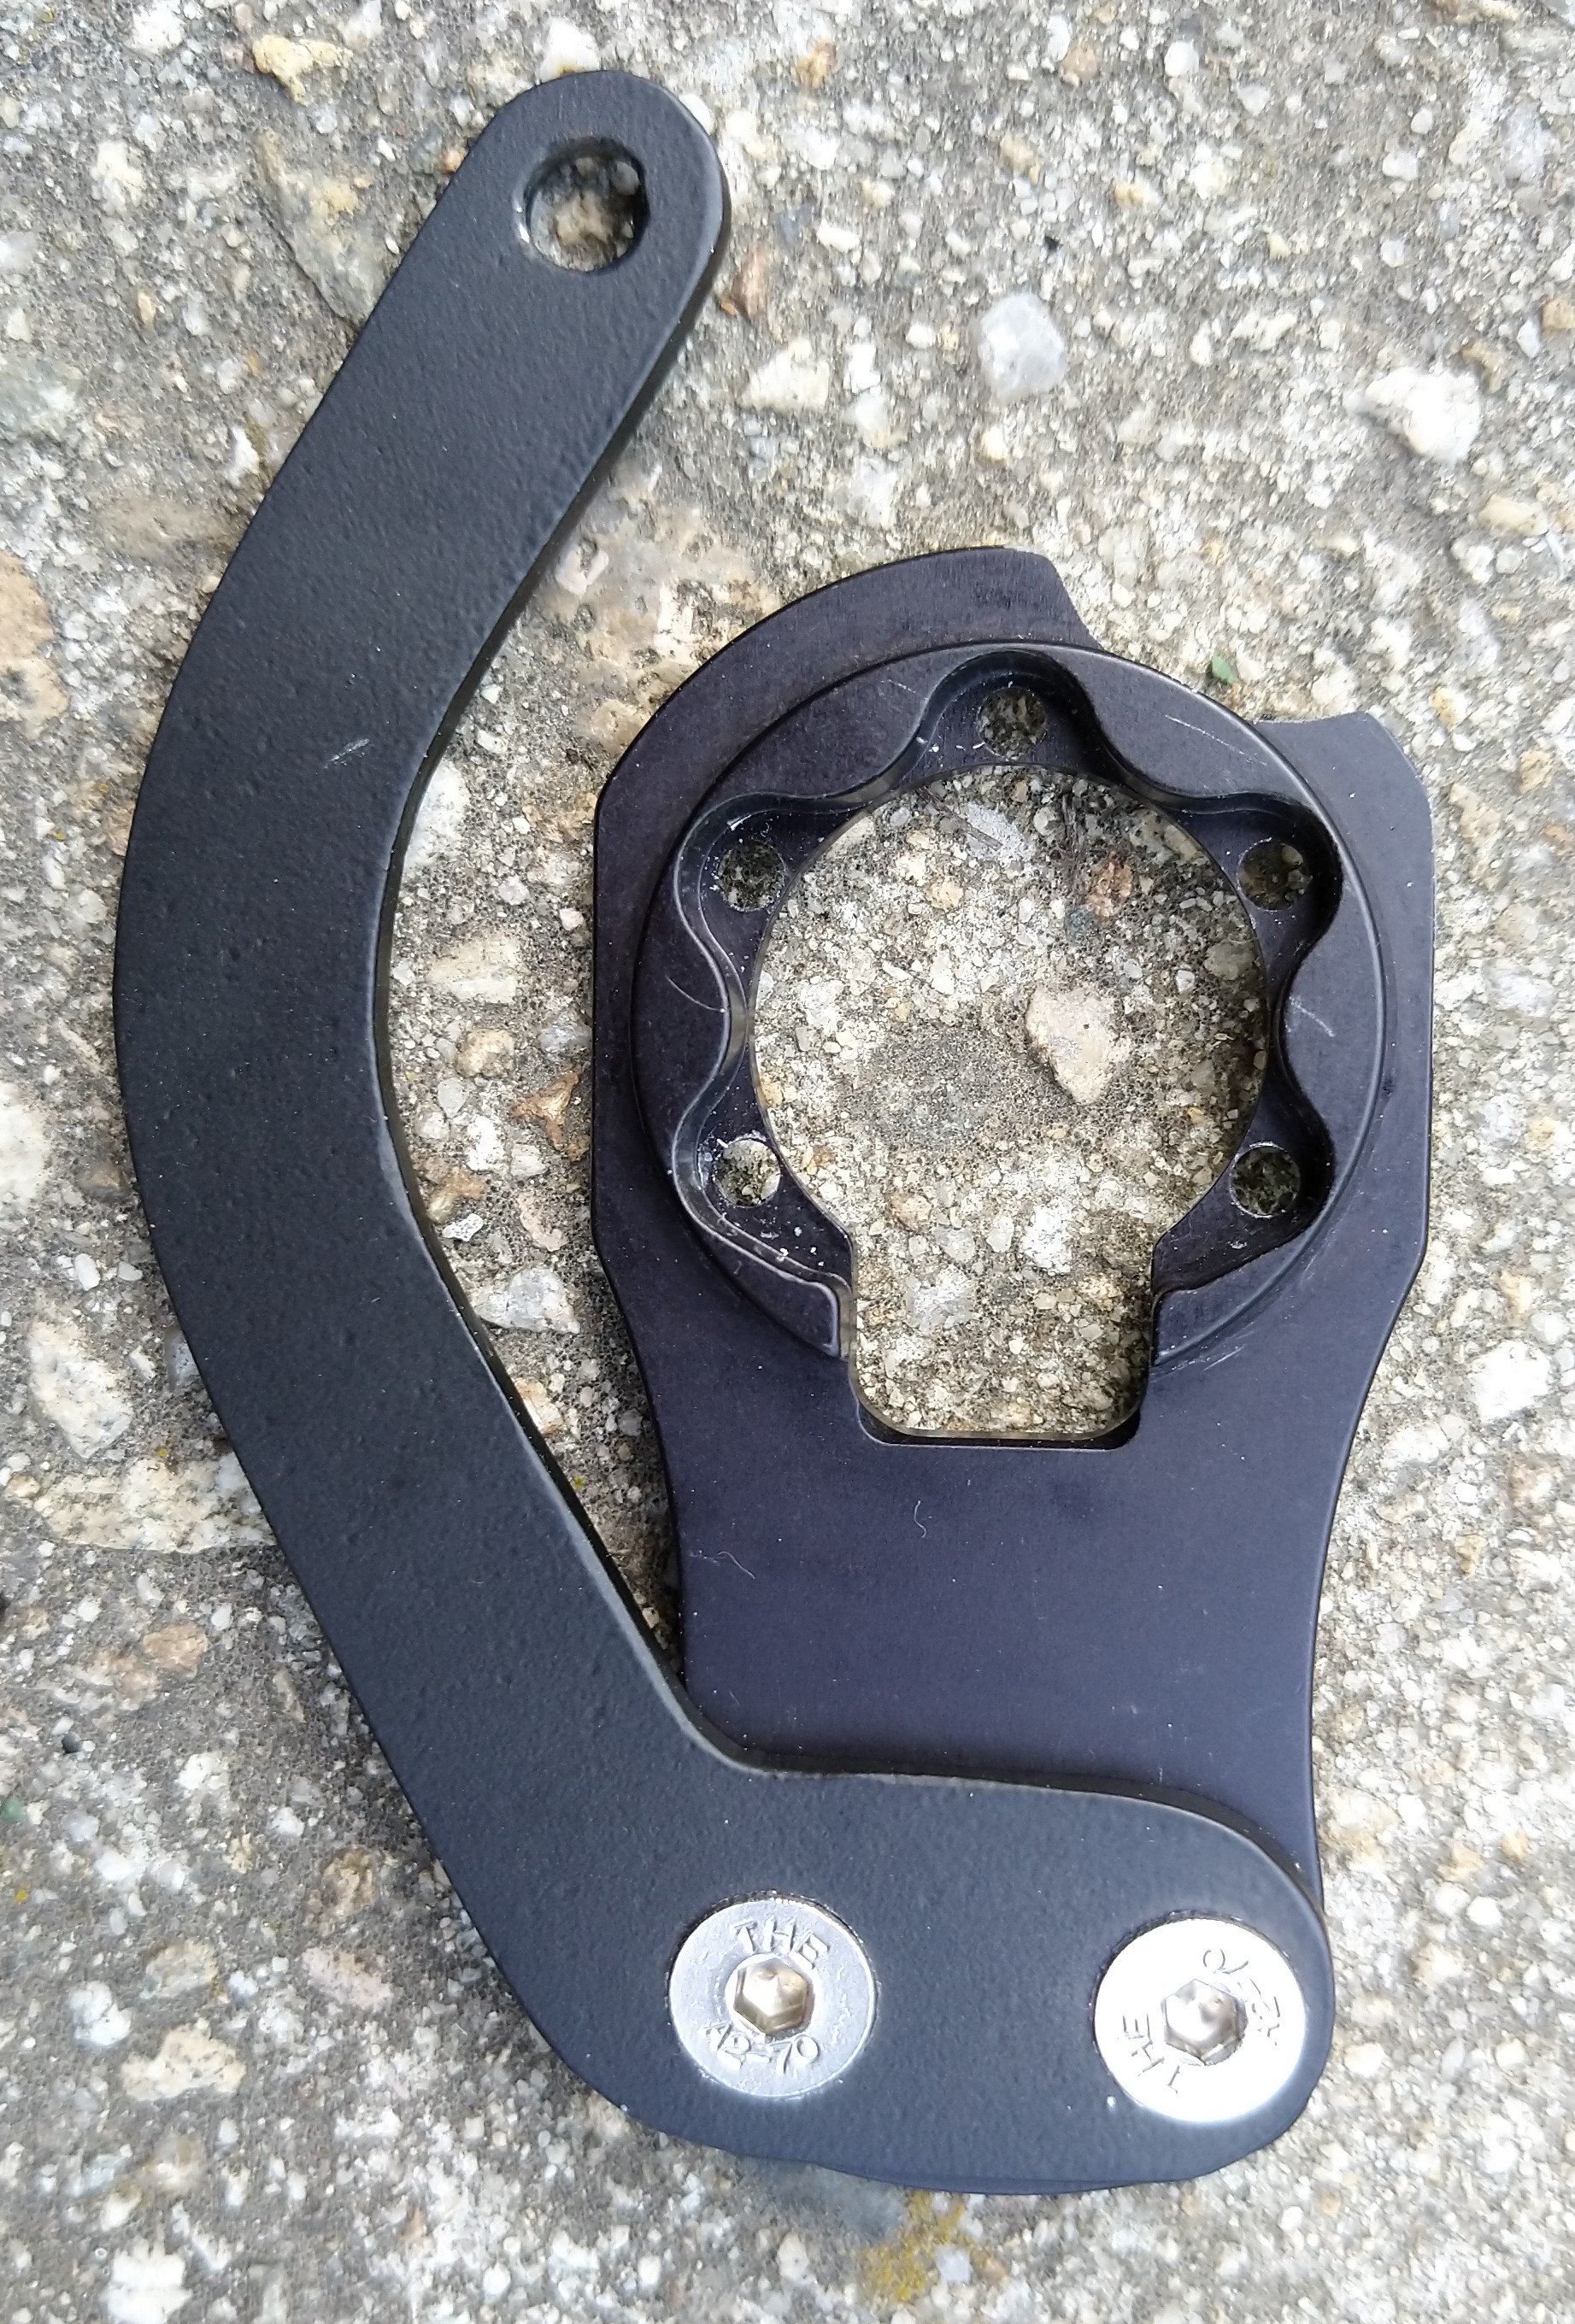
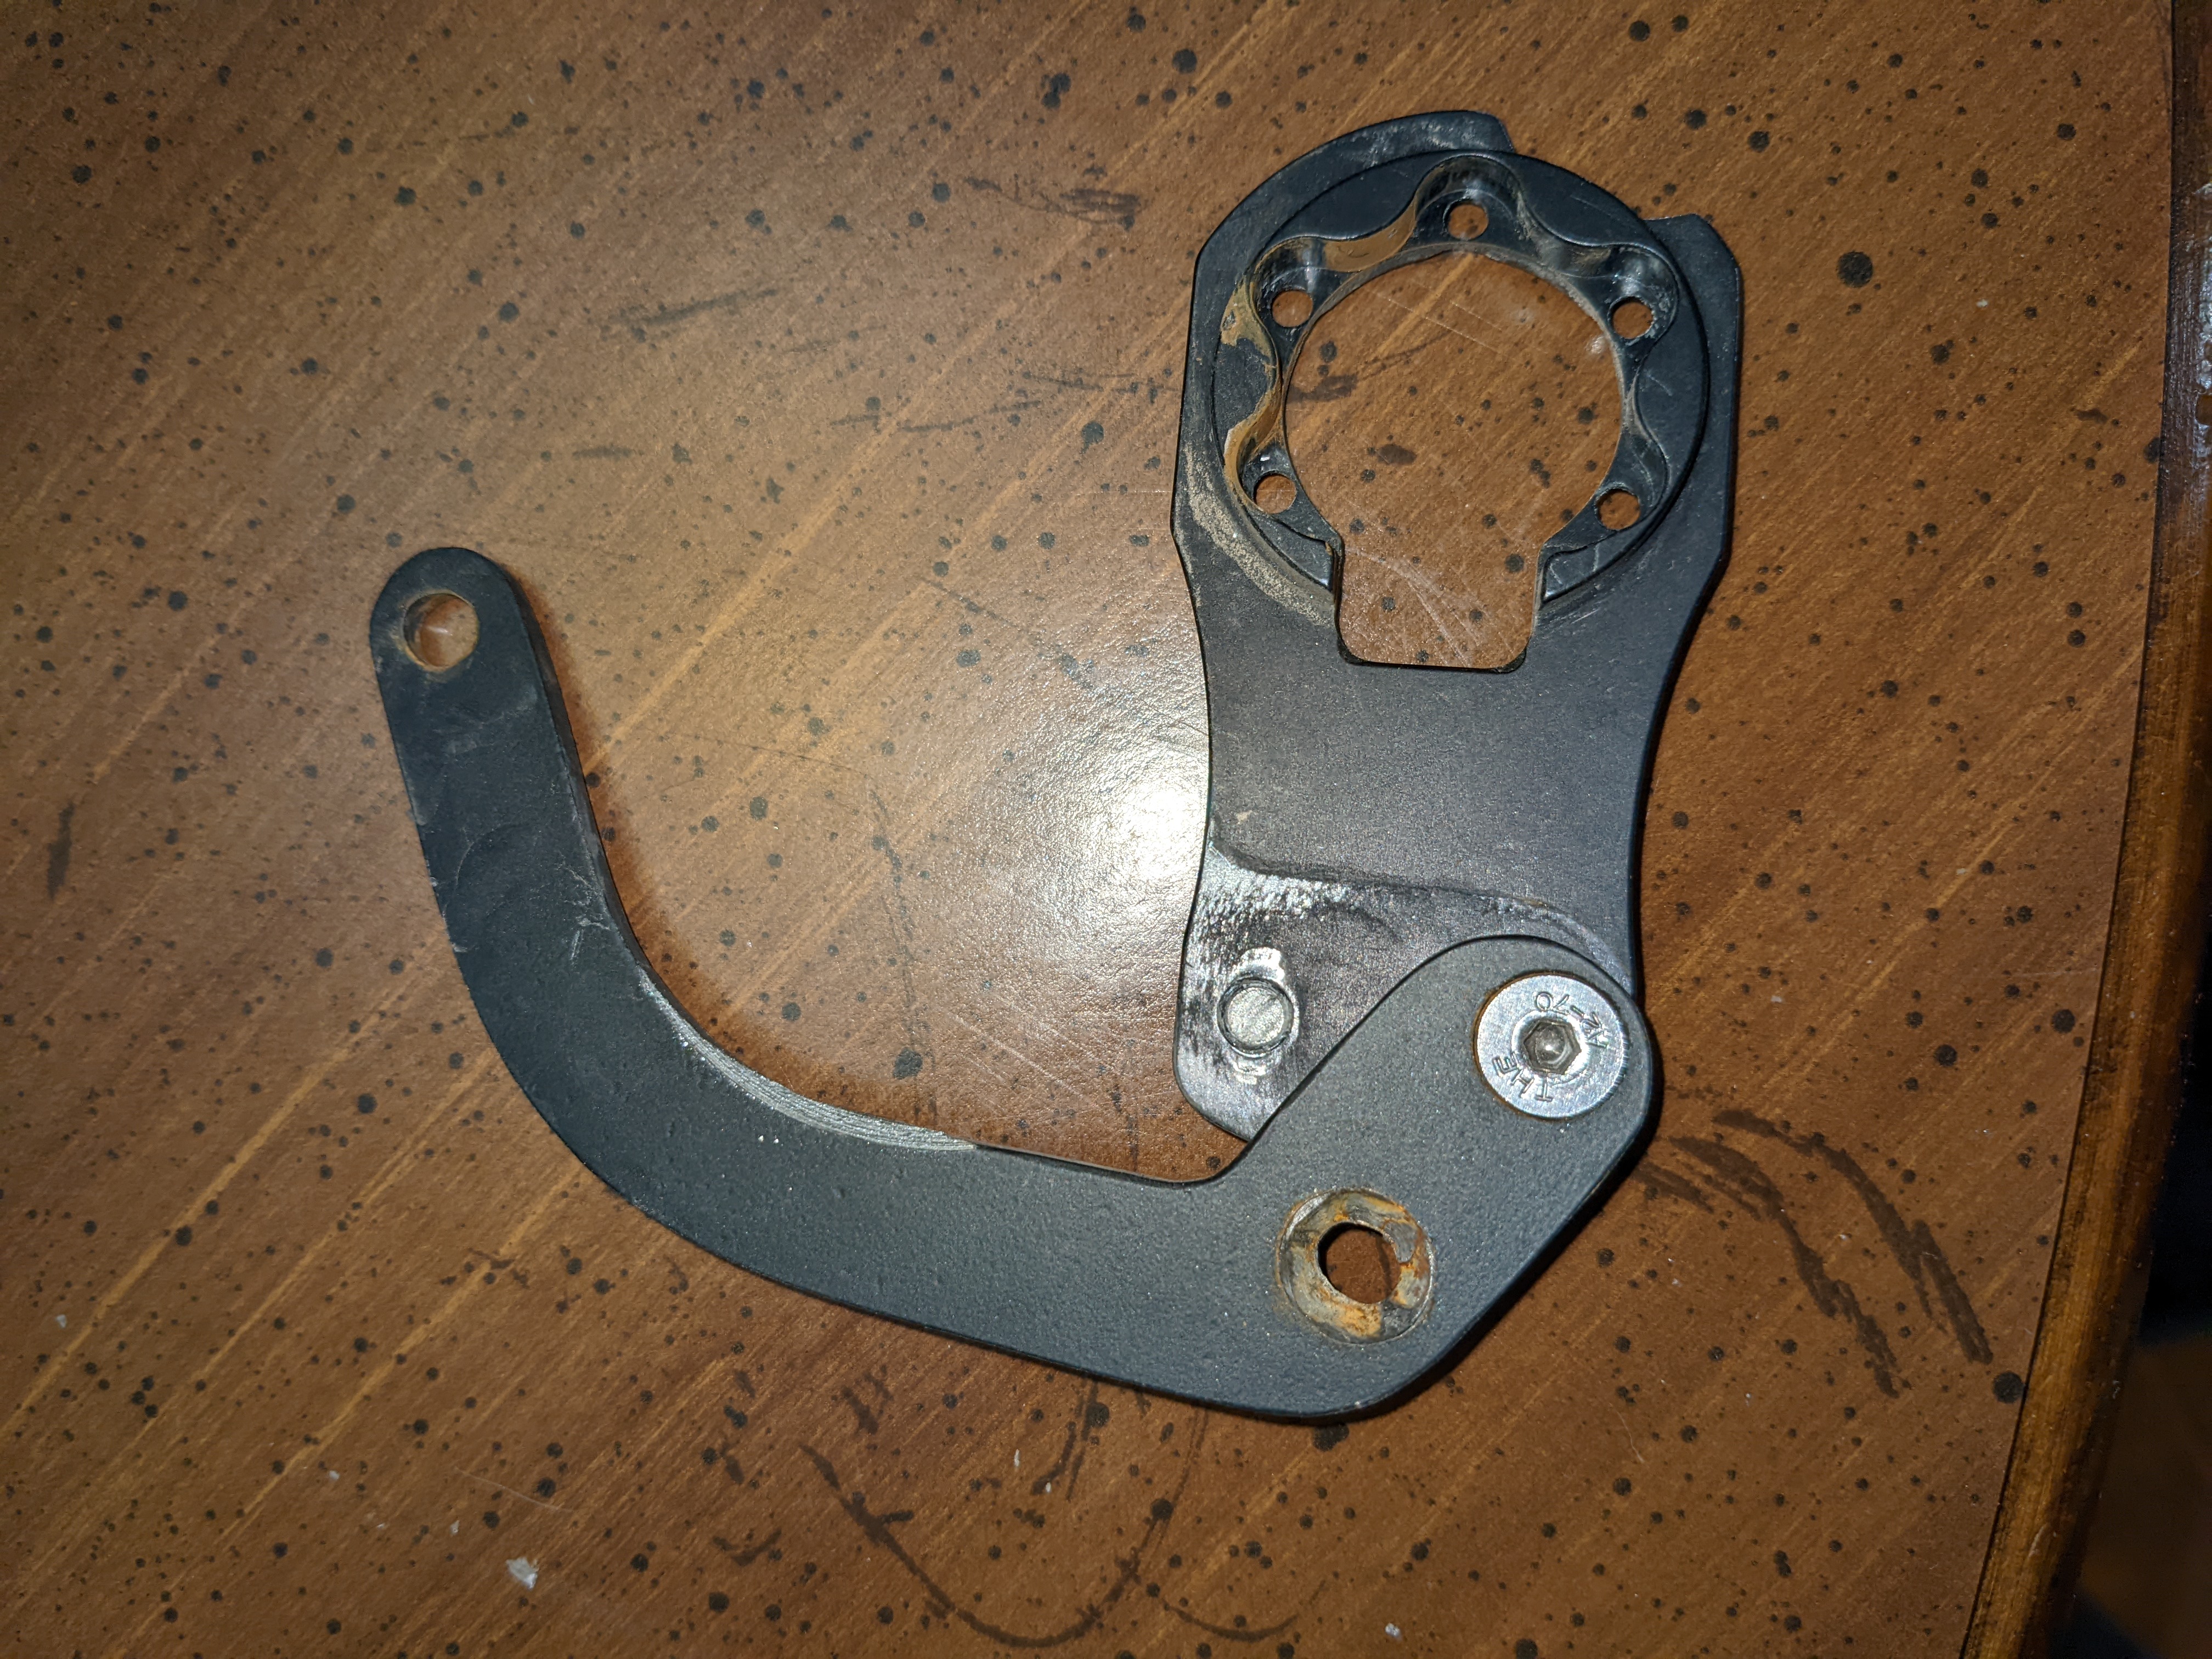
After months of Signal calls, more mailings back and forth, and prototypes first in wood and then aluminum, we couldn’t crack the code for the spline. Curse you crafty Grinners! The spline pattern always came out just a little too small or with some infinitely small misalignment at some location that we could never quite identify. Could have been due to some alignment issues with Paul’s CNC setup, incorrect Freecad dimensions, or some combination of both. I took a file to our final attempt; it was so close! After a whole lot more filing than expected I finally got the adapter to mate to the hub. But my ham-handed filing introduced a bunch of slop; it felt like the adapter would wind up harming the splines on the hub after a bunch of acceleration/deceleration cycles.
Our final attempt
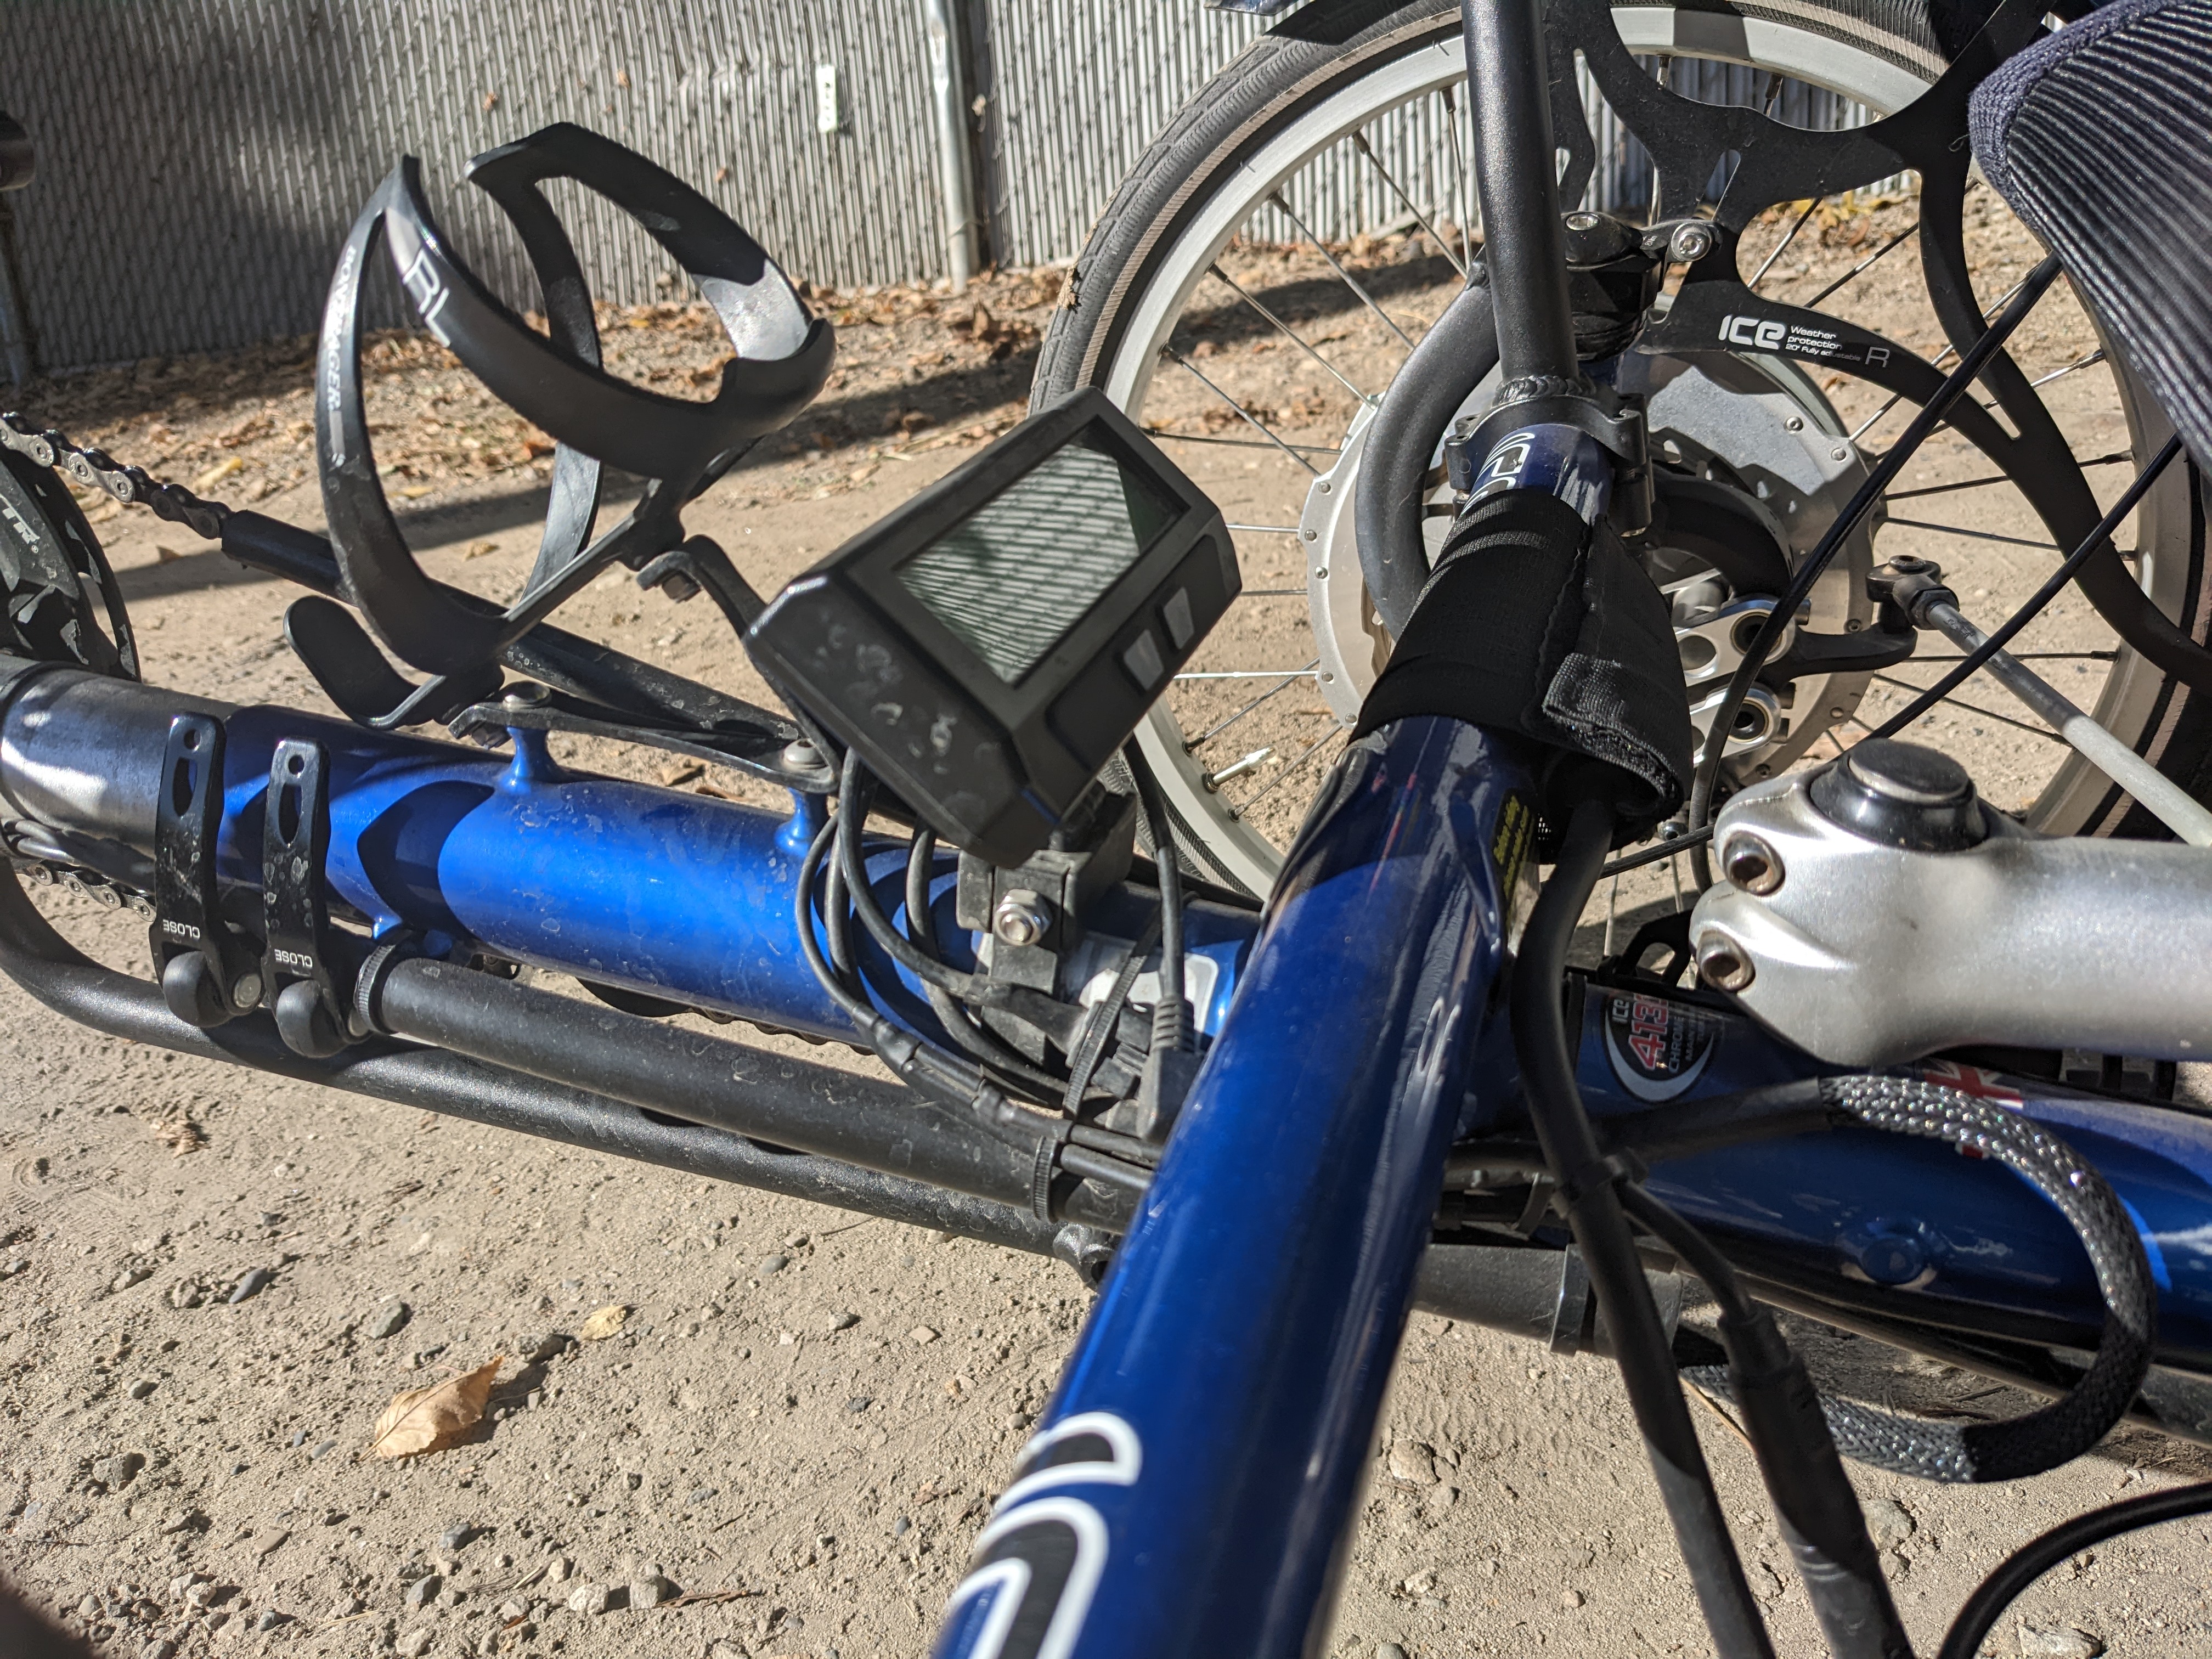
Installation of Grin components
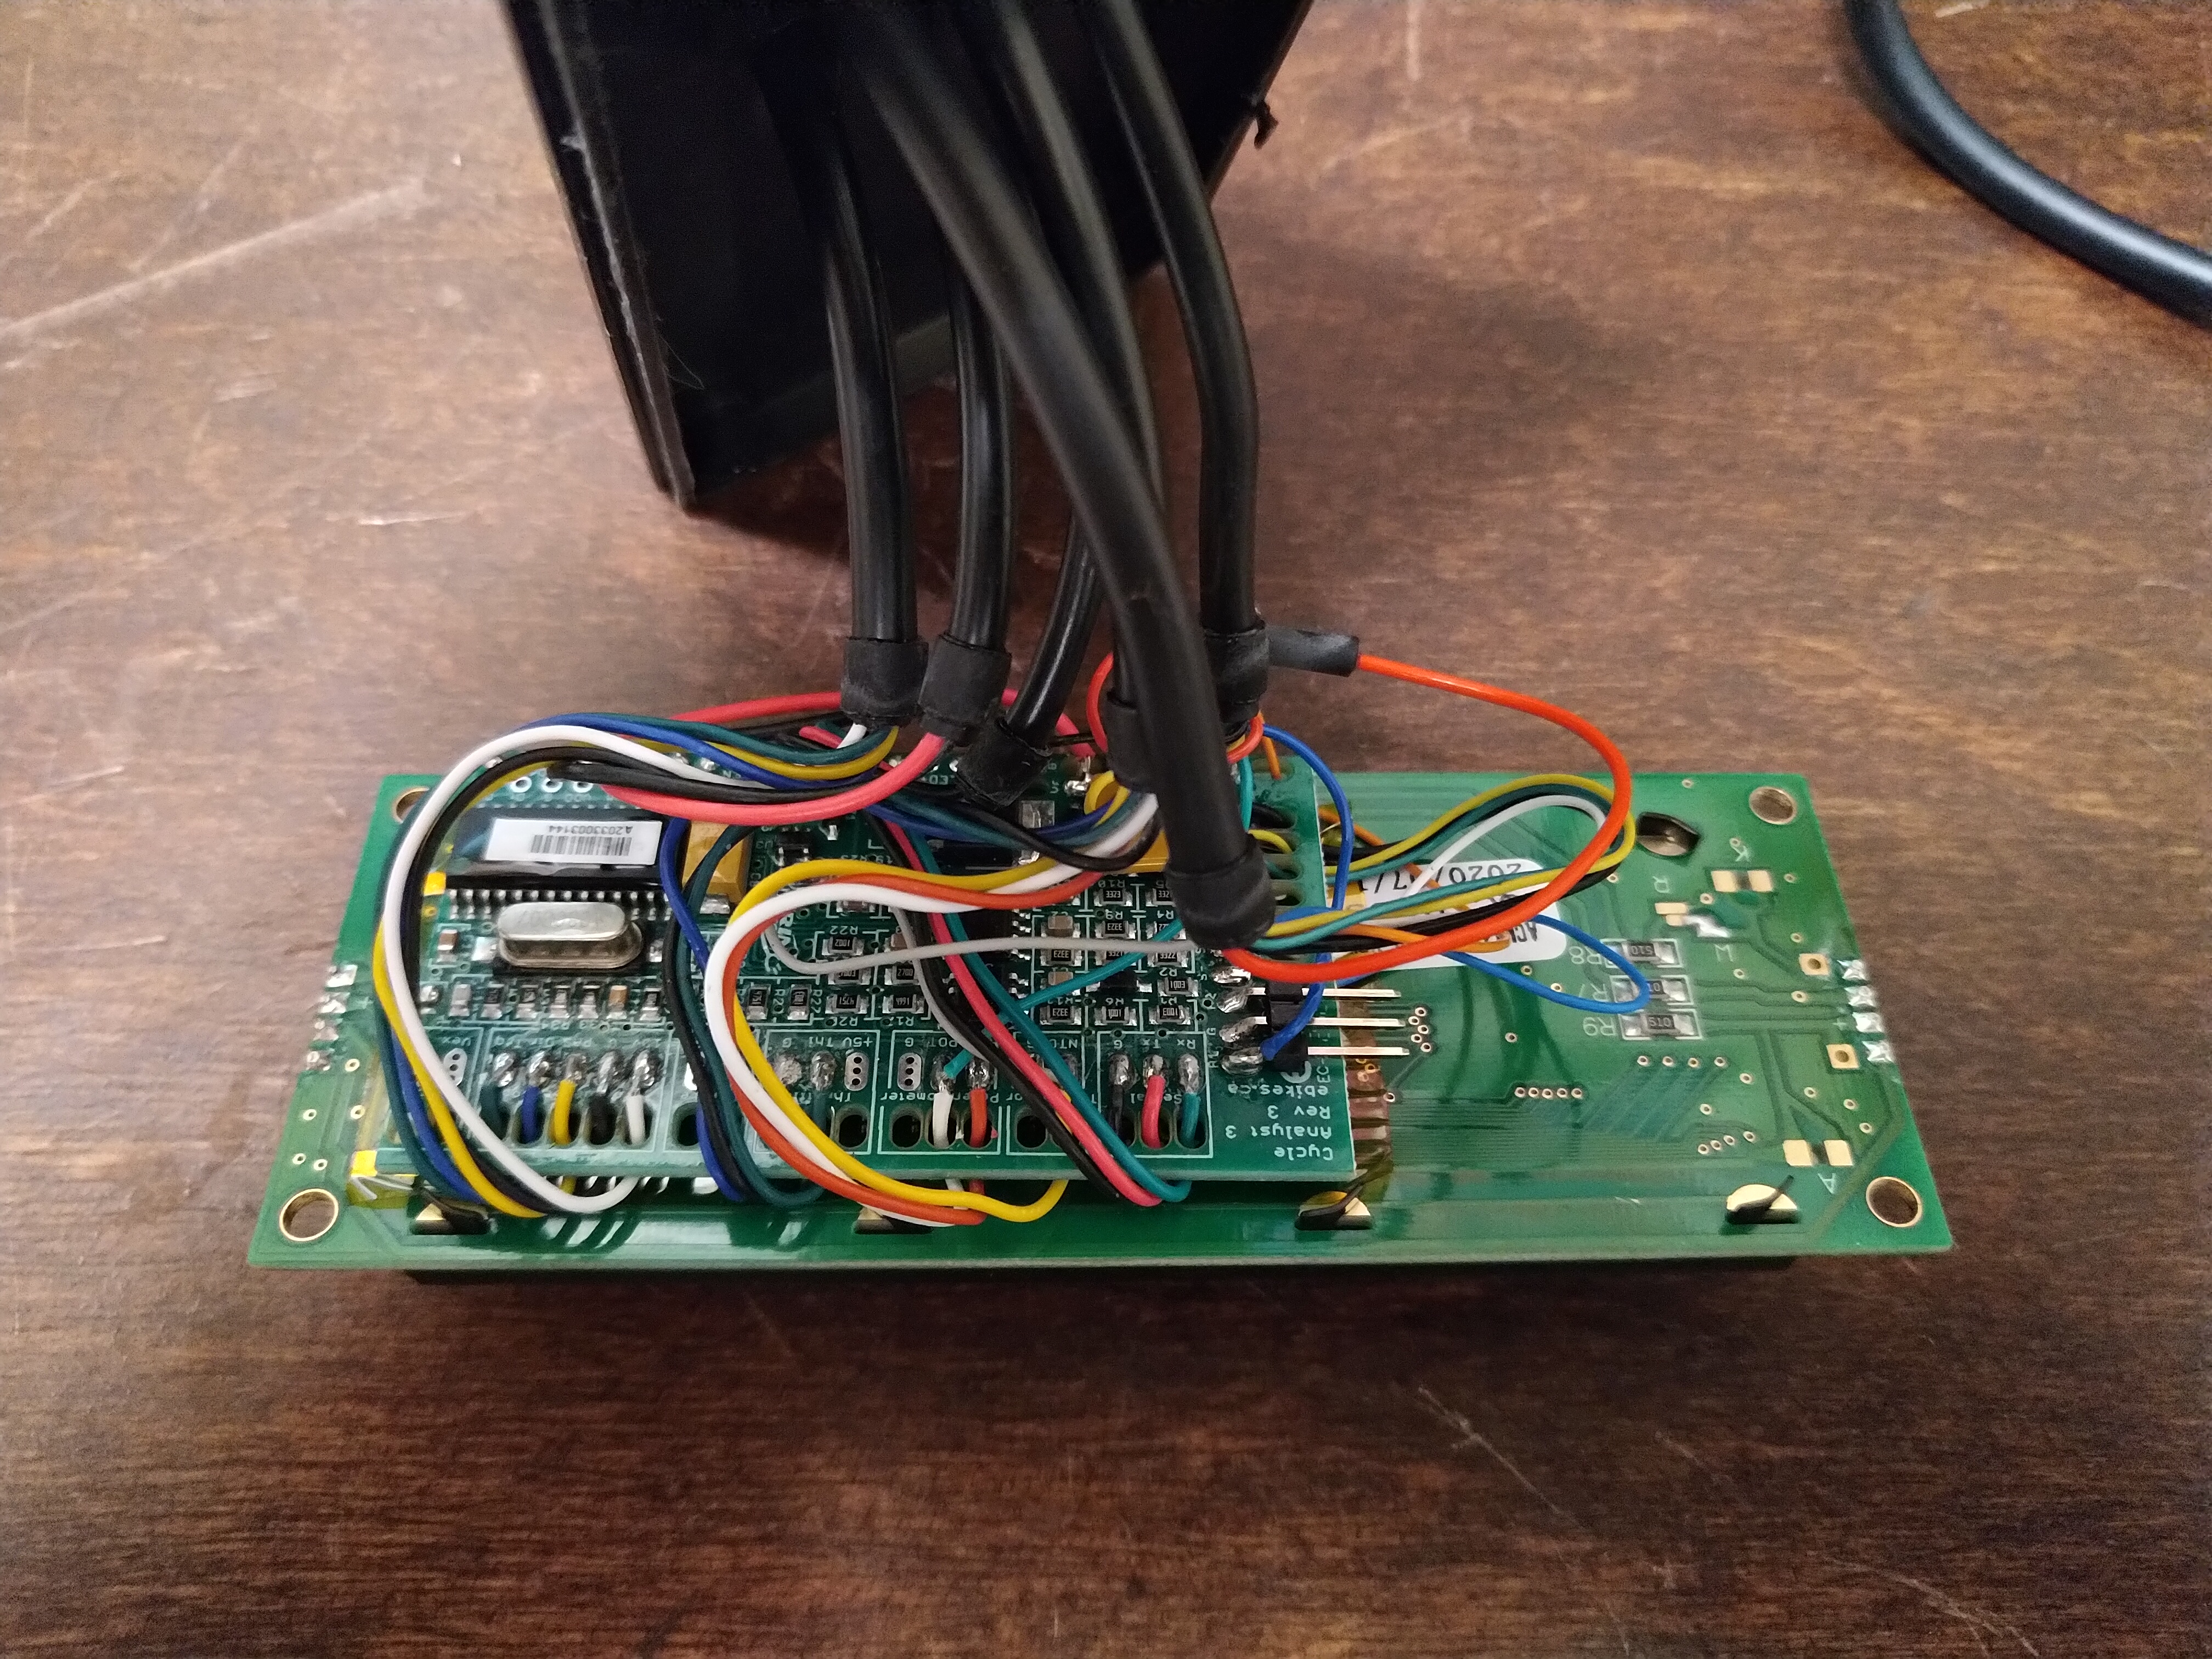
While Paul agonized over the torque adapter I installed all of the Grin components. First I made some modifications to the V3 Cycle Analyst: I removed cabling that wouldn’t be used for this install, added a cable to drive the headlight/taillight, and rewired it so the menu button on the auxiliary input and power switch activates the e-brake instead. The menu buttons on the Cycle Analyst are adequate for me and I thought it would useful to instead have a regen “paddle” like I have on my Chevy Bolt. It works quite well for this.
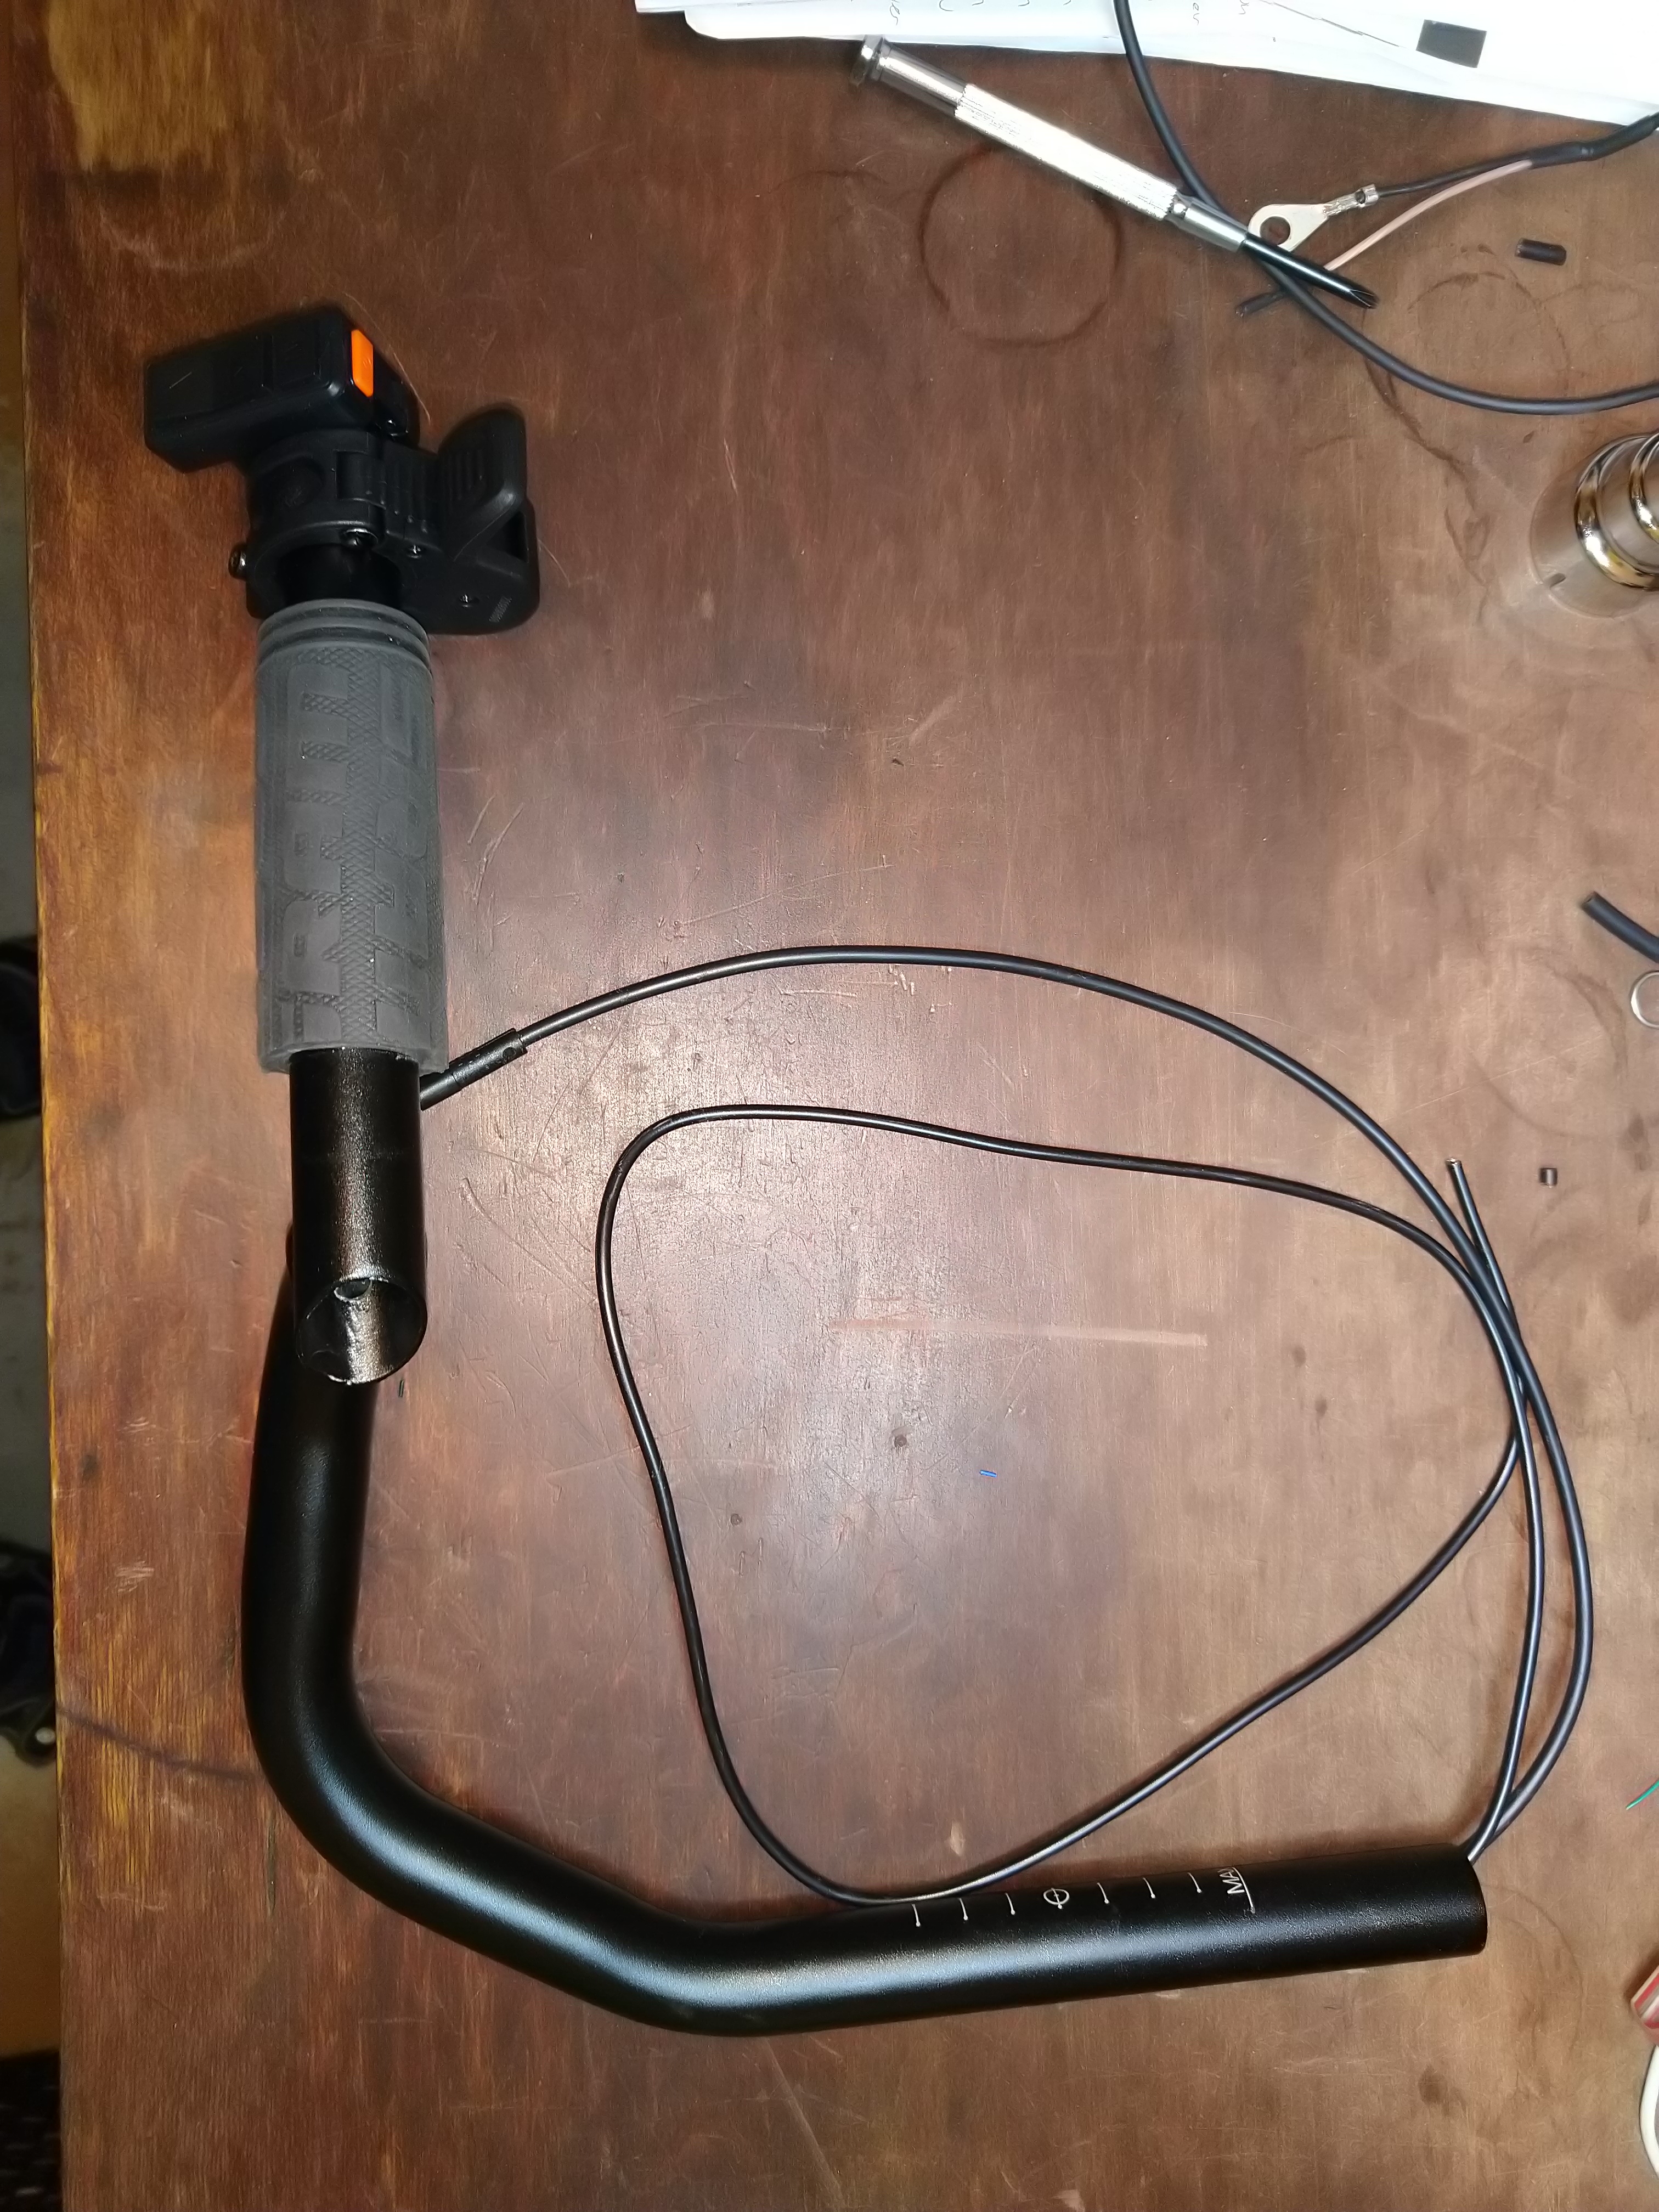
I installed the controller and battery mount low on the trike with a Terracycle battery mount. I routed wiring for all of the handlebar-mounted controls inside the handlebar tubes, multifunction controller on the left, throttle and e-brake tripwire on the right. This signal drives the same input as my modified “regen paddle” input so that either will initiate regen.
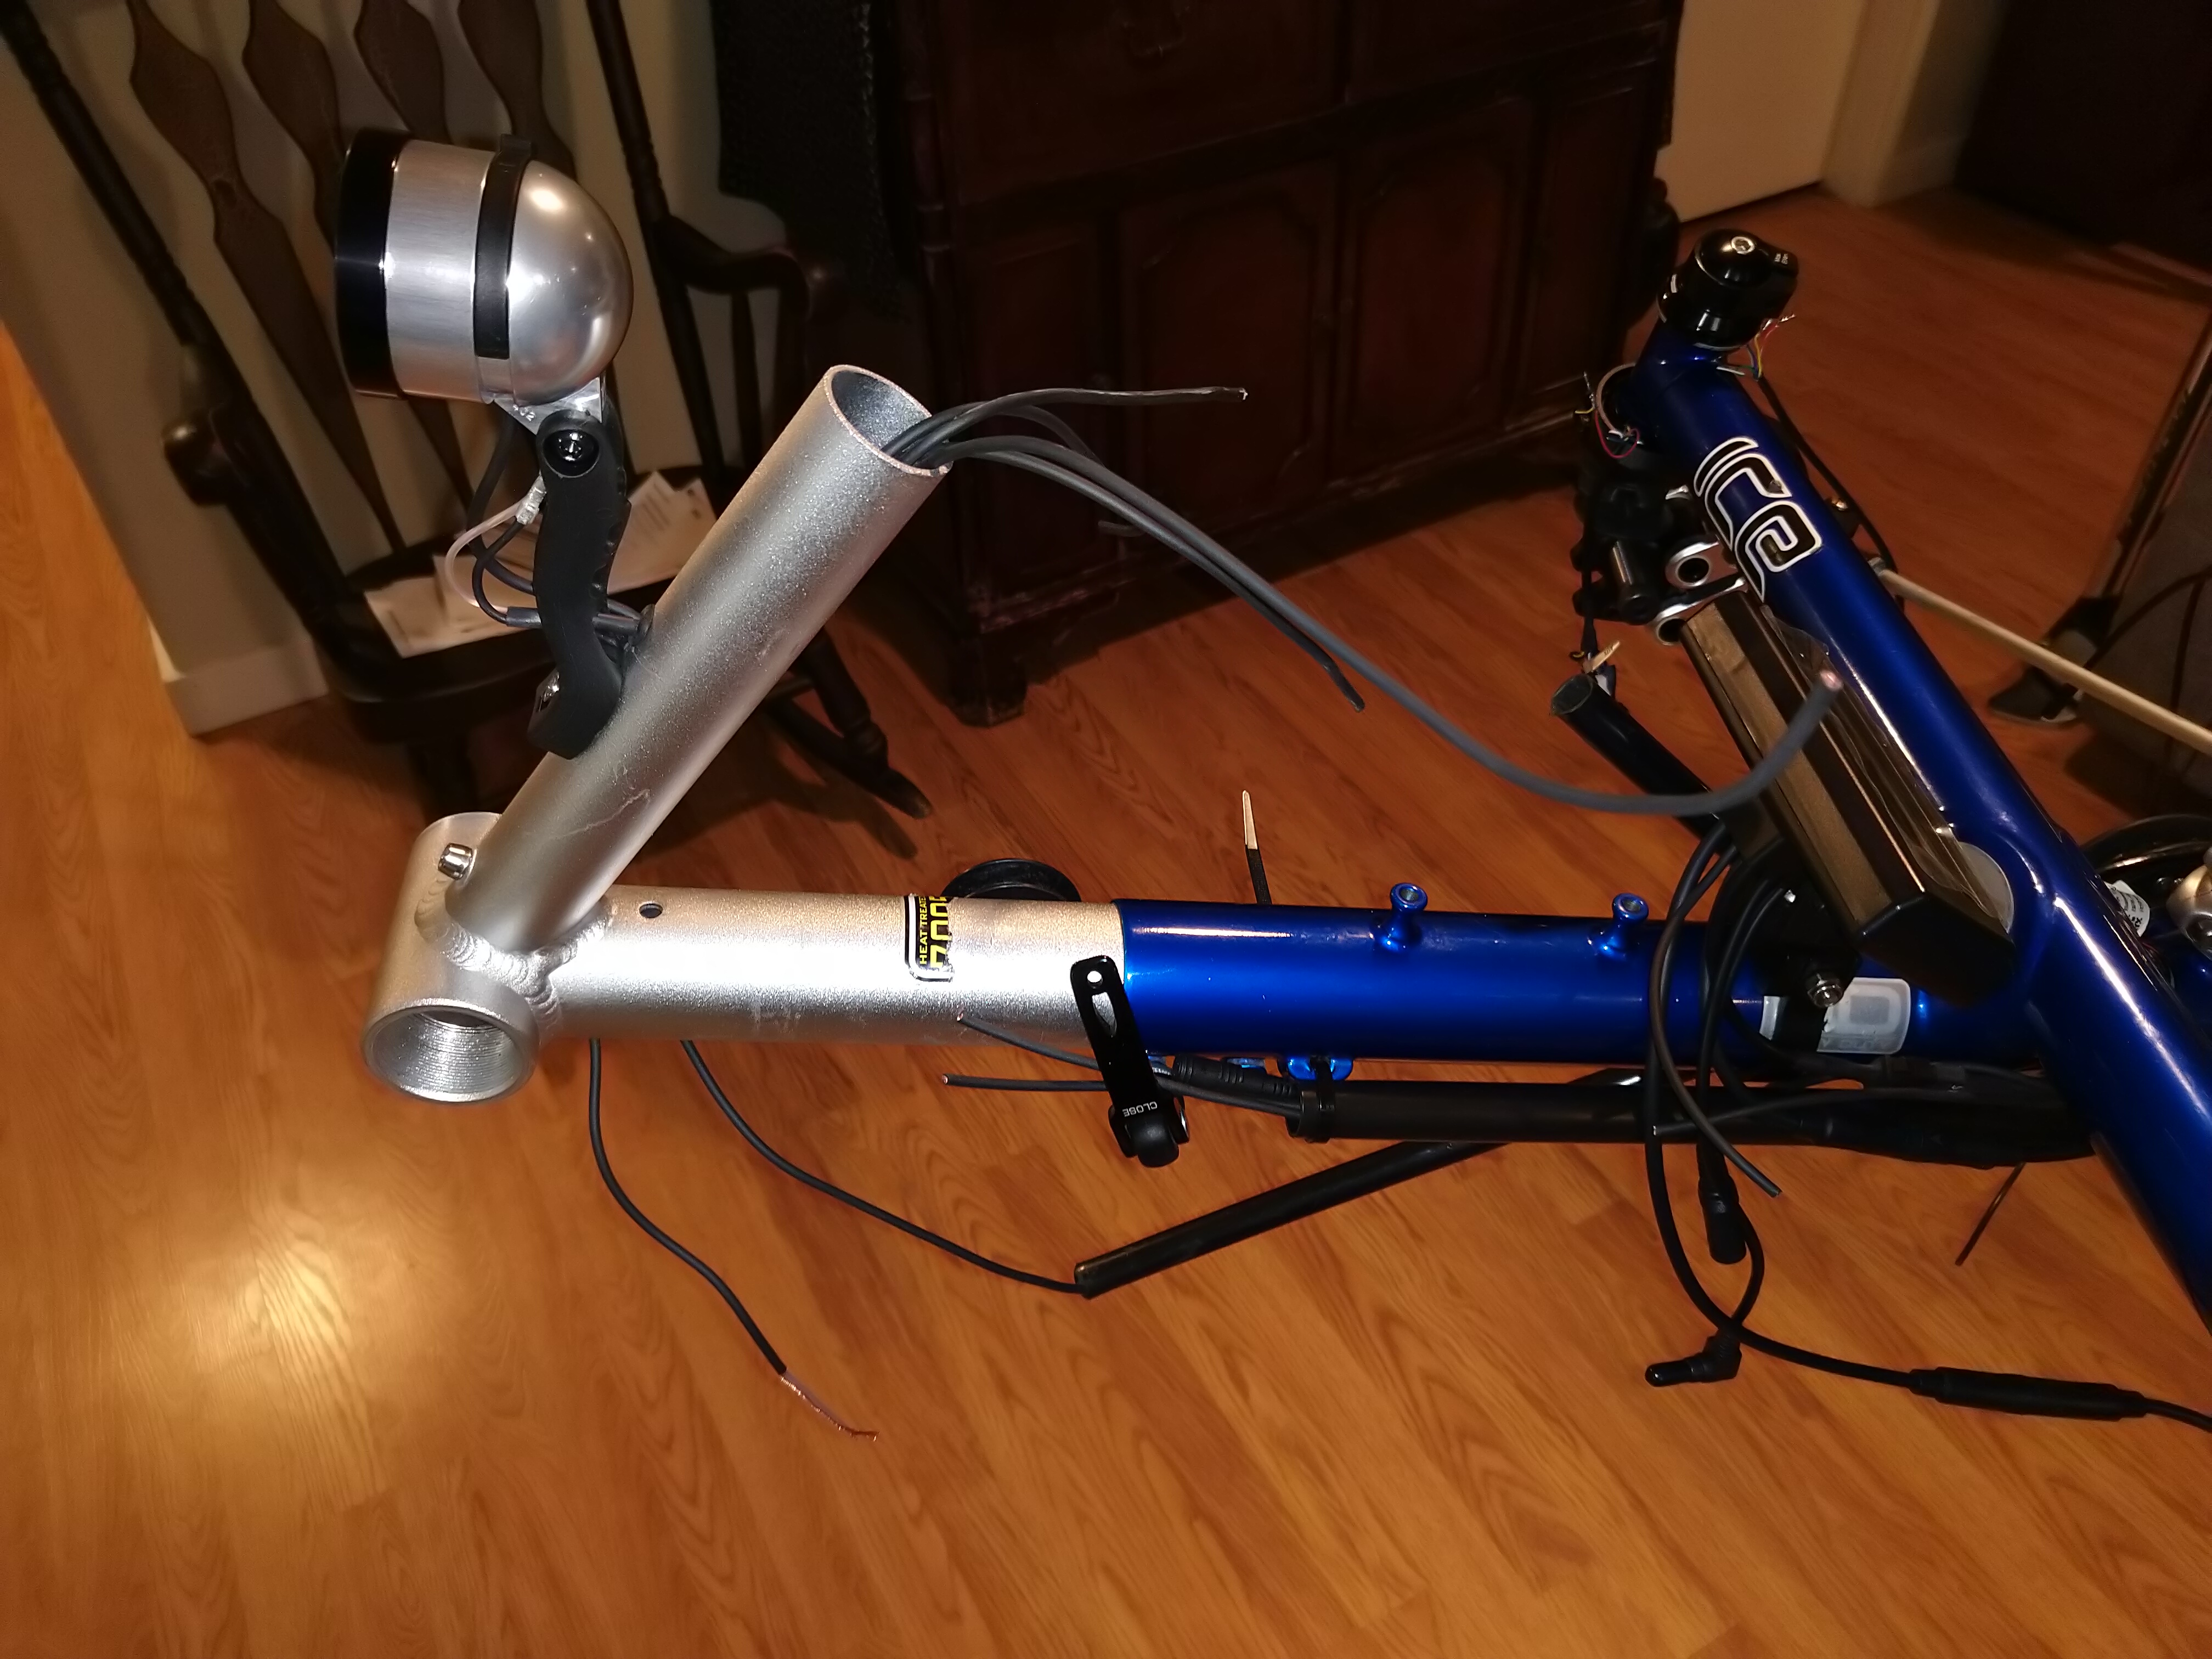
Because we use this trike for guests in addition to my wife and I, I have a chain easy-adjust kit installed that allows the boom to be adjusted for leg length without changing the length of the chain. This proved a challenge for the cabling running between the Cycle Analyst and the boom (to torque sensor and headlight/USB charger) because I had to add a big service loop to accommodate the longest leg length. I ran these cables inside a nylon sheath that keeps them together and in the proper shape when the boom is adjusted. It also protects them. It turned out quite nice. In fact all of the cable routing, much of it inside the handlebar tubes, is pretty clean.
Beginning Assembly
Headlight and USB charger wiring
Cycle Analyst wiring
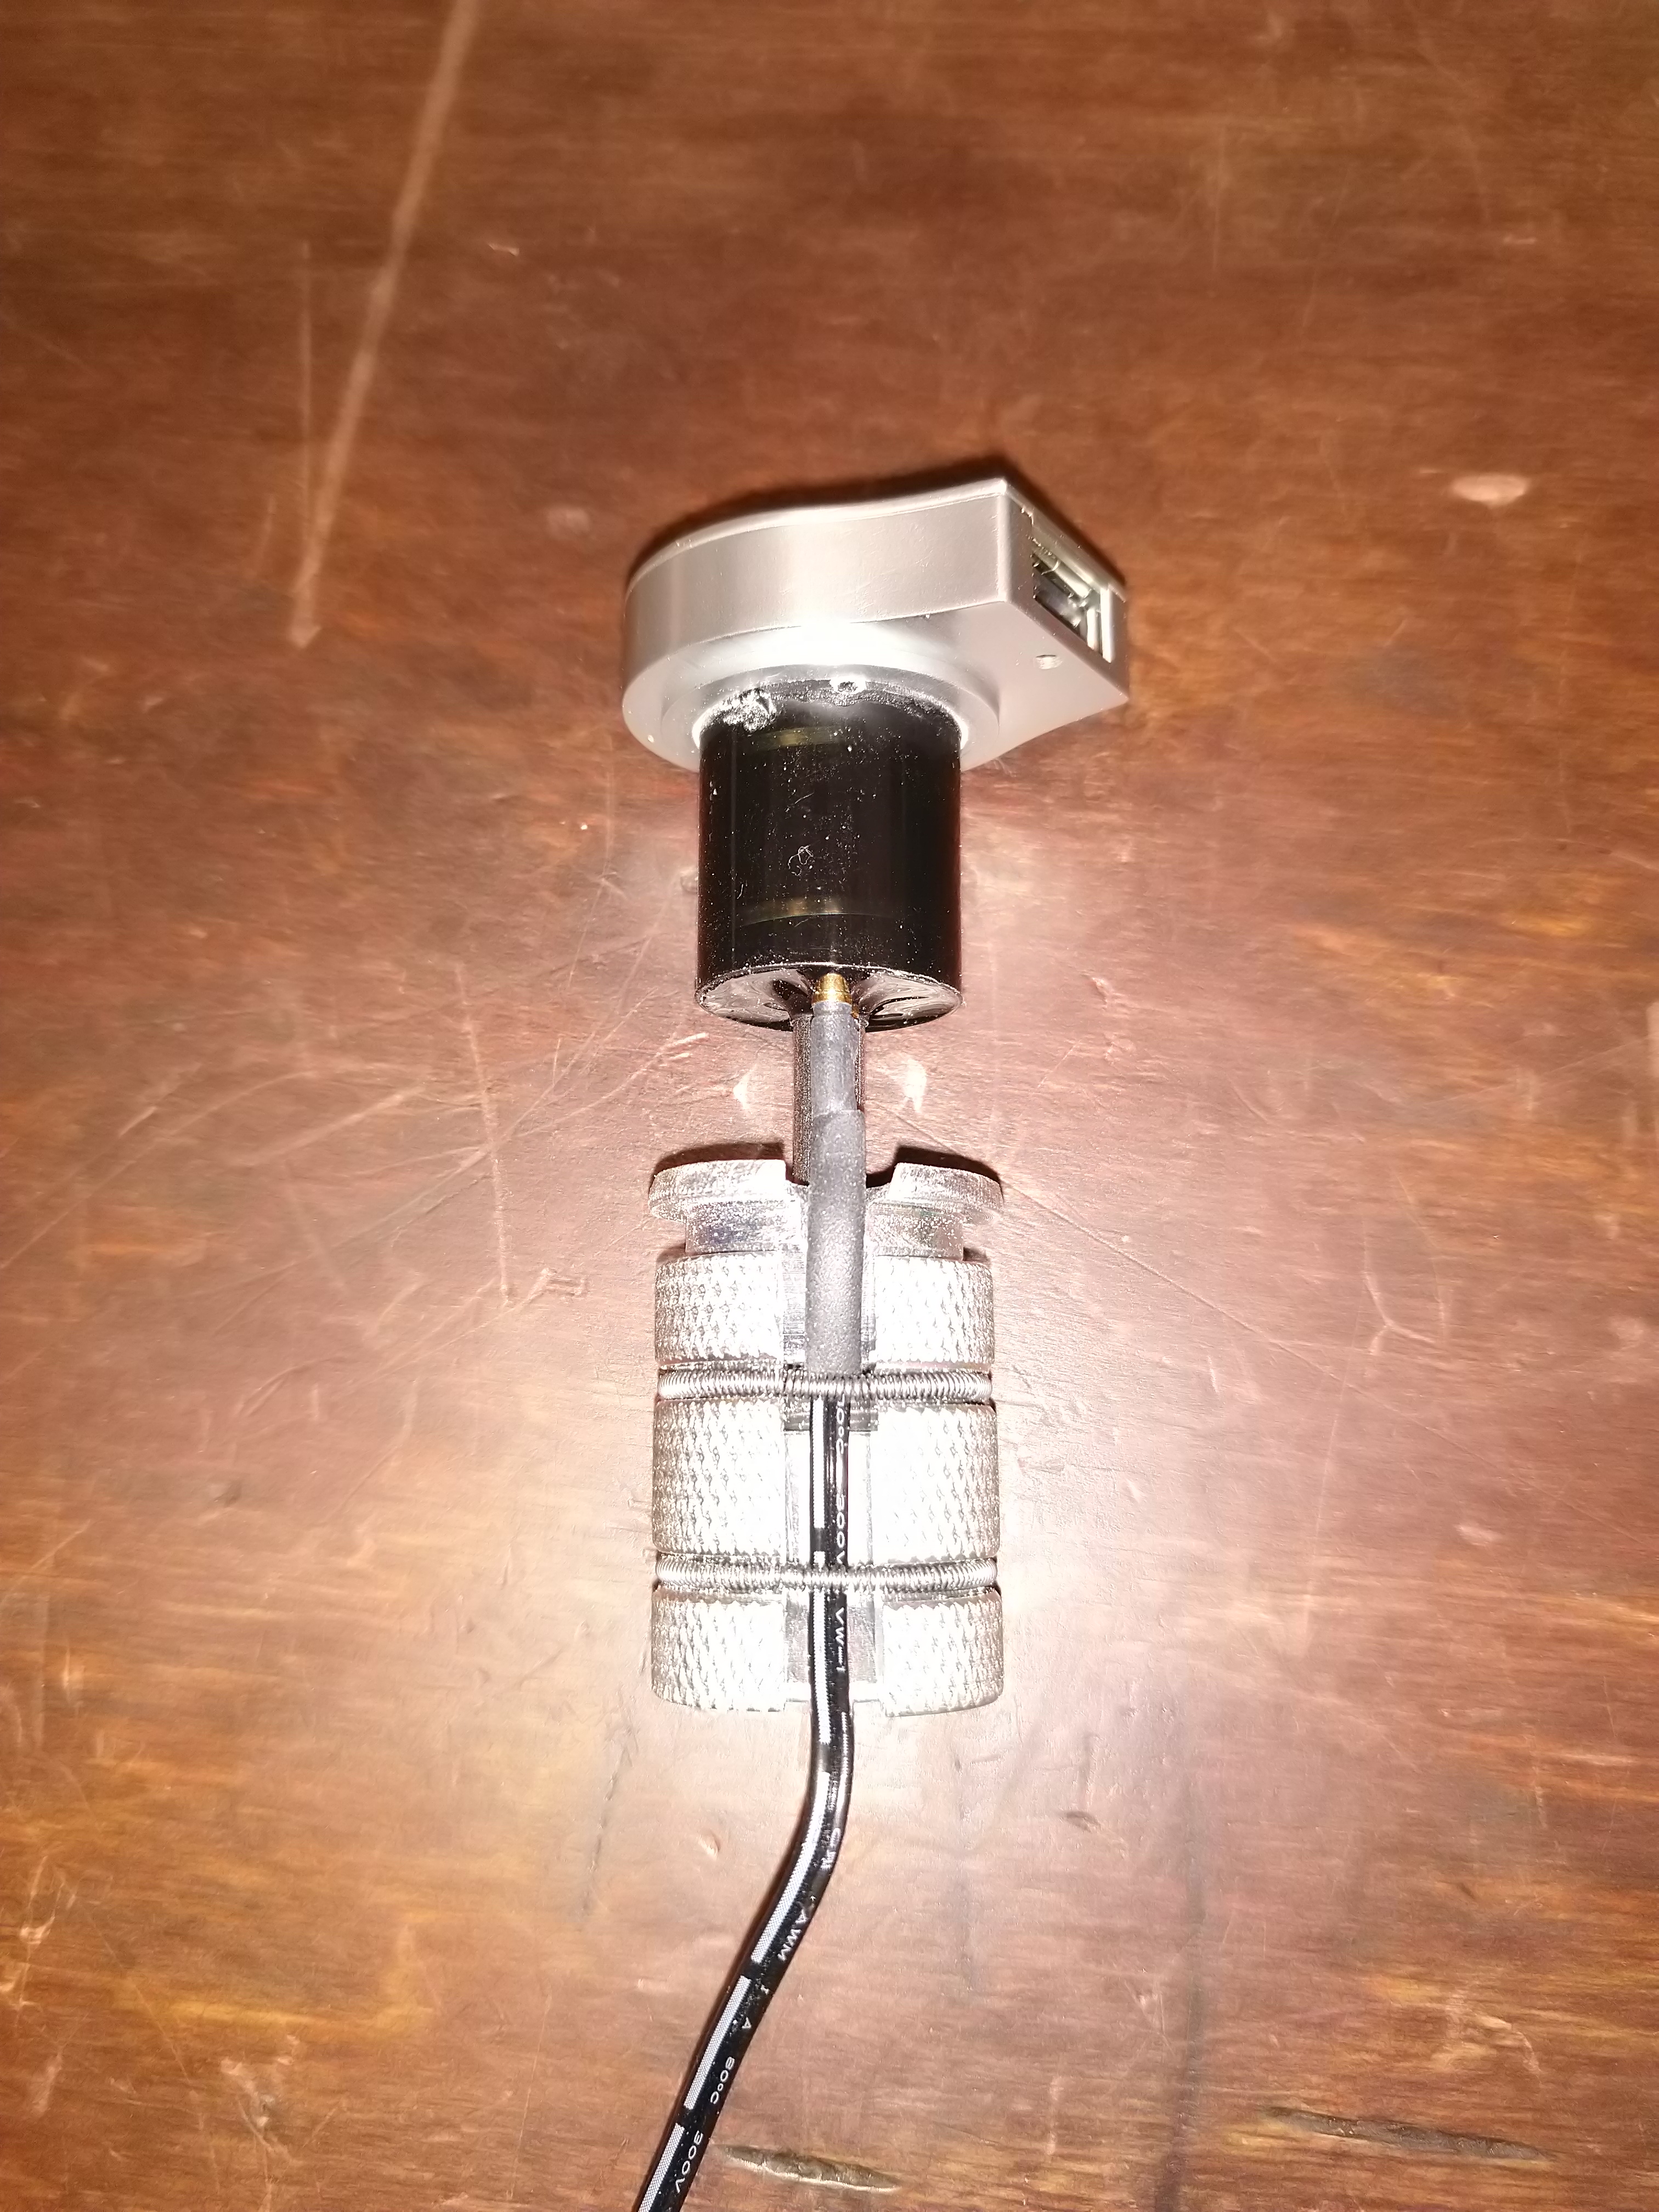
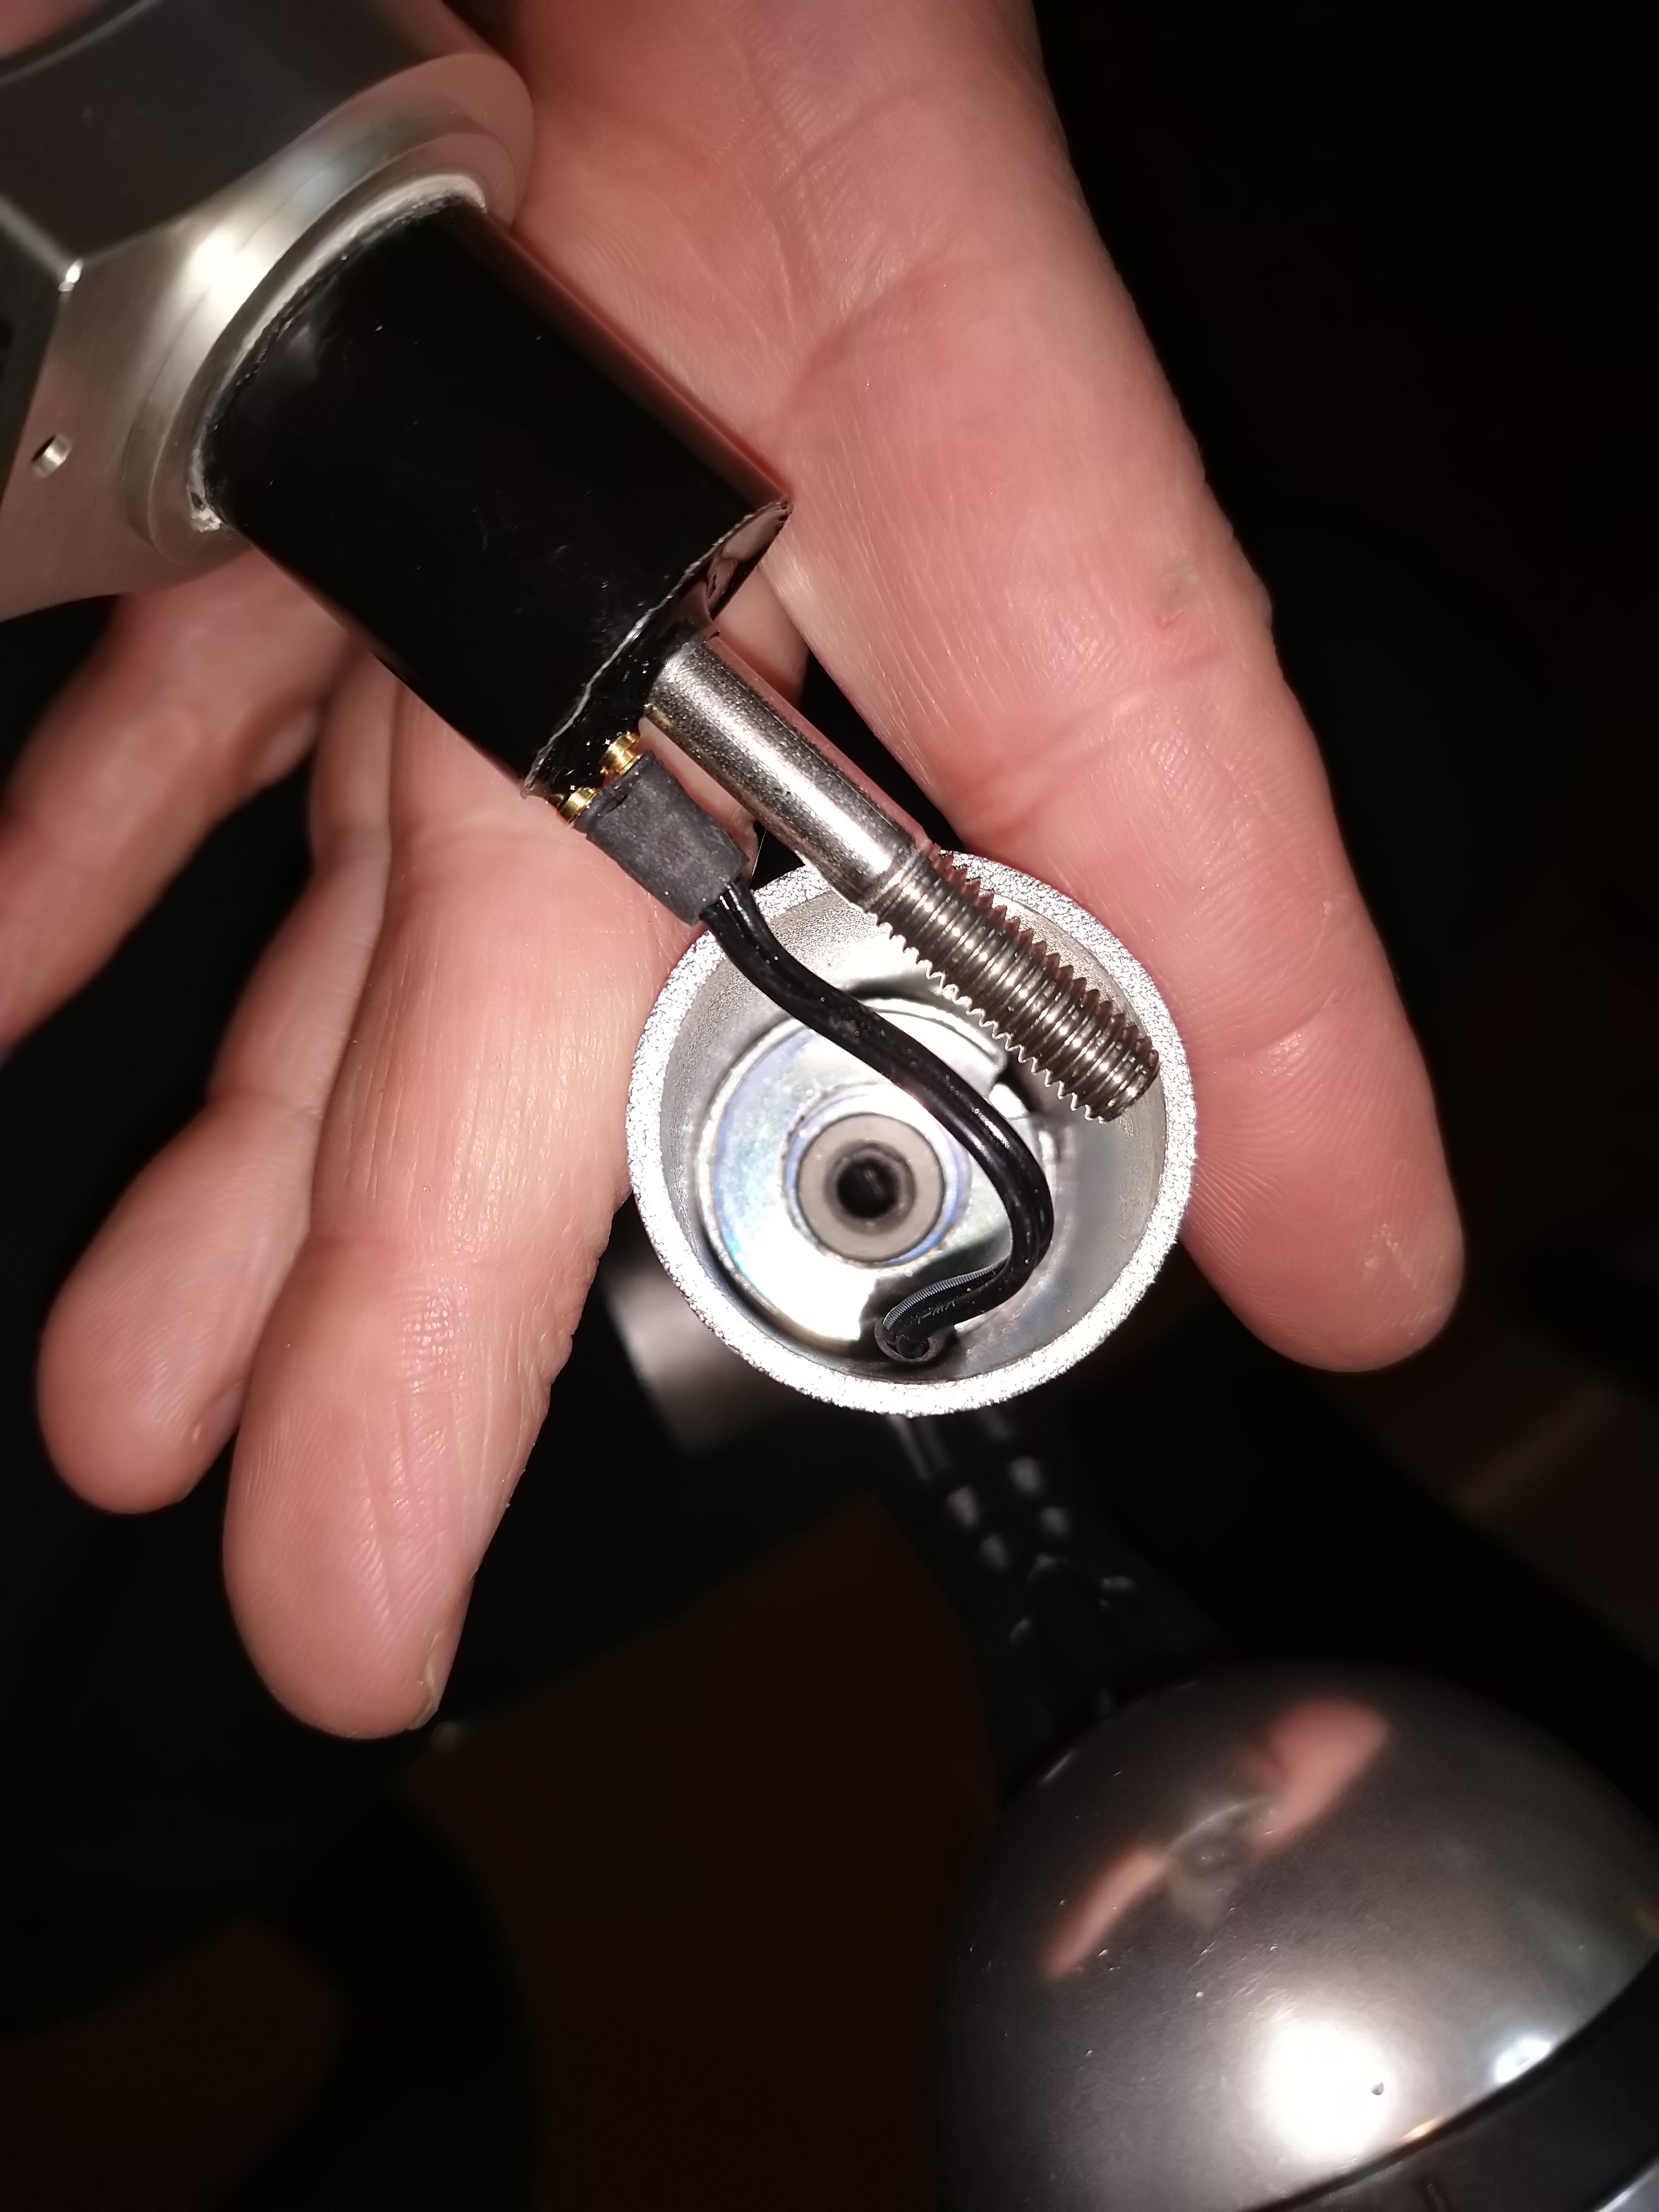
USB Charger
Installing USB Charger into Boom
Left handlebar with multifunction switch and throttle. I later moved the throttle to right handlebar.
B3620Li-DT 36 Volt 19.3 Ah Downtube Battery w/ mount
Grin
$510
Satiator Charger
Grin
$250
V3 Cycle Analyst
Grin
$125
Auxiliary Input and Power Switch
Grin
$20
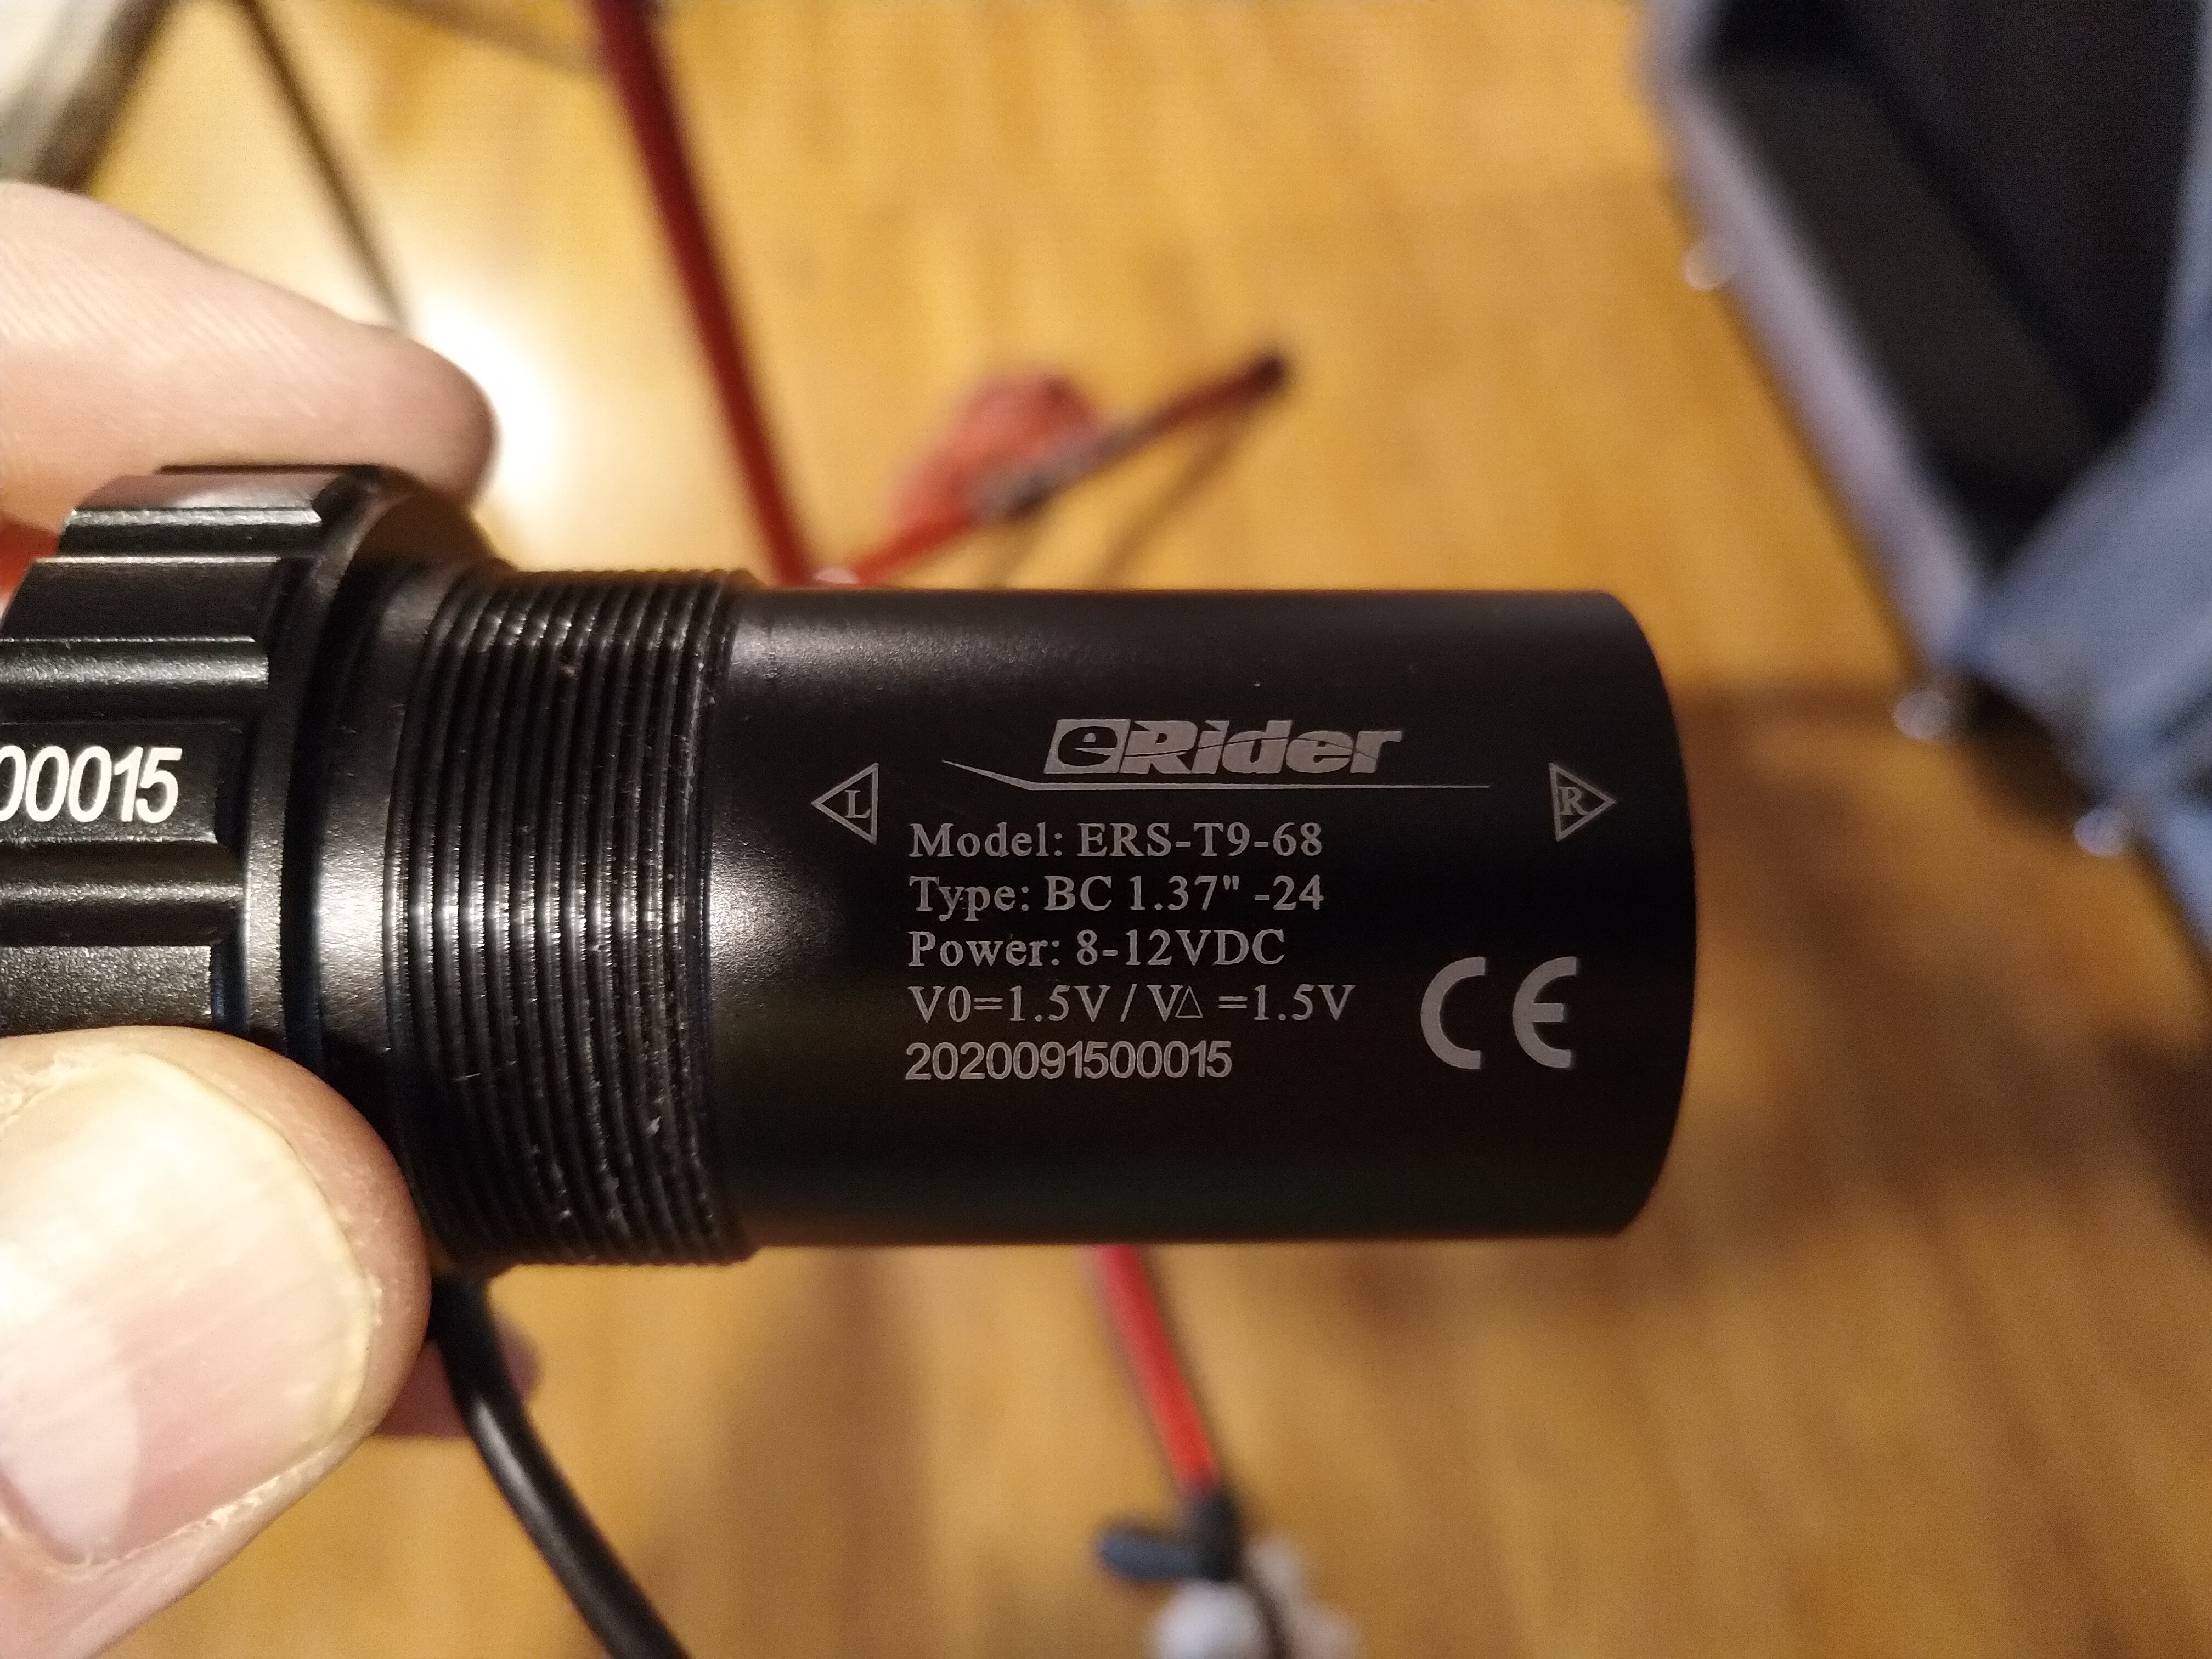
ERider68_4B 4 bolt Torque Sensor for 68mm BB
Grin
$155
T-Lever Throttle
Grin
$15
TripWire_push e-brake lever adapter
Grin
$39
Anderson Tap
Grin
$20
TTL-USB Programming cable
Grin
$14
Parts list for transforming HDQ into HDQE
Plan B
This project started sometime in late fall. By now June was approaching and with it an inaugural ride along the Mickelson Trail in South Dakota that my wife and I were planning. Paul and I ditched the custom CNC’d torque arm and slapped on the one we’d fabricated with Grin’s universal adapter.
And it worked! I had a week or so before the ride to run the assembled trike through its paces– my work commute and some of my recreational rides that incorporate the steepest hills around Boise. I watched motor temperatures on the climbs on some pretty warm days and they never got close to anything concerning. The trike performed flawlessly and the subsequent Mickelson trip was fantastic. Using the Grin simulator I had sized motor and battery to achieve at least 50 miles on a charge. The first leg of the Mickelson trip, on crushed gravel from Deadwood to Hill City, was about 50 miles with a significant climb in the middle. The HDQE tackled it with battery to spare.
Acceleration steer
Perhaps my biggest concern with this project was the possibility that mounting a motor on just one of the front wheels of a tadpole trike would introduce “acceleration steer”, the motor equivalent to brake steer. Brake steer, i.e. steering induced by braking on only one wheel, is something trike manufacturers solved many iterations ago. However even with the best trike designs, ICE included, there is still a hint of brake steer. Or maybe it’s my imagination. But would this turn out to be a noticeable problem when the motor is accelerating?
Turns out, no. There is not even a hint of steering when you romp on the throttle. Not even in my imagination. It just.. goes. I attribute this to a solid trike design and our strict attention to maintaining the same location for the tire’s contact patch as a stock ICE wheel.
Warranty: void
It’s worth noting that when I approached ICE about this project– I needed some dimensions on the suspension kingpost– their response was rather disappointing. Instead of giving me the information I requested they told me that such a modification was not engineered or tested by ICE and would void the warranty. Seems like classic CYA, I can’t imagine a motor puts more stress on the frame than a disc brake. But this frankentrike is so far beyond any warranty anyway that I couldn’t care less.
Epilogue
After a season of riding that began with the Mickelson trip and otherwise consisted of occasional rides, I noticed a bunch of “slop” when engaging the motor. Turns out one of the screws on that torque arm we had slapped on at the beginning of the season had sheared off. Our instincts about that solution were confirmed. And I had a crippled trike on my hands.
Time for Plan C
Thankfully Paul still had his Freecad model. Over the winter I contacted a local machine shop that took on what amounted to a pro bono project– I didn’t pay Terry nearly enough for the time he spent. But after a couple of prototypes and several tweaks on the final version, he nailed it. It’s been working flawlessly all summer, including a recent trip along the Trail of the Couer d’Alenes in northern Idaho. But now that the season is winding down I’ll remove the wheel and see how the new adapter is faring. Terry promised me one more pass at the adapter if I needed it.